
DIY furniture polish: Ever looked at your beloved wooden furniture and wished it had that showroom shine back? I know I have! We often think achieving that lustrous finish requires expensive, store-bought products filled with harsh chemicals. But what if I told you that you could create a fantastic, all-natural furniture polish right in your own kitchen?
For centuries, people have been crafting their own cleaning solutions, often relying on readily available ingredients. Think about it – our grandmothers likely didn’t have access to the vast array of commercial products we do today. They used ingenuity and simple ingredients like vinegar, olive oil, and beeswax to keep their homes sparkling. This tradition of resourcefulness and sustainability is something I find incredibly inspiring, and it’s at the heart of this DIY project.
Why should you ditch the store-bought stuff and embrace DIY furniture polish? Well, for starters, you’ll know exactly what’s going into your polish, avoiding potentially harmful chemicals that can damage your furniture and your health. Plus, it’s incredibly cost-effective! You probably already have most of the ingredients on hand. And let’s be honest, there’s a certain satisfaction that comes from creating something yourself, knowing you’re giving your furniture a healthy, natural shine. So, let’s dive in and discover how to make your own amazing furniture polish!
DIY Furniture Polish: Revive Your Wood with Natural Ingredients!
Hey there, fellow DIY enthusiasts! Are your wooden furniture pieces looking a little dull and lifeless? Don’t rush out to buy expensive commercial polishes filled with questionable chemicals. I’m going to show you how to whip up your own fantastic furniture polish using simple, natural ingredients you probably already have in your kitchen! This homemade polish is not only effective at restoring shine and protecting your wood, but it’s also eco-friendly and budget-friendly. Let’s get started!
What You’ll Need: The Essential Ingredients
Before we dive into the mixing, let’s gather our supplies. This recipe is super flexible, so feel free to adjust the ratios to suit your preferences and the type of wood you’re working with.
* Olive Oil: This is the base of our polish, providing moisture and a beautiful sheen. Extra virgin olive oil is great, but regular olive oil works just as well.
* Lemon Juice: The acidity in lemon juice helps to cut through grime and dirt, leaving your furniture sparkling clean. Freshly squeezed is best, but bottled lemon juice will do in a pinch.
* Beeswax (Optional): If you want a more durable, protective finish, beeswax is your friend. It adds a layer of water resistance and helps to fill in minor scratches. You can find beeswax pellets or blocks at most craft stores or online.
* Essential Oils (Optional): For a pleasant scent and added benefits, consider adding a few drops of your favorite essential oil. Lemon, orange, cedarwood, and lavender are all great choices for furniture polish.
* Vinegar (Optional): For stubborn grime, a touch of vinegar can be added. Use sparingly, as too much can be harsh on some finishes.
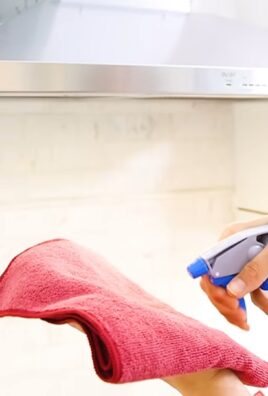
* Soft Cloths: You’ll need a clean, soft cloth for applying the polish and another for buffing. Microfiber cloths work wonders!
* Glass Jar or Container: To store your homemade polish. A small mason jar is perfect.
* Double Boiler or Microwave-Safe Bowl: If you’re using beeswax, you’ll need a way to melt it safely.
Mixing Your Magic Potion: Step-by-Step Instructions
Now for the fun part! Let’s create our furniture polish. I’ll give you a basic recipe, and then we can explore variations depending on your needs.
1. Start with the Base: In your glass jar or container, pour in 1/2 cup of olive oil. This will form the foundation of our polish, providing nourishment and shine to the wood.
2. Add the Cleaning Power: Next, add 1/4 cup of lemon juice. The lemon juice will help to dissolve any dirt, grime, or old wax buildup on your furniture.
3. Optional: Incorporate Beeswax (For a Protective Finish): If you’re using beeswax, this step requires a little extra attention.
* Melting the Beeswax: The safest way to melt beeswax is using a double boiler. If you don’t have one, you can create a makeshift double boiler by placing a heat-safe bowl over a pot of simmering water. Make sure the bottom of the bowl doesn’t touch the water. Add about 1 tablespoon of beeswax pellets or grated beeswax to the bowl.
* Microwave Method (Use with Caution): Alternatively, you can melt the beeswax in the microwave, but be very careful! Microwave in short 30-second intervals, stirring in between, until the beeswax is completely melted. Watch it closely to prevent it from burning.
* Adding the Beeswax to the Mixture: Once the beeswax is melted, carefully pour it into the olive oil and lemon juice mixture.
4. Optional: Enhance with Essential Oils (For Fragrance and Benefits): If you’re using essential oils, now’s the time to add them. A few drops (5-10) should be enough to provide a subtle scent. Remember to choose oils that are safe for wood and won’t cause any discoloration.
5. Optional: A Touch of Vinegar (For Stubborn Grime): If your furniture is particularly dirty, you can add a teaspoon or two of white vinegar to the mixture. Be cautious with vinegar, as it can be harsh on some finishes. Always test in an inconspicuous area first.
6. Mix it Up: Thoroughly stir all the ingredients together until they are well combined. If you’ve used beeswax, the mixture might thicken slightly as it cools.
Applying Your Homemade Polish: A Gentle Touch
Now that our polish is ready, let’s put it to work!
1. Prepare the Surface: Before applying the polish, make sure your furniture is clean and free of dust. You can use a soft cloth or a vacuum cleaner with a brush attachment to remove any loose debris.
2. Test in an Inconspicuous Area: This is crucial! Before applying the polish to the entire piece of furniture, test it in a small, hidden area to ensure it doesn’t damage or discolor the finish. Wait a few minutes and check for any adverse reactions.
3. Apply the Polish Sparingly: Dip a clean, soft cloth into the polish and apply a very thin layer to the furniture. Avoid applying too much polish, as this can leave a sticky residue.
4. Work in Sections: Work in small sections, applying the polish in circular motions. This will help to distribute the polish evenly and work it into the wood.
5. Buff to a Shine: After applying the polish, use a clean, dry cloth to buff the furniture to a shine. Buff in circular motions, applying gentle pressure. This will remove any excess polish and bring out the natural luster of the wood.
6. Let it Dry: Allow the polish to dry completely before using the furniture. This may take a few hours, depending on the humidity and temperature.
Troubleshooting and Tips for Success
* Cloudy Finish: If your furniture looks cloudy after applying the polish, you’ve probably used too much. Simply buff the surface again with a clean, dry cloth to remove the excess.
* Sticky Residue: A sticky residue can also be caused by using too much polish. Try buffing the surface again or wiping it down with a slightly damp cloth.
* Uneven Finish: An uneven finish can be caused by applying the polish unevenly. Make sure to apply a thin, even layer to the entire surface.
* Wood Type Matters: Different types of wood may react differently to the polish. Always test in an inconspicuous area first. For delicate or antique furniture, consult a professional before using any homemade polish.
* Frequency of Polishing: How often you need to polish your furniture will depend on how often it’s used and exposed to the elements. Generally, polishing every few months is sufficient.
* Storage: Store your homemade furniture polish in a cool, dark place. It should last for several months. If you notice any changes in color or odor, discard it.
* For Leather Furniture: While this recipe is primarily for wood, you can adapt it for leather furniture. Use a very small amount of olive oil and skip the lemon juice. Test in an inconspicuous area first.
* Dealing with Scratches: For minor scratches, you can try using a walnut. Rub the walnut meat over the scratch in a circular motion. The natural oils in the walnut will help to fill in the scratch and make it less noticeable.
* Always use clean cloths: Using dirty cloths can reintroduce dirt and grime back onto your furniture.
* Consider the Finish: Is your furniture finished with varnish, lacquer, shellac, or wax? This will affect how the polish interacts with the surface. If you’re unsure, err on the side of caution and test in an inconspicuous area.
* Don’t use on unsealed wood: This polish is designed for sealed wood surfaces. Using it on unsealed wood could cause staining or damage.
Variations on the Theme: Tailoring Your Polish
The beauty of DIY is that you can customize things to your liking! Here are a few variations on our basic recipe:
* For Dark Wood: Add a teaspoon of brewed black tea to the mixture. The tannins in the tea will help to enhance the color of dark wood.
* For Light Wood: Use a lighter oil, such as almond oil or grapeseed oil, instead of olive oil.
* For a More Aromatic Polish: Experiment with different essential oil blends. Try combining lemon and lavender for a fresh, clean scent, or cedarwood and orange for a warm, inviting aroma.
* For a Deeper Clean: Add a few drops of dish soap to the mixture. This will help to remove stubborn dirt and grime. Be sure to rinse the surface with a damp cloth after polishing.
Safety First!
While our homemade furniture polish is made with natural ingredients, it’s still important to take precautions:
* Keep out of reach of children and pets.
* Avoid contact with eyes. If
Conclusion
So, there you have it! Crafting your own DIY furniture polish is not only incredibly simple and cost-effective, but it’s also a fantastic way to ensure you’re using natural, non-toxic ingredients in your home. Forget about those harsh chemicals and overpowering fragrances that come with store-bought polishes. With just a few common household items, you can create a polish that will leave your furniture gleaming and protected, all while being kind to the environment and your health.
This isn’t just about saving money, although that’s certainly a perk. It’s about taking control of what you bring into your home and making conscious choices that benefit you and your family. The satisfaction of knowing exactly what’s in your furniture polish and the peace of mind that comes with using natural ingredients is truly priceless.
But the benefits don’t stop there. This DIY approach allows for endless customization. Want a polish with a hint of lemon? Add a few drops of lemon essential oil. Prefer a deeper, richer shine? Experiment with different ratios of olive oil and vinegar. The possibilities are truly endless, allowing you to tailor your DIY furniture polish to perfectly suit your specific needs and preferences.
Consider these variations to elevate your furniture polishing game:
* For Dark Wood: Add a teaspoon of strong brewed black tea to your mixture. The tannins in the tea will help to enhance the natural color and richness of dark wood furniture.
* For Scratches: Mix equal parts olive oil and vinegar, then gently rub the mixture into the scratch using a soft cloth. The oil will help to moisturize the wood, while the vinegar will help to blend the scratch with the surrounding finish.
* For Leather Furniture: Use a mixture of beeswax, coconut oil, and a few drops of essential oil. This will help to condition and protect your leather furniture, keeping it soft and supple.
* For a Pleasant Scent: Experiment with different essential oils like lavender, cedarwood, or orange. Just be sure to use pure essential oils and add them sparingly, as a little goes a long way.
We wholeheartedly encourage you to give this DIY furniture polish a try. It’s a simple, rewarding project that will leave your furniture looking its best. Don’t be afraid to experiment with different ingredients and ratios to find the perfect formula for your needs.
Once you’ve tried it, we’d love to hear about your experience! Share your tips, tricks, and variations in the comments below. Let’s build a community of DIY enthusiasts who are passionate about creating natural, effective solutions for their homes. Your feedback is invaluable and will help others discover the joy of making their own DIY furniture polish. So go ahead, give it a whirl, and let us know what you think! We can’t wait to hear from you.
Frequently Asked Questions (FAQ)
What types of furniture can I use this DIY polish on?
This DIY furniture polish is generally safe for most types of finished wood furniture, including tables, chairs, dressers, and cabinets. However, it’s always a good idea to test it on an inconspicuous area first, especially if you’re dealing with antique or delicate furniture. Avoid using it on unfinished wood, as the oil can soak in and cause staining. For leather furniture, use a specialized leather conditioner or a DIY recipe specifically designed for leather. Always check the manufacturer’s instructions for your furniture before applying any polish.
How often should I polish my furniture with this DIY mixture?
The frequency of polishing depends on how often your furniture is used and exposed to dust and dirt. Generally, polishing every one to three months is sufficient for most furniture. However, if your furniture is in a high-traffic area or is frequently exposed to sunlight, you may need to polish it more often. Over-polishing can lead to a buildup of residue, so it’s best to err on the side of caution.
Can I store the leftover DIY furniture polish?
Yes, you can store leftover DIY furniture polish in an airtight container in a cool, dark place. A glass jar is ideal. Be sure to label the container with the date you made the polish. The shelf life of the polish will depend on the ingredients you used. A polish made with olive oil and vinegar will typically last for several months. If you notice any changes in color, smell, or consistency, it’s best to discard the polish.
What kind of cloth should I use to apply the polish?
A soft, lint-free cloth is essential for applying DIY furniture polish. Microfiber cloths are an excellent choice, as they are gentle on furniture and won’t leave behind any lint or residue. Avoid using abrasive cloths or paper towels, as they can scratch the finish. You’ll also want a separate clean, dry cloth for buffing the furniture after applying the polish.
My furniture has a lot of buildup. Will this DIY polish remove it?
While this DIY furniture polish can help to remove some buildup, it may not be sufficient for heavily soiled furniture. In such cases, you may need to use a dedicated furniture cleaner first. Look for a cleaner that is specifically designed for your type of furniture and follow the manufacturer’s instructions carefully. Once the buildup is removed, you can then use the DIY polish to maintain the shine and protect the finish.
Is vinegar safe for all types of wood finishes?
While vinegar is generally safe for most finished wood surfaces, it’s always a good idea to test it on an inconspicuous area first. Vinegar is acidic and can potentially damage delicate finishes, especially those on antique furniture. If you’re concerned about using vinegar, you can substitute it with lemon juice, which is slightly less acidic.
Can I use this DIY polish on laminate furniture?
This DIY furniture polish is not recommended for laminate furniture. Laminate furniture is typically made with a plastic coating that can be damaged by oil-based polishes. Instead, use a damp cloth with a mild detergent to clean laminate furniture.
What essential oils are best to use in this DIY polish?
The best essential oils to use in DIY furniture polish depend on your personal preferences and the type of wood you’re polishing. Lemon essential oil is a popular choice for its fresh scent and cleaning properties. Cedarwood essential oil is known for its woodsy aroma and protective qualities. Lavender essential oil is a calming and relaxing scent that can also help to repel insects. Orange essential oil is a bright and uplifting scent that can also help to remove grease and grime. When using essential oils, be sure to use pure essential oils and add them sparingly, as a little goes a long way.
My DIY polish seems oily. What am I doing wrong?
If your DIY furniture polish seems oily, you may be using too much oil in the mixture. Try reducing the amount of oil and increasing the amount of vinegar or lemon juice. Also, be sure to use a very small amount of polish when applying it to your furniture. A little goes a long way. After applying the polish, buff the furniture thoroughly with a clean, dry cloth to remove any excess oil.
Can I use this DIY polish on my piano?
Polishing a piano requires special care, and it’s generally best to consult with a professional piano technician before using any type of polish, including DIY furniture polish. Pianos often have delicate finishes that can be easily damaged by improper cleaning or polishing. A professional can recommend the best products and techniques for maintaining the finish of your piano.
Leave a Comment