
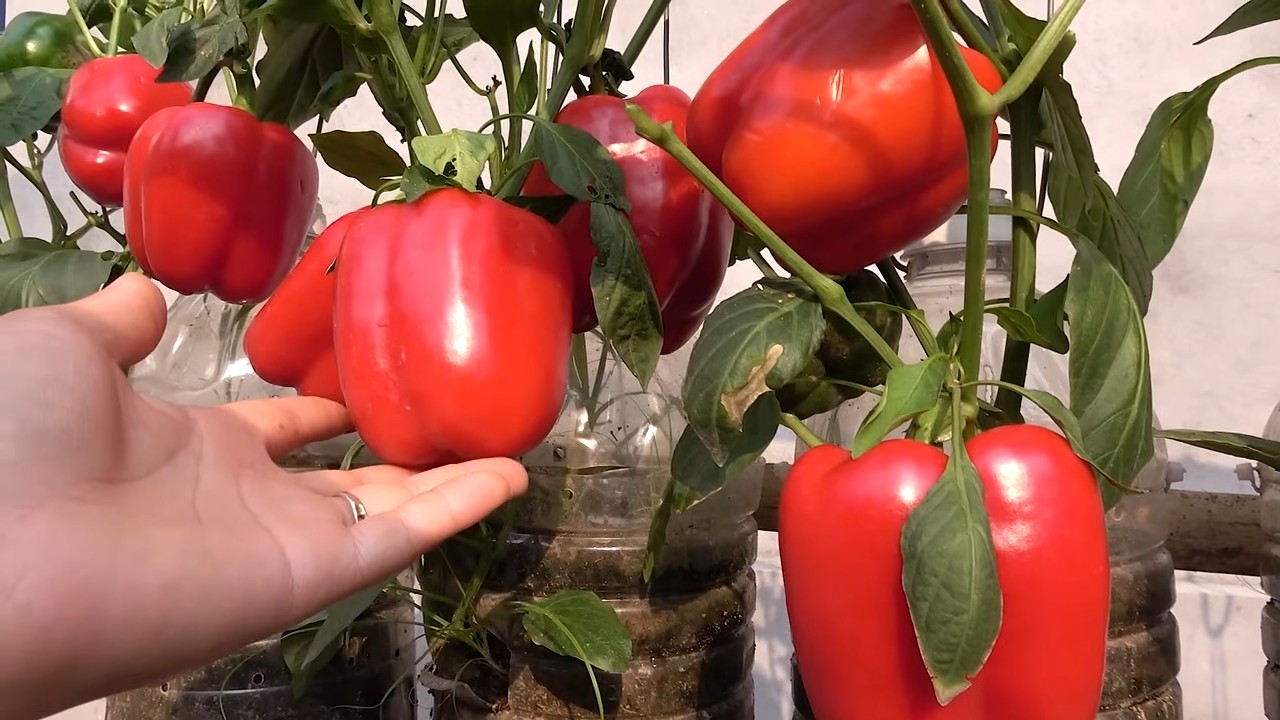
Bottle Grown Bell Peppers: Imagine plucking fresh, vibrant bell peppers right from your windowsill, even if you don’t have a sprawling garden! Sounds like a dream? Well, it’s a dream that can easily become your reality with this simple and rewarding DIY project. For centuries, humans have sought innovative ways to cultivate food in limited spaces, from ancient rooftop gardens to modern-day vertical farms. This method of growing bell peppers in bottles is a testament to that enduring spirit of ingenuity.
Why should you try this? Because let’s face it, not everyone has access to a large garden, and store-bought bell peppers can sometimes lack that fresh, homegrown flavor. Plus, this project is incredibly budget-friendly and a fantastic way to recycle those plastic bottles you might otherwise toss away. I’m going to show you how to create your own mini bell pepper paradise, bringing a touch of green and a burst of flavor into your home. Get ready to learn some amazing bottle grown bell peppers tricks that will transform your space and your plate!
Paprika im Topf ziehen: So einfach geht’s!
Hallo liebe Gartenfreunde! Habt ihr auch so Lust auf frische, knackige Paprika aus dem eigenen Garten? Aber keinen Garten? Kein Problem! Ich zeige euch, wie ihr Paprika ganz einfach in Flaschen oder Töpfen ziehen könnt – perfekt für Balkon, Terrasse oder sogar die Fensterbank. Es ist einfacher als ihr denkt und macht riesigen Spaß!
Was ihr braucht:
* Paprikasamen: Am besten Bio-Saatgut oder Samen aus einer reifen Paprika, die ihr selbst gegessen habt. Achtet darauf, dass die Paprika gesund und frei von Krankheiten war.
* Anzuchterde: Diese ist nährstoffarm und locker, ideal für die Keimung.
* Töpfe oder Flaschen: Alte Plastikflaschen (1,5 Liter oder größer) eignen sich super. Ihr könnt aber auch normale Blumentöpfe verwenden.
* Messer oder Schere: Zum Zuschneiden der Flaschen.
* Sprühflasche: Zum Befeuchten der Erde.
* Klarsichtfolie oder Mini-Gewächshaus: Um ein feuchtwarmes Klima für die Keimung zu schaffen.
* Pikierstab oder Löffel: Zum Vereinzeln der Sämlinge.
* Gemüseerde: Für das spätere Umpflanzen.
* Dünger: Flüssigdünger für Gemüse oder Langzeitdünger.
* Stützstäbe: Paprikapflanzen können recht hoch werden und brauchen eventuell Unterstützung.
Vorbereitung ist alles: Die Flaschen vorbereiten
Bevor wir mit dem Säen loslegen, müssen wir unsere Flaschen vorbereiten. Das ist ganz einfach:
1. Flaschen reinigen: Spült die Flaschen gründlich mit warmem Wasser und Spülmittel aus. So entfernt ihr alle Rückstände.
2. Abtropflöcher bohren: Am Boden der Flaschen müssen unbedingt Löcher sein, damit überschüssiges Wasser ablaufen kann. Sonst droht Staunässe, und das mögen Paprikapflanzen gar nicht. Ich nehme dafür einen Bohrer oder einen heißen Nagel.
3. Flaschen zuschneiden: Schneidet die Flaschen etwa 10-15 cm unterhalb des Flaschenhalses ab. So erhaltet ihr einen kleinen Topf. Ihr könnt die Schnittkanten mit Klebeband entschärfen, damit ihr euch nicht daran schneidet.
Aussaat: Der Start ins Paprika-Glück
Jetzt kommt der spannende Teil: die Aussaat!
1. Anzuchterde vorbereiten: Füllt die vorbereiteten Flaschen oder Töpfe mit Anzuchterde. Drückt die Erde leicht an.
2. Samen aussäen: Verteilt die Paprikasamen gleichmäßig auf der Erde. Achtet darauf, dass sie nicht zu dicht liegen. Ein Abstand von etwa 2-3 cm ist ideal.
3. Samen bedecken: Bedeckt die Samen mit einer dünnen Schicht Anzuchterde (ca. 0,5 cm).
4. Angießen: Befeuchtet die Erde vorsichtig mit einer Sprühflasche. Die Erde sollte feucht, aber nicht nass sein.
5. Mini-Gewächshaus bauen: Stülpt Klarsichtfolie oder ein Mini-Gewächshaus über die Töpfe. Das sorgt für ein feuchtwarmes Klima, das die Keimung fördert.
6. Warm stellen: Stellt die Töpfe an einen warmen, hellen Ort. Ideal sind Temperaturen zwischen 22 und 28 Grad Celsius. Eine Fensterbank über der Heizung ist perfekt.
7. Lüften: Lüftet das Mini-Gewächshaus täglich kurz, um Schimmelbildung zu vermeiden.
Pflege: Geduld zahlt sich aus
Nach etwa 1-2 Wochen sollten die ersten kleinen Pflänzchen sprießen. Jetzt ist es wichtig, die Paprika gut zu pflegen:
1. Feuchtigkeit: Haltet die Erde immer leicht feucht, aber vermeidet Staunässe. Gießt am besten mit einer Sprühflasche oder von unten, indem ihr die Töpfe in eine Schale mit Wasser stellt.
2. Licht: Paprika brauchen viel Licht. Stellt die Töpfe an einen möglichst hellen Ort. Wenn es nicht genug natürliches Licht gibt, könnt ihr mit einer Pflanzenlampe nachhelfen.
3. Lüften: Entfernt die Klarsichtfolie oder das Mini-Gewächshaus, sobald die Pflänzchen etwas größer sind.
4. Drehen: Dreht die Töpfe regelmäßig, damit die Pflanzen nicht zum Licht wachsen und schief werden.
Pikieren: Den Kleinen mehr Platz geben
Wenn die Paprikapflänzchen etwa 5-6 cm groß sind und die ersten richtigen Blätter haben, ist es Zeit zum Pikieren. Das bedeutet, dass wir die Pflänzchen vereinzeln und in größere Töpfe umpflanzen.
1. Vorbereitung: Füllt größere Töpfe (ca. 10-12 cm Durchmesser) mit Gemüseerde.
2. Pflänzchen ausheben: Löst die Pflänzchen vorsichtig mit einem Pikierstab oder Löffel aus der Anzuchterde. Achtet darauf, die Wurzeln nicht zu beschädigen.
3. Umpflanzen: Setzt die Pflänzchen in die vorbereiteten Töpfe mit Gemüseerde. Die Pflänzchen dürfen etwas tiefer gesetzt werden als zuvor.
4. Angießen: Gießt die Pflänzchen vorsichtig an.
5. Weiter pflegen: Stellt die Töpfe an einen hellen, warmen Ort und pflegt die Pflänzchen weiter wie zuvor.
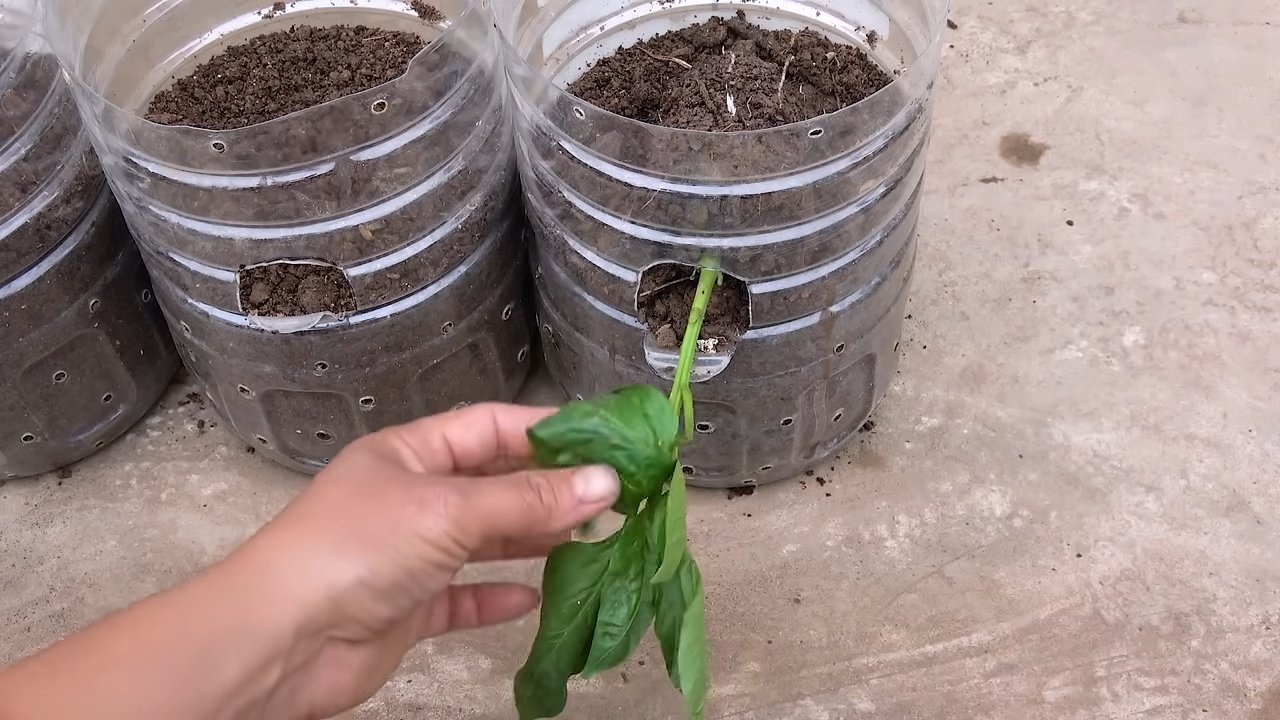
Umpflanzen ins Freie oder in größere Töpfe
Nach den Eisheiligen (Mitte Mai) können die Paprikapflanzen ins Freie umziehen oder in noch größere Töpfe (mindestens 20 Liter) umgepflanzt werden.
1. Abhärten: Bevor ihr die Pflanzen ins Freie setzt, solltet ihr sie langsam an die Sonne und die kühleren Temperaturen gewöhnen. Stellt sie dafür tagsüber für ein paar Stunden nach draußen und holt sie abends wieder rein.
2. Umpflanzen: Wählt einen sonnigen, windgeschützten Standort für eure Paprikapflanzen. Grabt ein Loch, das etwas größer ist als der Wurzelballen. Setzt die Pflanze hinein und füllt das Loch mit Erde auf.
3. Angießen: Gießt die Pflanze gründlich an.
4. Stützen: Paprikapflanzen können recht hoch werden und brauchen eventuell Unterstützung. Steckt einen Stützstab neben die Pflanze und bindet sie locker daran fest.
Düngung: Damit die Paprika Früchte tragen
Paprikapflanzen sind Starkzehrer und brauchen regelmäßig Dünger, um gut zu wachsen und viele Früchte zu tragen.
1. Düngen: Beginnt etwa 2-3 Wochen nach dem Umpflanzen mit dem Düngen. Verwendet einen Flüssigdünger für Gemüse oder einen Langzeitdünger. Beachtet die Dosierungsanleitung auf der Verpackung.
2. Regelmäßig düngen: Düngt die Paprikapflanzen regelmäßig, etwa alle 2-3 Wochen.
Ernte: Die Früchte eurer Arbeit
Nach etwa 2-3 Monaten könnt ihr die ersten reifen Paprika ernten. Die Paprika sind reif, wenn sie ihre typische Farbe haben und sich leicht vom Stiel lösen lassen.
1. Ernten: Schneidet die Paprika mit einem scharfen Messer oder einer Schere ab.
2. Regelmäßig ernten: Erntet die Paprika regelmäßig, damit die Pflanze neue Früchte bilden kann.
Zusätzliche Tipps für eine reiche Ernte:
* Ausgeizen: Entfernt regelmäßig die Seitentriebe, die zwischen dem Haupttrieb und den Blättern wachsen. Das fördert das Wachstum der Früchte.
* Bestäubung: Paprika sind Selbstbestäuber, aber ihr könnt die Bestäubung unterstützen, indem ihr die Blüten leicht schüttelt.
* Schädlinge: Achtet auf Schädlinge wie Blattläuse oder Spinnmilben. Bei Befall könnt ihr natürliche Schädlingsbekämpfungsmittel verwenden.
* Gießen: Gießt die Paprikapflanzen regelmäßig, besonders an heißen Tagen. Vermeidet aber
Conclusion
So, there you have it! Growing bell peppers in bottles isn’t just a quirky gardening experiment; it’s a genuinely effective way to cultivate these vibrant vegetables, especially when space is at a premium. We’ve explored the simple steps, from selecting the right bottle and preparing the soil to nurturing your pepper plants and harvesting your bounty. This method offers a unique blend of sustainability, convenience, and surprisingly impressive yields.
Why is this DIY trick a must-try? Because it democratizes gardening. It removes the barriers of large plots and extensive equipment, making fresh, homegrown bell peppers accessible to anyone with a sunny windowsill or balcony. Imagine the satisfaction of snipping a perfectly ripe, colorful bell pepper from a plant you nurtured entirely within a recycled bottle. It’s a rewarding experience that connects you to the food you eat and reduces your environmental footprint.
But the beauty of this method lies in its adaptability. Feel free to experiment with different varieties of bell peppers. Perhaps you’d like to try growing smaller, sweeter varieties like mini bell peppers or even spicier options like poblano peppers in larger bottles. You can also explore different soil mixes to find what works best for your local climate and the specific needs of your chosen pepper variety. Consider adding companion plants like basil or marigolds to your bottle garden to deter pests and enhance the flavor of your peppers. Another variation is to create a vertical garden by hanging multiple bottle planters, maximizing your space and creating a stunning visual display. You can even get creative with the bottles themselves, painting them or decorating them to add a personal touch to your garden.
Beyond the practical benefits, growing bell peppers in bottles is a fantastic educational opportunity. It’s a hands-on way to learn about plant life cycles, soil science, and the importance of sustainable practices. It’s also a wonderful project to share with children, fostering their curiosity about nature and teaching them valuable skills.
Don’t be intimidated by the prospect of gardening. This method is incredibly forgiving and easy to learn. The key is to start small, be patient, and observe your plants carefully. Pay attention to their needs, adjust your watering and feeding accordingly, and don’t be afraid to experiment.
We wholeheartedly encourage you to give this DIY trick a try. Embrace the challenge, enjoy the process, and savor the delicious rewards. Once you’ve experienced the joy of harvesting your own bottle-grown bell peppers, we’re confident you’ll be hooked.
And most importantly, we want to hear about your experiences! Share your photos, tips, and stories with us in the comments below. Let’s create a community of bottle-gardeners, sharing our knowledge and inspiring others to embrace this sustainable and rewarding way to grow their own food. Let us know what worked for you, what challenges you faced, and any creative variations you came up with. Together, we can unlock the full potential of bottle gardening and make fresh, homegrown bell peppers a reality for everyone. So, grab a bottle, some soil, and a bell pepper seedling, and let the gardening adventure begin!
Frequently Asked Questions (FAQ)
What kind of bottle is best for growing bell peppers?
The ideal bottle is a clear or translucent plastic bottle with a wide mouth. A two-liter soda bottle or a large juice bottle works well. The bottle should be clean and free of any residue. Avoid using bottles that have contained harsh chemicals. The size of the bottle will influence the size of the bell pepper plant it can support, so larger bottles are generally better for larger pepper varieties. Make sure to thoroughly wash the bottle with soap and water before using it.
What type of soil should I use?
A well-draining potting mix is essential. You can purchase a pre-made potting mix or create your own by combining equal parts of garden soil, compost, and perlite or vermiculite. The compost provides nutrients, while the perlite or vermiculite improves drainage and aeration. Avoid using soil directly from your garden, as it may contain pests or diseases. Ensure the soil is loose and not compacted to allow for proper root growth.
How often should I water my bell pepper plant in a bottle?
Watering frequency depends on the weather, the size of the bottle, and the type of soil you’re using. Generally, you should water your plant when the top inch of soil feels dry to the touch. Avoid overwatering, as this can lead to root rot. Ensure the bottle has drainage holes to prevent water from accumulating at the bottom. During hot weather, you may need to water your plant daily. Check the soil moisture regularly and adjust your watering schedule accordingly.
How much sunlight does my bell pepper plant need?
Bell peppers need at least 6-8 hours of direct sunlight per day to thrive. Place your bottle garden in a sunny location, such as a south-facing window or balcony. If you don’t have enough natural sunlight, you can supplement with a grow light. Rotate the bottle regularly to ensure that all sides of the plant receive adequate sunlight. Insufficient sunlight can lead to leggy growth and reduced fruit production.
Do I need to fertilize my bell pepper plant?
Yes, bell peppers are heavy feeders and benefit from regular fertilization. Use a balanced fertilizer specifically formulated for vegetables. Follow the instructions on the fertilizer package for application rates and frequency. You can also use organic fertilizers, such as compost tea or fish emulsion. Fertilize your plant every 2-3 weeks during the growing season. Avoid over-fertilizing, as this can burn the roots.
How do I prevent pests and diseases?
Regularly inspect your plant for signs of pests or diseases. Common pests include aphids, spider mites, and whiteflies. You can control these pests by spraying your plant with insecticidal soap or neem oil. Ensure good air circulation around the plant to prevent fungal diseases. Remove any yellowing or dead leaves promptly. If you notice any signs of disease, such as spots or lesions on the leaves, treat your plant with a fungicide.
When can I harvest my bell peppers?
Bell peppers are typically ready to harvest 60-90 days after transplanting. The peppers should be firm, glossy, and fully colored. You can harvest them when they are green, yellow, orange, or red, depending on the variety. Use a sharp knife or scissors to cut the pepper from the plant, leaving a small stem attached. Harvesting peppers regularly will encourage the plant to produce more fruit.
Can I grow bell peppers indoors year-round?
Yes, you can grow bell peppers indoors year-round if you provide them with adequate light, warmth, and humidity. Use a grow light to supplement natural sunlight, especially during the winter months. Maintain a consistent temperature of 70-80°F (21-27°C). Increase humidity by misting the plant regularly or placing a tray of water near the bottle. Pollinate the flowers manually by gently shaking the plant or using a small brush to transfer pollen from one flower to another.
What if my bell pepper plant isn’t producing fruit?
There are several reasons why your bell pepper plant may not be producing fruit. Insufficient sunlight, lack of pollination, nutrient deficiencies, and temperature extremes can all contribute to poor fruit production. Ensure your plant is receiving at least 6-8 hours of direct sunlight per day. Pollinate the flowers manually if necessary. Fertilize your plant regularly with a balanced fertilizer. Maintain a consistent temperature and humidity level.
Can I reuse the soil from my bottle garden?
It’s generally not recommended to reuse soil from a bottle garden, especially if the plant has been affected by pests or diseases. The soil may be depleted of nutrients and contain harmful pathogens. If you choose to reuse the soil, sterilize it by baking it in the oven at 200°F (93°C) for 30 minutes. Add fresh compost and fertilizer to replenish the nutrients. However, for best results, it’s always best to use fresh potting mix for each planting.
Leave a Comment