
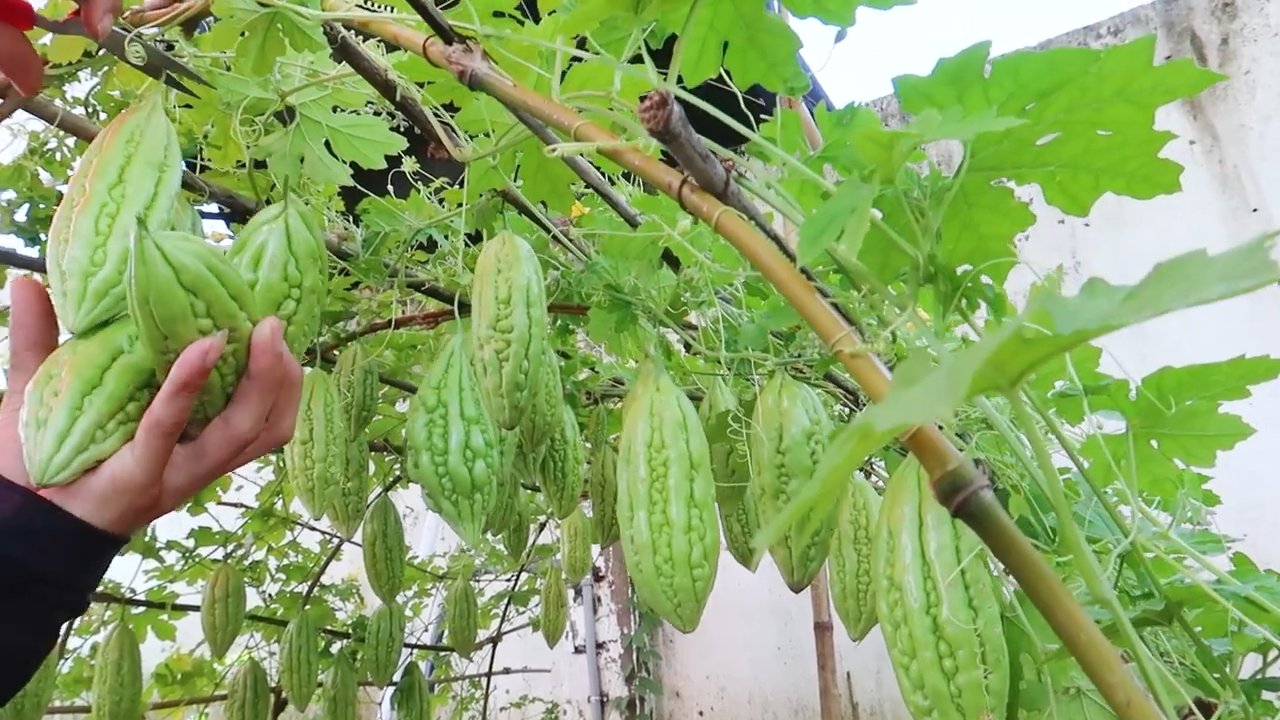
Bitter Melon Sack Growing: Ever dreamed of harvesting a bounty of bitter melons right from your own backyard, even if you’re short on space? I know I have! Forget sprawling vines taking over your garden; we’re about to unlock a clever, space-saving secret that will have you enjoying fresh, homegrown bitter melon in no time. This isn’t just about gardening; it’s about embracing a time-honored technique with a modern twist.
The practice of growing vegetables in containers and unconventional spaces has roots stretching back centuries, from ancient hanging gardens to resourceful communities maximizing limited resources. Today, with urban living on the rise and a growing desire for sustainable food sources, these methods are more relevant than ever. But why bitter melon specifically? Well, this unique vegetable, prized in Asian cuisine and traditional medicine, can be tricky to cultivate. Its vigorous vines need support, and space can quickly become an issue.
That’s where our DIY bitter melon sack growing trick comes in! I’m going to show you how to create a simple, effective growing system using readily available materials. This method not only saves space but also provides excellent drainage and aeration for healthy root development. Imagine the satisfaction of plucking fresh, vibrant bitter melons from your own vertical garden – it’s easier than you think! So, let’s ditch the gardening myths and get ready to embark on a rewarding journey of homegrown goodness. Get ready to learn the secrets of successful bitter melon sack growing!
DIY: Bittermelon im Sack anbauen – Dein eigener kleiner Gemüsegarten!
Hey Leute! Habt ihr auch so einen kleinen Garten oder nur einen Balkon und wollt trotzdem leckeres Gemüse anbauen? Dann habe ich heute genau das Richtige für euch: Bittermelonen im Sack! Ja, richtig gelesen. Das ist nicht nur platzsparend, sondern auch super effektiv. Ich zeige euch, wie ihr das ganz einfach selbst machen könnt. Los geht’s!
Was du brauchst: Die Materialliste
Bevor wir loslegen, hier eine Liste mit allem, was du brauchst. Keine Sorge, das meiste hast du wahrscheinlich schon zu Hause!
* Sack: Ein großer, stabiler Sack. Ich empfehle einen Jutesack oder einen robusten Pflanzsack. Er sollte mindestens 60 Liter Fassungsvermögen haben.
* Bittermelonen-Samen: Die gibt’s im Gartencenter oder online. Achte auf eine gute Qualität.
* Anzuchterde: Für die Voranzucht der Samen.
* Pflanzerde: Eine Mischung aus Gartenerde, Kompost und etwas Sand. Das sorgt für eine gute Drainage und Nährstoffversorgung.
* Kompost: Der beste Dünger überhaupt!
* Sand: Verbessert die Drainage und verhindert Staunässe.
* Pflanzstäbe oder Rankhilfe: Bittermelonen sind Kletterpflanzen, die Unterstützung brauchen.
* Gießkanne: Zum Bewässern, logisch!
* Schere oder Messer: Zum Zuschneiden des Sacks (falls nötig).
* Handschuhe: Um deine Hände sauber zu halten.
* Optional: Kokosfaser oder Perlite zur Verbesserung der Drainage.
Schritt-für-Schritt-Anleitung: So gelingt’s!
Jetzt geht’s ans Eingemachte! Ich führe dich Schritt für Schritt durch den Prozess.
Phase 1: Die Voranzucht der Samen
1. Samen vorbereiten: Um die Keimung zu beschleunigen, kannst du die Samen für 24 Stunden in lauwarmes Wasser legen. Das weicht die harte Schale auf.
2. Aussaat: Fülle kleine Anzuchttöpfe oder eine Anzuchtschale mit Anzuchterde. Drücke die Erde leicht an und lege pro Topf oder Zelle 2-3 Samen etwa 1-2 cm tief in die Erde.
3. Bewässerung: Gieße die Erde vorsichtig an, sodass sie feucht, aber nicht nass ist.
4. Standort: Stelle die Anzuchttöpfe an einen warmen, hellen Ort. Eine Fensterbank oder ein Gewächshaus sind ideal. Die optimale Keimtemperatur liegt bei 25-30°C.
5. Geduld: Halte die Erde feucht und warte, bis die Samen keimen. Das dauert in der Regel 1-2 Wochen.
6. Pikieren: Sobald die Sämlinge 2-3 Blätter haben, kannst du sie pikieren. Das bedeutet, du setzt die stärksten Sämlinge in größere Töpfe um.
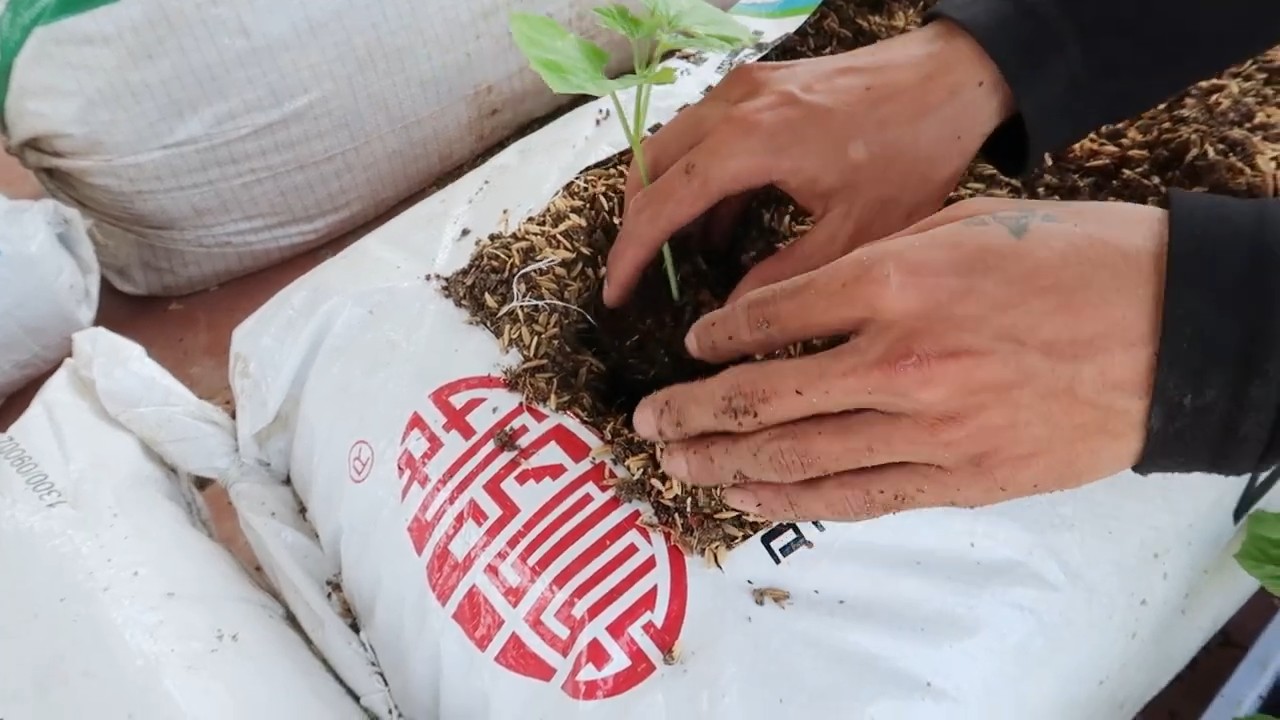
Phase 2: Den Sack vorbereiten
1. Sack auswählen: Wähle einen stabilen Sack, der groß genug ist. Ein Jutesack ist atmungsaktiv und umweltfreundlich. Ein Pflanzsack aus Kunststoff ist robuster und hält länger.
2. Drainage: Um Staunässe zu vermeiden, solltest du am Boden des Sacks eine Drainageschicht anlegen. Fülle dazu eine Schicht Kies, Blähton oder Tonscherben in den Sack.
3. Erde mischen: Mische Pflanzerde, Kompost und Sand im Verhältnis 2:1:1. Das sorgt für eine gute Nährstoffversorgung und Drainage. Du kannst auch etwas Kokosfaser oder Perlite hinzufügen, um die Drainage weiter zu verbessern.
4. Sack befüllen: Fülle den Sack mit der Erdmischung. Lass oben etwa 10-15 cm Platz.
5. Rankhilfe anbringen: Bittermelonen sind Kletterpflanzen und brauchen eine Rankhilfe. Du kannst Pflanzstäbe in den Sack stecken oder eine Rankhilfe aus Draht oder Bambus anbringen. Achte darauf, dass die Rankhilfe stabil ist und die Pflanze gut tragen kann.
Phase 3: Die Bittermelonen einpflanzen
1. Pflanzlöcher vorbereiten: Grabe im Sack 2-3 Pflanzlöcher. Die Löcher sollten etwas größer sein als die Wurzelballen der Sämlinge.
2. Einpflanzen: Nimm die Sämlinge vorsichtig aus den Anzuchttöpfen und setze sie in die Pflanzlöcher. Achte darauf, dass die Wurzelballen nicht beschädigt werden.
3. Anhäufeln: Fülle die Pflanzlöcher mit Erde auf und drücke sie leicht an.
4. Bewässern: Gieße die Pflanzen gründlich an.
5. Standort: Stelle den Sack an einen sonnigen, warmen Ort. Bittermelonen lieben die Sonne!
Phase 4: Pflege und Ernte
1. Bewässerung: Bittermelonen brauchen regelmäßig Wasser, besonders während der Wachstums- und Fruchtbildungsphase. Gieße die Pflanzen, wenn die oberste Erdschicht trocken ist. Vermeide Staunässe.
2. Düngung: Dünge die Pflanzen alle 2-3 Wochen mit einem organischen Dünger oder Komposttee. Das sorgt für eine gute Nährstoffversorgung und fördert das Wachstum.
3. Rankhilfe: Leite die Triebe der Bittermelonen an der Rankhilfe entlang. Das sorgt für eine gute Belüftung und verhindert Krankheiten.
4. Ausgeizen: Entferne regelmäßig Seitentriebe, um die Fruchtbildung zu fördern.
5. Schutz vor Schädlingen: Kontrolliere die Pflanzen regelmäßig auf Schädlinge wie Blattläuse oder Spinnmilben. Bei Bedarf kannst du biologische Schädlingsbekämpfungsmittel einsetzen.
6. Ernte: Bittermelonen sind erntereif, wenn sie eine grüne Farbe haben und sich leicht vom Stiel lösen lassen. Die Erntezeit ist in der Regel von Juli bis Oktober.
7. Regelmäßiges Ernten: Ernte die Bittermelonen regelmäßig, um die Fruchtbildung anzuregen. Je mehr du erntest, desto mehr Früchte werden nachwachsen.
Zusätzliche Tipps und Tricks für den Bittermelonen-Anbau im Sack
* Sonnenschein ist Trumpf: Bittermelonen lieben die Sonne. Stelle sicher, dass dein Sack an einem Ort steht, der mindestens 6 Stunden Sonne pro Tag bekommt.
* Windschutz: Ein windgeschützter Standort ist ideal, da starke Winde die Pflanzen beschädigen können.
* Mulchen: Eine Mulchschicht aus Stroh oder Rasenschnitt hilft, die Feuchtigkeit im Boden zu halten und Unkraut zu unterdrücken.
* Bodenprobe: Wenn du unsicher bist, ob dein Boden die richtigen Nährstoffe enthält, kannst du eine Bodenprobe nehmen und analysieren lassen.
* Sortenwahl: Es gibt verschiedene Bittermelonen-Sorten. Informiere dich, welche Sorte am besten für dein Klima und deine Bedürfnisse geeignet ist.
* Krankheiten vorbeugen: Achte auf eine gute Belüftung und vermeide Staunässe, um Krankheiten vorzubeugen.
* Regelmäßige Kontrolle: Kontrolliere deine Pflanzen regelmäßig auf Schädlinge und Krankheiten. Je früher du Probleme erkennst, desto einfacher lassen sie sich beheben.
* Geduld: Der Anbau von Bittermelonen braucht Zeit und Geduld. Lass dich nicht entmutigen, wenn es nicht sofort klappt. Mit etwas Übung wirst du bald eine reiche Ernte einfahren.
* Kreativität: Sei kreativ bei der Gestaltung deiner Rankhilfe. Du kannst zum Beispiel alte Äste, Bambusstöcke oder Draht verwenden.
* Nachhaltigkeit: Verwende organische Dünger und Pflanzenschutzmittel, um die Umwelt zu schonen.
Häufige Probleme und Lösungen
* Gelbe Blätter: Können auf Nährstoffmangel oder Überwässerung hindeuten. Dünge die Pflanzen oder reduziere die Bewässerung.
* Blattläuse: Bekämpfe sie mit einem natürlichen Insektizid oder spüle sie mit einem starken Wasserstrahl ab.
* F
Conclusion
So, there you have it! Mastering the art of bitter melon sack growing is not just a gardening technique; it’s a gateway to healthier, more abundant harvests, and a deeper connection with the food you eat. We’ve explored the ins and outs of this method, highlighting its benefits in terms of pest control, improved fruit quality, and overall plant health.
Why is this a must-try? Because it empowers you to take control of your garden’s ecosystem. Imagine harvesting bitter melons that are consistently blemish-free, protected from fruit flies and other pests without relying on harmful chemicals. Think of the satisfaction of knowing you’ve nurtured your plants in a way that promotes their natural resilience. This method isn’t just about growing bitter melons; it’s about cultivating a thriving, sustainable garden.
But the beauty of gardening lies in its adaptability. Feel free to experiment with different sack materials. While we’ve recommended breathable fabrics like nylon or organza, you might find that other materials work well in your specific climate and garden conditions. Consider using different sizes of sacks depending on the variety of bitter melon you’re growing and the expected fruit size.
Another variation to explore is the timing of sack application. While we suggest applying the sacks shortly after pollination, you could experiment with applying them earlier, even before pollination, to completely exclude pests. However, remember that this might require hand-pollination, which can be a rewarding experience in itself.
Don’t be afraid to get creative with your support structures. While bamboo stakes and trellises are common choices, you can use anything that provides adequate support for the growing vines and the weight of the fruit-filled sacks. Recycled materials like old ladders or repurposed fencing can add a unique touch to your garden.
The key takeaway is that bitter melon sack growing is a flexible technique that can be tailored to your specific needs and preferences. It’s not a one-size-fits-all solution, but rather a starting point for your own gardening journey.
We wholeheartedly encourage you to try this DIY trick in your own garden. Witness firsthand the difference it makes in the health and productivity of your bitter melon plants. And most importantly, share your experience with us and the wider gardening community. Let us know what worked for you, what challenges you encountered, and any variations you discovered. Your insights can help others learn and improve their own gardening practices.
Gardening is a collaborative endeavor, and by sharing our knowledge and experiences, we can all become better gardeners. So, go ahead, give bitter melon sack growing a try. You might be surprised at the results! Happy gardening!
Frequently Asked Questions (FAQ)
What type of sack material is best for bitter melon sack growing?
The best sack material is breathable and allows for air circulation while providing a barrier against pests. Nylon mesh, organza, or even fine netting are excellent choices. Avoid using plastic bags, as they can trap moisture and lead to fungal diseases. The key is to find a material that allows the bitter melon to “breathe” while still offering protection. Consider the climate in your area; in humid environments, extra breathability is crucial.
When is the ideal time to apply the sacks to the bitter melons?
The ideal time is shortly after pollination, when the fruit is just beginning to develop. This ensures that the fruit is protected from pests from an early stage. You can identify successful pollination by observing the small fruit forming at the base of the flower. Applying the sacks too early, before pollination, may require hand-pollination, while applying them too late may allow pests to damage the fruit before it’s protected.
How do I ensure proper air circulation within the sacks?
Using breathable materials is the primary way to ensure proper air circulation. Additionally, avoid overcrowding the sacks. Each sack should contain only one or two developing bitter melons to allow for adequate airflow around each fruit. Regularly inspect the sacks to ensure they are not damaged or blocked by debris. If you live in a particularly humid area, consider using sacks with larger mesh openings for increased ventilation.
Can I reuse the sacks for multiple seasons?
Yes, you can reuse the sacks if they are properly cleaned and stored. After harvesting, wash the sacks thoroughly with soap and water to remove any dirt, debris, or pest eggs. Allow them to dry completely before storing them in a cool, dry place. Inspect the sacks for any damage, such as tears or holes, and repair them if necessary. Proper care will extend the lifespan of your sacks and save you money in the long run.
What if I notice pests inside the sacks after application?
If you notice pests inside the sacks, it means they were either present on the fruit or flower before the sack was applied, or the sack has a hole. Carefully remove the sack and inspect the fruit for any signs of damage. If the damage is minimal, you can try cleaning the fruit and reapplying a new sack. If the damage is significant, it’s best to remove the affected fruit to prevent the pests from spreading to other plants. Ensure the new sack is free of holes and properly sealed.
How do I support the weight of the bitter melons inside the sacks?
Use sturdy support structures such as trellises, bamboo stakes, or even repurposed materials like old ladders. The support structure should be strong enough to bear the weight of the growing vines and the fruit-filled sacks. Ensure the vines are securely attached to the support structure to prevent them from collapsing under the weight. Regularly inspect the support structure and reinforce it if necessary.
Will using sacks affect the taste or texture of the bitter melons?
No, using sacks should not negatively affect the taste or texture of the bitter melons. In fact, it can often improve the quality of the fruit by protecting it from pests and diseases. The sacks allow for proper air circulation and sunlight exposure, which are essential for healthy fruit development. Some gardeners even report that using sacks results in sweeter and more flavorful bitter melons.
Can I use this method for other types of vegetables or fruits?
Yes, the concept of using protective sacks can be applied to other types of vegetables and fruits that are susceptible to pest damage. For example, you can use sacks to protect tomatoes, cucumbers, or even certain types of berries. The key is to choose a sack material that is appropriate for the specific crop and to apply the sacks at the right time. Experiment with different materials and techniques to find what works best for your garden.
What are the environmental benefits of using bitter melon sack growing?
Bitter melon sack growing offers several environmental benefits. It reduces the need for chemical pesticides, which can harm beneficial insects and pollute the environment. It promotes sustainable gardening practices by encouraging natural pest control methods. It also helps to reduce food waste by protecting the fruit from damage and spoilage. By using reusable sacks, you can further minimize your environmental impact.
Where can I purchase the materials needed for bitter melon sack growing?
You can purchase the materials needed for bitter melon sack growing at most garden centers, hardware stores, or online retailers. Look for breathable fabrics like nylon mesh or organza, as well as support structures like trellises or bamboo stakes. You may also need scissors, string, or zip ties to secure the sacks to the plants. Consider purchasing reusable sacks to reduce waste and save money in the long run.


Leave a Comment