
Growing peanuts in containers might sound like a quirky challenge, but trust me, it’s a surprisingly rewarding and fun DIY project! Forget those sprawling peanut farms; we’re bringing the peanut patch to your patio, balcony, or even your kitchen windowsill. Have you ever imagined harvesting your own homegrown peanuts, roasted to perfection and enjoyed fresh from your garden? This article will guide you through every step of the process, making it easier than you think.
Peanuts, despite their name, aren’t actually nuts! They’re legumes, and their history stretches back thousands of years to South America, where they were cultivated as a vital food source. They eventually spread across the globe, becoming a staple in cuisines worldwide. Now, you can participate in this rich agricultural history by growing peanuts in containers right at home.
Why should you try this DIY trick? Well, for starters, it’s incredibly satisfying to nurture a plant from seed to harvest. Plus, growing peanuts in containers allows you to control the growing environment, protecting your precious plants from pests and diseases. It’s also a fantastic way to introduce children to the wonders of gardening and where their food comes from. So, let’s ditch the store-bought peanuts for a season and embark on this exciting gardening adventure together! I promise, you’ll be shelling out smiles in no time.
Growing Peanuts in Containers: A Beginner’s Guide
Hey there, fellow gardening enthusiasts! Ever thought about growing your own peanuts? It’s surprisingly easy, even if you don’t have a sprawling garden. Container gardening is the perfect solution, and I’m here to guide you through the whole process. Get ready to enjoy fresh, homegrown peanuts right from your patio!
Choosing the Right Container and Soil
Before we even think about planting, let’s talk about setting the stage for success. The right container and soil are crucial for happy peanut plants.
* Container Size: Peanuts need room to spread their roots and develop those delicious nuts underground. I recommend a container that’s at least 18 inches in diameter and 12 inches deep. The bigger, the better, really! Think large pots, half barrels, or even sturdy grow bags.
* Drainage: Excellent drainage is a must! Peanuts don’t like soggy feet. Make sure your container has plenty of drainage holes. If not, you can drill some yourself.
* Soil Mix: Forget heavy garden soil. Peanuts thrive in a light, well-draining soil mix. A combination of potting mix, compost, and a little bit of sand works wonders. I usually go for a ratio of 2 parts potting mix, 1 part compost, and 1 part sand. The compost provides nutrients, while the sand improves drainage.
Planting Your Peanut Seeds
Alright, now for the fun part – planting! You can either start with raw, unsalted peanuts from the grocery store (make sure they’re unroasted!) or purchase peanut seeds specifically for planting. I’ve had success with both methods.
* Soaking the Seeds (Optional): Soaking the peanuts in water for a few hours (or overnight) can help speed up germination. It’s not absolutely necessary, but I find it gives them a little head start.
* Planting Depth: Plant the peanuts about 1-2 inches deep.
* Spacing: If you’re planting multiple peanuts in the same container, space them about 6-8 inches apart. This gives them enough room to grow without overcrowding.
* Watering: After planting, water the soil thoroughly. Keep the soil consistently moist, but not waterlogged, until the seedlings emerge.
Step-by-Step Planting Instructions
1. Prepare Your Container: Fill your chosen container with the well-draining soil mix, leaving a couple of inches of space at the top.
2. Soak Seeds (Optional): If you’re soaking your peanuts, do that now.
3. Plant the Peanuts: Make small holes in the soil, 1-2 inches deep, and space them 6-8 inches apart. Place one peanut in each hole.
4. Cover the Seeds: Gently cover the peanuts with soil.
5. Water Thoroughly: Water the soil until it’s evenly moist.
6. Find a Sunny Spot: Place your container in a location that receives at least 6-8 hours of direct sunlight per day. Peanuts are sun-loving plants!
Caring for Your Peanut Plants
Once your peanut plants have sprouted, it’s time to provide them with the care they need to flourish.
* Watering: Water regularly, especially during hot and dry weather. The soil should be consistently moist, but avoid overwatering. I usually check the soil moisture by sticking my finger in – if the top inch feels dry, it’s time to water.
* Fertilizing: Peanuts are legumes, which means they can fix nitrogen from the air. However, they still benefit from occasional fertilization. Use a balanced fertilizer (like 10-10-10) every few weeks, following the instructions on the fertilizer package. I prefer using a liquid fertilizer diluted in water for easier application.
* Hilling: This is a crucial step! As the peanut plants grow, they’ll produce small, yellow flowers. After the flowers fade, “pegs” (also known as gynophores) will emerge from the base of the flowers and grow downwards into the soil. These pegs are what develop into peanuts. To encourage peanut production, you need to “hill” the soil around the base of the plants, covering the pegs with soil. Do this every few weeks as the plants grow.
* Weeding: Keep the container free of weeds. Weeds compete with the peanut plants for nutrients and water.
* Pest Control: Keep an eye out for pests like aphids or spider mites. If you spot any, you can try spraying them with insecticidal soap or neem oil. I always prefer organic pest control methods whenever possible.
Flowering and Pegging
This is where the magic happens! You’ll notice small, yellow flowers appearing on your peanut plants. These flowers are self-pollinating, so you don’t need to worry about hand-pollinating them. After the flowers fade, the pegs will start to grow downwards into the soil. This is a sign that your peanuts are developing! Remember to keep hilling the soil around the base of the plants to encourage pegging.
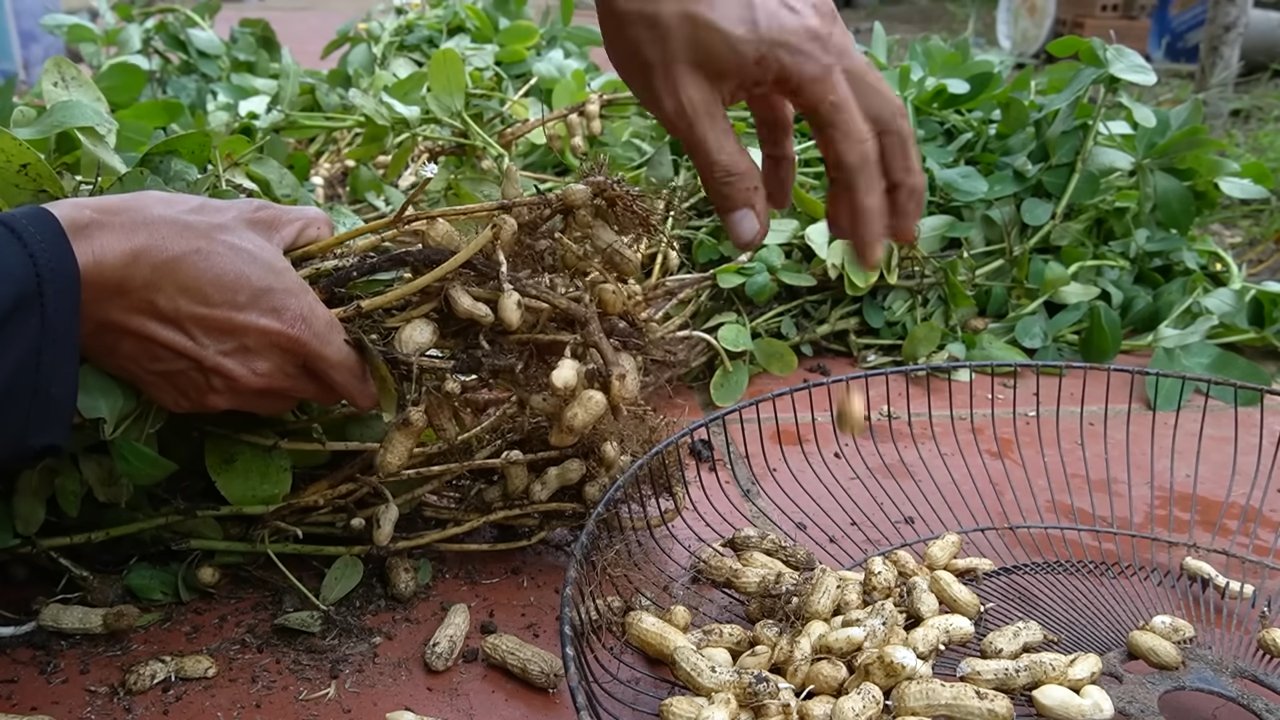
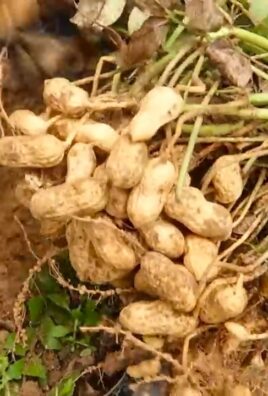
Harvesting Your Peanuts
Harvest time is the most rewarding part of growing peanuts! It usually takes about 120-150 days from planting to harvest, depending on the variety and your climate.
* When to Harvest: The best time to harvest is when the leaves of the peanut plants start to turn yellow and the plant begins to die back. You can also dig up a few plants to check the peanuts. If the peanut shells are mature and the kernels inside are plump, it’s time to harvest.
* How to Harvest: Carefully dig up the entire plant, being careful not to damage the peanuts. Shake off as much soil as possible.
* Curing the Peanuts: Curing is essential for developing the flavor and preventing mold. Hang the peanut plants upside down in a warm, dry, and well-ventilated place for about 2-4 weeks. You can also spread the peanuts out on a screen or tray to dry.
* Shelling the Peanuts: Once the peanuts are cured, you can shell them. This is a fun activity to do with kids!
* Storing the Peanuts: Store the shelled peanuts in an airtight container in a cool, dry place. You can also freeze them for longer storage.
Step-by-Step Harvesting Instructions
1. Observe the Plants: Wait for the leaves to turn yellow and the plant to start dying back.
2. Test a Plant (Optional): Dig up one plant to check the peanut development.
3. Dig Up the Plants: Carefully dig up the remaining plants, being gentle with the peanuts.
4. Shake Off Soil: Remove as much soil as possible from the plants.
5. Cure the Peanuts: Hang the plants upside down or spread the peanuts out to dry for 2-4 weeks.
6. Shell the Peanuts: Once cured, shell the peanuts.
7. Store the Peanuts: Store the shelled peanuts in an airtight container.
Troubleshooting Common Problems
Even with the best care, you might encounter a few challenges along the way. Here are some common problems and how to address them:
* Poor Germination: If your peanut seeds don’t germinate, it could be due to several factors: old seeds, poor soil, or improper watering. Make sure you’re using fresh seeds, a well-draining soil mix, and keeping the soil consistently moist.
* Yellowing Leaves: Yellowing leaves can be a sign of nutrient deficiency or overwatering. Check the soil moisture and fertilize if necessary.
* Pests: Keep an eye out for pests like aphids or spider mites. Treat them with insecticidal soap or neem oil.
* Lack of Peanuts: If your plants are growing well but not producing peanuts, it could be due to insufficient sunlight or improper hilling. Make sure your plants are getting enough sunlight and that you’re hilling the soil around the base of the plants regularly.
Tips for Success
Here are a few extra tips to help you succeed in growing peanuts in containers:
* Choose the Right Variety: Some peanut varieties are better suited for container gardening than others. Look for varieties that are compact and early-maturing.
* Provide Support: As the peanut plants grow, they may become top-heavy. You can provide support by staking them or using a tomato cage.
* Rotate Your Crops: If you’re growing peanuts in the same container year after year, it’s a good idea to rotate your crops to prevent soilborne diseases.
* Have Fun! Growing peanuts is a rewarding experience. Don’t be afraid to experiment and learn from your mistakes.
Growing peanuts in containers is a fun and rewarding project that anyone can do. With a little bit of care and attention, you can enjoy fresh, homegrown peanuts right from your patio. So, grab a container, some peanut seeds, and get
Conclusion
So, there you have it! Growing peanuts in containers is not only achievable, but it’s also a surprisingly rewarding experience. Forget the sprawling fields and specialized equipment; with a few simple supplies and a little patience, you can cultivate your own homegrown peanuts right on your patio, balcony, or even indoors.
Why is this DIY trick a must-try? Because it offers a unique connection to your food. There’s something incredibly satisfying about nurturing a plant from seed to harvest, especially when that harvest yields a delicious and nutritious snack. Plus, growing peanuts in containers allows you to control the growing environment, minimizing the risk of pests and diseases that can plague traditional peanut farms. You’ll know exactly what’s going into your peanuts – no mystery chemicals or questionable practices.
Beyond the satisfaction and control, container peanut growing is also a fantastic educational opportunity. It’s a great way to teach children (and adults!) about plant life cycles, the importance of soil health, and the wonders of nature. It’s a hands-on learning experience that’s far more engaging than reading about it in a book.
But the benefits don’t stop there. Growing peanuts in containers is also a sustainable practice. By growing your own food, you’re reducing your carbon footprint and supporting local food systems. You’re also contributing to biodiversity by providing a habitat for beneficial insects and pollinators.
Ready to take your peanut growing to the next level? Consider these variations:
* **Experiment with different peanut varieties:** There are numerous peanut varieties available, each with its own unique flavor and characteristics. Try growing Virginia peanuts for their large size and mild flavor, or Spanish peanuts for their smaller size and nutty taste.
* **Add companion plants:** Planting companion plants alongside your peanuts can help to deter pests, attract pollinators, and improve soil health. Marigolds, basil, and rosemary are all excellent choices.
* **Get creative with your containers:** Don’t limit yourself to traditional pots. You can grow peanuts in buckets, tubs, or even repurposed containers. Just make sure the container is large enough and has adequate drainage.
* Try growing peanuts indoors: If you live in a colder climate, you can still enjoy the experience of growing peanuts by growing them indoors. Just make sure to provide them with plenty of sunlight and warmth.
Ultimately, the best way to discover the joys of growing peanuts in containers is to simply give it a try. Don’t be afraid to experiment, learn from your mistakes, and most importantly, have fun! We are confident that you will find that **growing peanuts in containers** is a rewarding and enjoyable experience.
We encourage you to embark on this exciting gardening adventure. Once you’ve harvested your first batch of homegrown peanuts, we’d love to hear about your experience. Share your tips, tricks, and photos with us in the comments below. Let’s create a community of container peanut growers and learn from each other! Happy growing!
Frequently Asked Questions (FAQ)
**Q: What kind of container is best for growing peanuts?**
A: The ideal container for growing peanuts should be at least 18 inches in diameter and 12 inches deep. This provides ample space for the peanut plants to develop their root systems and produce a good yield. Choose a container made from a durable material like plastic, terracotta, or even a repurposed bucket or tub. Ensure the container has adequate drainage holes to prevent waterlogging, which can lead to root rot. The material of the container isn’t as important as the size and drainage capabilities.
**Q: What type of soil should I use for growing peanuts in containers?**
A: Peanuts thrive in well-draining, sandy loam soil. Avoid heavy clay soils, as they can become compacted and restrict root growth. You can create your own potting mix by combining equal parts of garden soil, compost, and sand. Alternatively, you can purchase a pre-made potting mix specifically formulated for vegetables. Ensure the soil is slightly acidic to neutral, with a pH between 6.0 and 7.0. Adding some organic matter, like well-rotted manure or compost, will improve soil fertility and drainage.
**Q: How often should I water my peanut plants in containers?**
A: Water your peanut plants regularly, especially during hot and dry weather. The soil should be kept consistently moist, but not waterlogged. Water deeply whenever the top inch of soil feels dry to the touch. Avoid overhead watering, as this can promote fungal diseases. Instead, water at the base of the plant, using a watering can or a soaker hose. Reduce watering frequency during cooler weather or when the plants are not actively growing.
**Q: How much sunlight do peanut plants need?**
A: Peanut plants require at least 6-8 hours of direct sunlight per day to thrive. Choose a sunny location for your container garden, such as a south-facing balcony or patio. If you’re growing peanuts indoors, place them near a sunny window or supplement with artificial grow lights. Insufficient sunlight can lead to stunted growth and reduced peanut production.
**Q: When is the best time to plant peanuts in containers?**
A: The best time to plant peanuts in containers is after the last frost, when the soil has warmed up to at least 65°F (18°C). In most regions, this is typically in late spring or early summer. You can start peanut seeds indoors 4-6 weeks before the last frost to get a head start on the growing season. Transplant the seedlings into your containers once the weather has warmed up and the risk of frost has passed.
**Q: How long does it take for peanuts to mature in containers?**
A: Peanuts typically take 120-150 days to mature, depending on the variety and growing conditions. You’ll know the peanuts are ready to harvest when the foliage begins to turn yellow and the pods feel plump and firm. To harvest, carefully dig up the entire plant and shake off the excess soil. Hang the plants upside down in a dry, well-ventilated area for several weeks to cure the peanuts.
**Q: Are there any common pests or diseases that affect peanut plants in containers?**
A: While container growing minimizes some pest and disease issues, peanut plants can still be susceptible to certain problems. Aphids, spider mites, and whiteflies can infest peanut plants, sucking the sap from the leaves. Control these pests with insecticidal soap or neem oil. Fungal diseases like leaf spot and powdery mildew can also affect peanut plants, especially in humid conditions. Prevent these diseases by providing good air circulation and avoiding overhead watering.
**Q: Do I need to fertilize my peanut plants in containers?**
A: Yes, peanut plants benefit from regular fertilization. Use a balanced fertilizer with a ratio of 10-10-10 or 5-10-10. Apply the fertilizer according to the package instructions, typically every 2-3 weeks during the growing season. Avoid over-fertilizing, as this can lead to excessive foliage growth and reduced peanut production. You can also supplement with organic fertilizers like compost tea or fish emulsion.
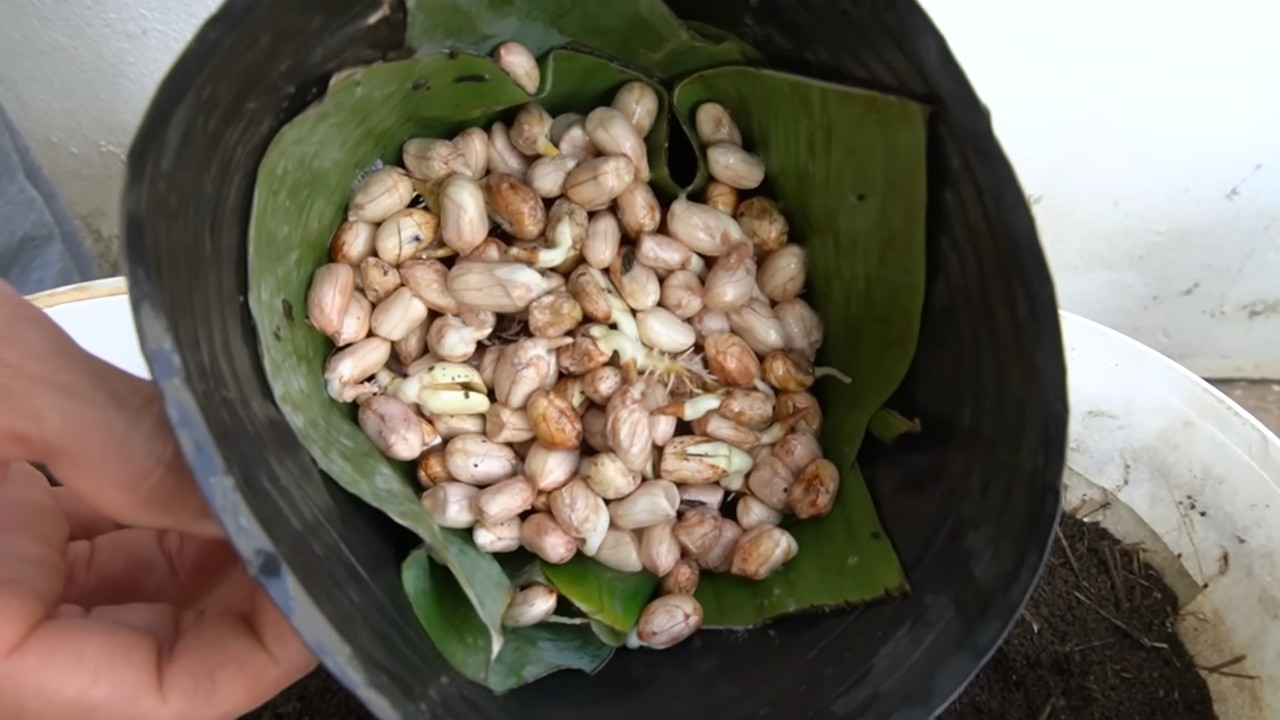
**Q: Can I save peanut seeds from my homegrown peanuts to plant next year?**
A: Yes, you can save peanut seeds from your homegrown peanuts to plant next year. Select the largest and healthiest peanuts from your harvest. Allow the peanuts to dry completely before storing them in an airtight container in a cool, dark place. Before planting, crack open the shells and remove the peanut kernels. Soak the kernels in water for 24 hours to improve germination rates.

Leave a Comment