
Waterless Celery Growing: Sounds like magic, right? I know, I thought so too when I first heard about it! But trust me, it’s not only possible, it’s surprisingly simple. Forget lugging around watering cans and constantly worrying about soggy soil. This DIY guide will unlock the secrets to cultivating crisp, delicious celery with minimal water, saving you time, effort, and precious resources.
Celery, with its satisfying crunch and refreshing flavor, has been enjoyed for centuries. Originating in the Mediterranean, it was initially valued for its medicinal properties before becoming a culinary staple. From soups and salads to crudités and snacks, celery adds a unique texture and taste to countless dishes. But traditionally, growing celery has been notoriously water-intensive, making it a challenge for many home gardeners, especially those in drier climates or with limited access to water.
That’s where this waterless celery growing hack comes in! In today’s world, where water conservation is more important than ever, finding innovative ways to garden sustainably is crucial. This method not only reduces your water consumption but also minimizes the risk of common celery diseases caused by overwatering. Plus, it’s a fantastic way to experiment with a new gardening technique and impress your friends with your green thumb. So, are you ready to ditch the watering can and discover the joy of waterless celery growing? Let’s get started!
Growing Celery Without Soil: A Fun DIY Experiment!
Hey there, fellow gardening enthusiasts! Ever thought about growing celery without any soil? It sounds a bit crazy, right? But trust me, it’s a super fun and surprisingly easy DIY project that even beginners can tackle. Plus, it’s a great way to reduce food waste and get a little extra celery for your soups, salads, and snacks. I’m going to walk you through the whole process, step-by-step, so you can have your own water-grown celery in no time.
What You’ll Need
Before we dive in, let’s gather our supplies. This is a pretty low-cost project, which is always a bonus!
* Celery Stalk with Base Intact: This is the most important part! When you buy your celery from the store, make sure the base (the part where all the stalks are connected) is still there and looks relatively healthy. Avoid stalks that are already browning or mushy.
* Shallow Dish or Bowl: A small bowl, a pie plate, or even a plastic container will work perfectly. Just make sure it’s wide enough to comfortably hold the celery base.
* Water: Tap water is fine, but filtered water is even better.
* Spray Bottle (Optional): This is helpful for keeping the celery moist during the initial stages.
* Sunny Location: A windowsill or countertop that gets plenty of sunlight is ideal.
* Patience: This isn’t an overnight process, so be prepared to wait a few weeks to see significant growth.
Getting Started: Preparing the Celery Base
Okay, let’s get our hands dirty (well, not really, since we’re avoiding soil!). The first step is to prepare the celery base.
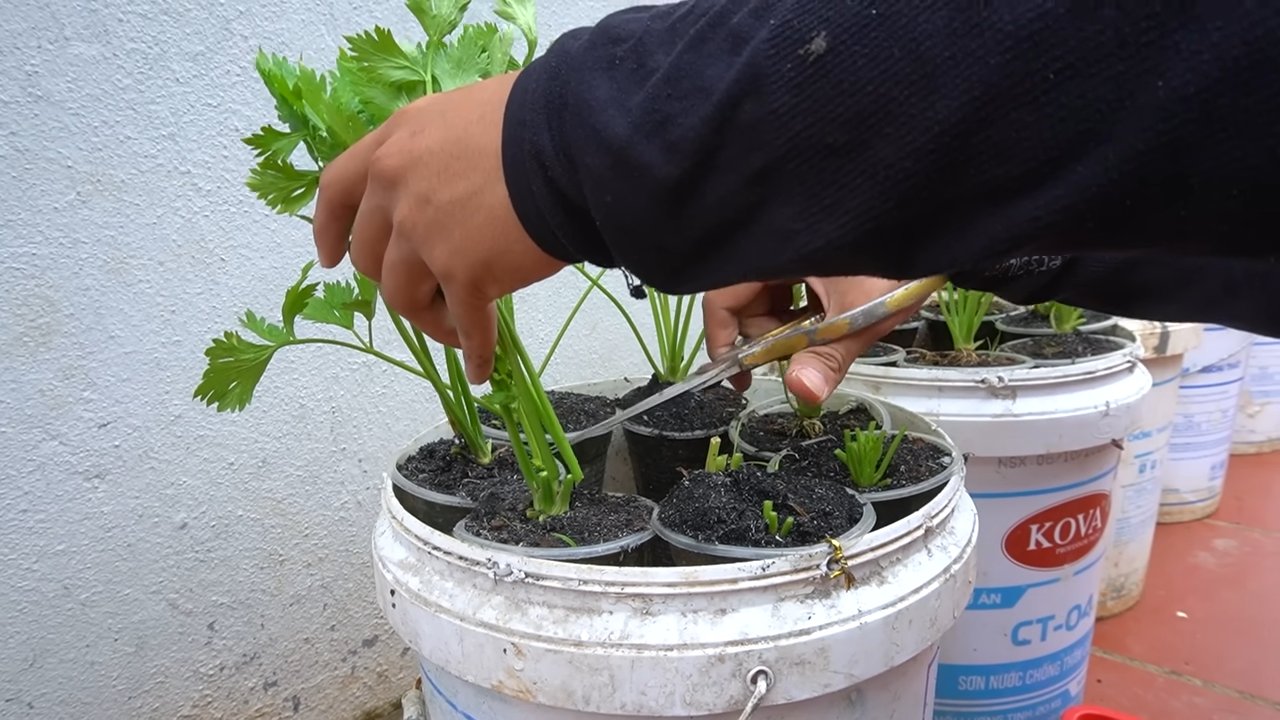
1. Cut the Stalks: Using a sharp knife, carefully cut off the celery stalks about 1-2 inches above the base. You can use these stalks for cooking or snacking – don’t throw them away! We’re only interested in the base for this project.
2. Clean the Base: Gently rinse the celery base under cool water to remove any dirt or debris. Be careful not to damage the root area.
3. Inspect for Rot: Take a good look at the base and make sure there are no signs of rot or mold. If you see any, you can try to carefully trim away the affected areas, but if the rot is extensive, it’s best to start with a fresh celery stalk.
The Water Propagation Phase
Now comes the fun part – putting the celery base in water and watching it grow!
1. Place the Base in Water: Fill your shallow dish or bowl with about an inch of water. Place the celery base in the water, cut-side up. Make sure the bottom of the base is submerged, but the top is exposed to air.
2. Find a Sunny Spot: Place the dish with the celery base in a sunny location, such as a windowsill. Celery needs plenty of sunlight to grow, so the more light it gets, the better.
3. Change the Water Regularly: This is crucial! Change the water every 1-2 days to prevent bacteria growth and keep the water fresh. Stale water can lead to rot and hinder growth.
4. Keep it Moist (Optional): During the first few days, you can use a spray bottle to lightly mist the top of the celery base with water. This will help keep it from drying out.
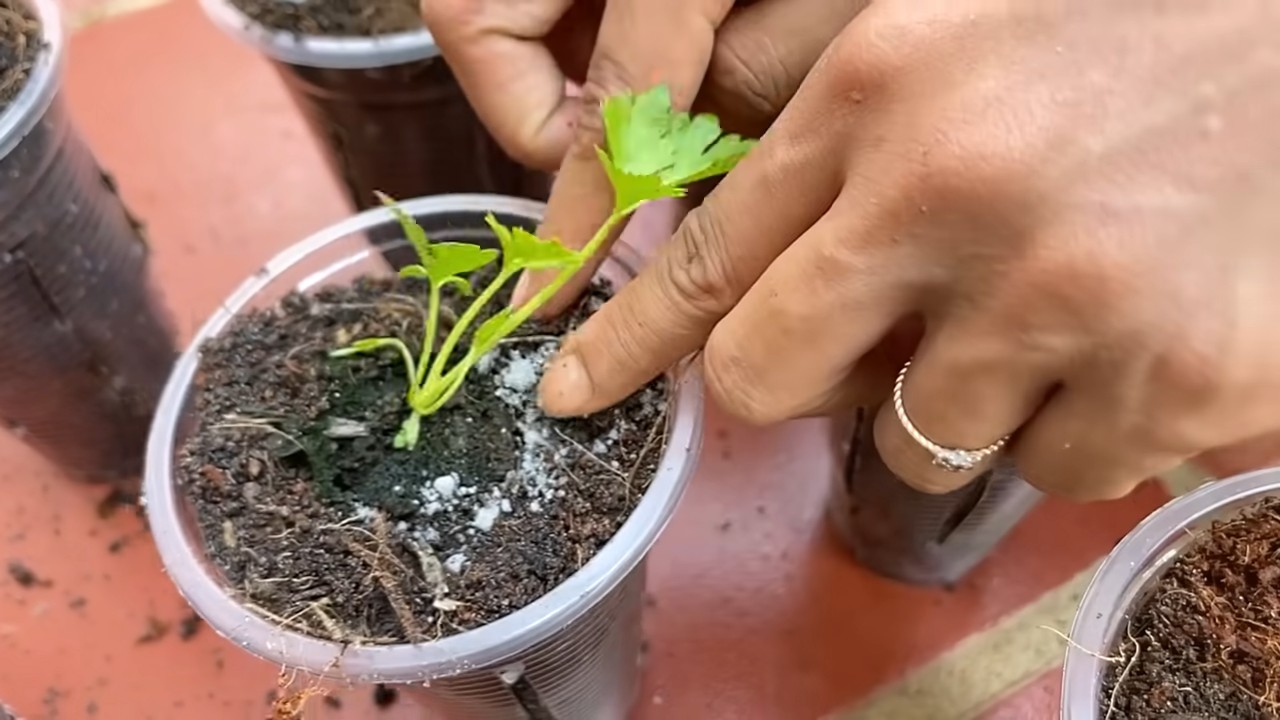
5. Observe and Wait: Now comes the waiting game. Over the next few days, you should start to see small leaves sprouting from the center of the celery base. This is a sign that your celery is growing!
Transplanting to a Larger Container (Optional)
After about a week or two, you should see a good amount of new growth. At this point, you have a couple of options: you can continue growing the celery in water, or you can transplant it to a larger container with soil.
Growing in Water:
If you choose to continue growing in water, simply keep changing the water regularly and ensure the celery gets plenty of sunlight. You can even add a diluted liquid fertilizer to the water every few weeks to provide extra nutrients. Just be sure to follow the instructions on the fertilizer package.
Transplanting to Soil:
If you want to grow a larger celery plant, transplanting to soil is the way to go. Here’s how:
1. Choose a Pot: Select a pot that is at least 6 inches in diameter and has drainage holes. Celery needs plenty of room to grow.
2. Prepare the Soil: Fill the pot with a well-draining potting mix. You can also add some compost or other organic matter to improve the soil’s fertility.
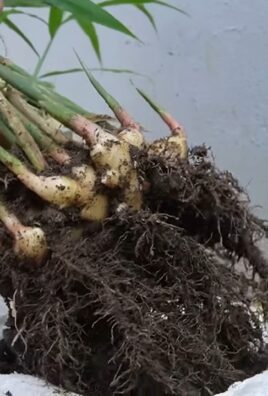
3. Carefully Remove the Celery: Gently remove the celery base from the water. Be careful not to damage the roots.
4. Plant the Celery: Dig a hole in the center of the pot that is large enough to accommodate the celery base. Place the celery in the hole and gently backfill with soil. Make sure the top of the base is slightly above the soil line.
5. Water Thoroughly: Water the soil thoroughly after planting.
6. Place in a Sunny Location: Place the pot in a sunny location and water regularly, keeping the soil moist but not soggy.
Caring for Your Water-Grown Celery
Whether you choose to grow your celery in water or soil, here are a few tips for keeping it healthy and happy:
* Sunlight: Celery needs at least 6 hours of sunlight per day. If you don’t have a sunny location, you can supplement with a grow light.
* Watering: Keep the water fresh (if growing in water) or the soil moist (if growing in soil). Celery is a thirsty plant, so don’t let it dry out.
* Fertilizing: If you’re growing in water, add a diluted liquid fertilizer every few weeks. If you’re growing in soil, fertilize every month or two with a balanced fertilizer.
* Pest Control: Keep an eye out for pests, such as aphids or spider mites. If you see any, you can try spraying them with insecticidal soap or neem oil.
* Harvesting: You can start harvesting celery stalks as soon as they are large enough to eat. Simply cut off the stalks you need, leaving the base intact so it can continue to grow.
Troubleshooting
Sometimes, things don’t go exactly as planned. Here are a few common problems you might encounter and how to fix them:
* Celery Base Rotting: This is usually caused by bacteria growth in the water. Make sure you’re changing the water regularly and using clean water. If the rot is severe, it’s best to start with a fresh celery stalk.
* Slow Growth: This could be due to a lack of sunlight, nutrients, or water. Make sure your celery is getting plenty of sunlight, fertilize regularly, and keep the water or soil moist.
* Yellowing Leaves: This could be a sign of overwatering or nutrient deficiency. Make sure the water or soil is well-draining and fertilize regularly.
* Pests: Inspect your celery regularly for pests and treat them promptly with insecticidal soap or neem oil.
Why This Works: The Science Behind It
You might be wondering how celery can grow without soil. The answer lies in the fact that celery, like many plants, can regenerate from its base. The base contains dormant buds that, when exposed to water and sunlight, will start to sprout and grow new leaves. The water provides the necessary moisture, and the sunlight provides the energy for photosynthesis, which is the process by which plants convert light energy into chemical energy.
While the celery won’t grow as large or as quickly as it would in soil, it can still produce a decent amount of new growth. And the best part is, it’s a fun and educational way to learn about plant propagation and reduce food waste!
Beyond Celery: Other Vegetables You Can Regrow in Water
Celery isn’t the only vegetable you can regrow in water. Here are a few other options:
* Lettuce: Similar to celery, you can regrow lettuce from the base.
* Green Onions: Simply place the white bulb end of the green onion in water, and it will start to regrow.
* Garlic: You can sprout garlic cloves in water and then plant them in soil to grow a full garlic plant.
* Avocado: This one takes a bit more patience, but you can sprout an avocado pit in water and eventually grow an avocado tree.
Final Thoughts
Growing celery without soil is a simple, rewarding, and educational project that anyone can do. It’s a great way to reduce food waste, learn about plant propagation, and add a little bit of green to your home. So, grab a celery stalk, a bowl of water, and get ready to
Conclusion
So, there you have it – the surprisingly simple yet incredibly effective method for **waterless celery growing**! We’ve walked you through the steps, highlighting how you can coax new life from those seemingly discarded celery bases. This isn’t just about saving money; it’s about reducing food waste, connecting with the growing process, and enjoying the unparalleled freshness of homegrown celery, even without a traditional garden.
Why is this a must-try? Because it’s accessible to everyone, regardless of their gardening experience or living situation. Whether you have a sprawling backyard or a tiny apartment windowsill, you can participate in this rewarding project. It’s a fantastic way to introduce children to the wonders of plant propagation and teach them about sustainability. Plus, the satisfaction of watching those little celery stalks emerge from what was once kitchen scrap is truly unmatched.
But don’t stop there! Experiment with different variations to personalize your waterless celery growing experience. Try using different types of containers – from repurposed yogurt tubs to decorative planters. Consider adding a diluted liquid fertilizer to the water during the initial rooting phase to give your celery a nutrient boost. Once your celery is established in soil, you can even try growing it indoors under a grow light for a year-round supply.
Another exciting variation is to explore different celery varieties. While the standard green celery is readily available in most grocery stores, you might be able to find other varieties, such as golden celery or red celery, at farmers’ markets or specialty stores. Each variety offers a slightly different flavor profile and texture, adding a unique twist to your waterless celery growing adventure.
Don’t be afraid to get creative with how you use your homegrown celery. Of course, it’s delicious in salads, soups, and stir-fries. But you can also use it to make celery juice, a refreshing and nutritious beverage. Or, try adding it to smoothies for a boost of vitamins and minerals. You can even use the celery leaves to make a flavorful pesto or garnish for your favorite dishes.
We are confident that you’ll be amazed by the results. The process is straightforward, the rewards are plentiful, and the impact on your wallet and the environment is significant.
Now, it’s your turn! Grab that celery base, follow our simple instructions, and embark on your own waterless celery growing journey. We can’t wait to hear about your experiences. Share your photos, tips, and tricks with us in the comments below. Let’s build a community of waterless celery growers and inspire others to embrace this sustainable and rewarding practice. Happy growing!
Frequently Asked Questions (FAQ)
What exactly is “waterless celery growing,” and how does it differ from traditional methods?
Waterless celery growing, in the context of this article, refers to the method of regrowing celery from the base (the part you typically discard after using the stalks) without initially submerging it entirely in water. Traditional methods often involve placing the celery base in a shallow dish of water to encourage root growth before transplanting it to soil. Our method focuses on providing a consistently moist environment around the base, promoting root development without the risk of rot that can sometimes occur with prolonged submersion. This approach is particularly beneficial in preventing fungal growth and ensuring a healthier start for your celery plant.
How long does it take to see results with waterless celery growing?
You should start to see new growth within 5-7 days. Small roots will begin to emerge from the bottom of the celery base, and you’ll notice the inner stalks starting to sprout. The speed of growth depends on factors like temperature, humidity, and the overall health of the original celery base. Be patient, and ensure the growing medium remains consistently moist but not waterlogged.
What kind of soil is best for transplanting the celery base after it has rooted?
A well-draining potting mix is ideal. Celery prefers soil that is rich in organic matter and retains moisture without becoming soggy. You can amend your potting mix with compost or aged manure to improve its fertility and drainage. Avoid heavy clay soils, as they can compact and restrict root growth. A slightly acidic to neutral pH (around 6.0 to 7.0) is also optimal.
How often should I water the celery plant after transplanting it to soil?
Water regularly to keep the soil consistently moist, but avoid overwatering. Check the soil moisture level by inserting your finger about an inch deep. If the soil feels dry, it’s time to water. Water deeply, allowing the water to drain out of the bottom of the pot. During hot weather, you may need to water more frequently. Mulching around the base of the plant can help retain moisture and suppress weeds.
What are some common problems I might encounter with waterless celery growing, and how can I fix them?
One common problem is rot, which can occur if the celery base is kept too wet. To prevent this, ensure the growing medium is well-draining and avoid overwatering. If you notice any signs of rot, such as a slimy or foul-smelling base, remove the affected parts immediately. Another potential issue is pest infestations, such as aphids or spider mites. Inspect your plants regularly and treat any infestations with insecticidal soap or neem oil. Yellowing leaves can indicate nutrient deficiencies, which can be addressed by fertilizing with a balanced liquid fertilizer.
Can I grow celery indoors year-round using this method?
Yes, you can! Celery requires at least 6 hours of sunlight per day, so if you’re growing it indoors, you’ll need to supplement with a grow light. Place the grow light a few inches above the plant and keep it on for 12-14 hours per day. Maintain a consistent temperature of around 60-70°F (15-21°C) and provide adequate humidity. Regular fertilization is also important for indoor celery growing.
Is there a specific type of celery that works best for waterless growing?
While you can regrow most types of celery, the standard green celery found in grocery stores is generally the easiest to work with. It tends to root and grow more readily than some of the more specialized varieties. However, feel free to experiment with different types of celery to see what works best for you.
How do I know when my celery is ready to harvest?
Your celery is ready to harvest when the stalks are at least 6-8 inches long and have reached a desirable thickness. You can harvest individual stalks as needed, or you can harvest the entire plant at once. To harvest, simply cut the stalks at the base of the plant with a sharp knife.
Can I use this method to grow other vegetables besides celery?
While this specific method is tailored for celery, the general principle of regrowing vegetables from scraps can be applied to other plants as well. For example, you can regrow lettuce, green onions, and bok choy from their bases using a similar technique. Experiment with different vegetables and see what you can successfully regrow!
What are the benefits of growing my own celery compared to buying it from the store?
Growing your own celery offers several benefits. First, it’s a sustainable way to reduce food waste and save money. Second, homegrown celery is often fresher and more flavorful than store-bought celery. Third, you have control over the growing process, so you can avoid using harmful pesticides and herbicides. Finally, it’s a rewarding and educational experience that connects you with the natural world.


Leave a Comment