
Grow Bok Choy Indoors? Absolutely! Imagine fresh, crisp bok choy, bursting with flavor, ready to harvest right from your kitchen windowsill. Forget those sad, wilted greens from the grocery store – we’re talking vibrant, homegrown goodness, even if you don’t have a sprawling garden. This DIY guide is your passport to becoming a bok choy-growing pro, no matter the season or your outdoor space.
Bok choy, also known as pak choi, has been a staple in Asian cuisine for centuries, with its origins tracing back to China. It’s not just delicious; it’s packed with vitamins and nutrients, making it a healthy and versatile addition to any meal. Traditionally, it was cultivated in fields, but the beauty of modern gardening is that we can adapt and bring the farm to our homes!
Why should you learn to grow bok choy indoors? Well, for starters, it gives you control over the growing environment, protecting your precious plants from pests, unpredictable weather, and even hungry critters. Plus, it’s incredibly rewarding to nurture something from seed to table. I’ve found that having fresh bok choy readily available encourages me to eat healthier and experiment with new recipes. So, let’s dive in and unlock the secrets to successfully growing this amazing vegetable indoors!
Growing Bok Choy Indoors: A Beginner’s Guide
Hey there, fellow plant enthusiasts! Ever thought about growing your own fresh bok choy right in your home? It’s easier than you might think, and the satisfaction of harvesting your own veggies is truly rewarding. I’ve been growing bok choy indoors for a while now, and I’m excited to share my tips and tricks with you. Let’s get started!
What You’ll Need
Before we dive into the nitty-gritty, let’s gather all the necessary supplies. Having everything ready beforehand will make the process much smoother.
* Bok Choy Seeds: Choose a variety that’s well-suited for indoor growing. Dwarf varieties tend to do well in containers.
* Seed Starting Tray or Small Pots: These are perfect for germinating your seeds.
* Seed Starting Mix: This is a light and airy soil mix that’s ideal for delicate seedlings.
* Larger Pots (6-8 inches in diameter): You’ll need these when you transplant your seedlings.
* Potting Soil: A good quality potting mix that drains well is essential.
* Grow Lights: Bok choy needs plenty of light, so grow lights are a must, especially during the darker months.
* Watering Can or Spray Bottle: For gentle watering.
* Fertilizer: A balanced liquid fertilizer will help your bok choy thrive.
* Spray Bottle (for pest control): Fill with water and a drop of dish soap (optional).
Phase 1: Starting Your Seeds
This is where the magic begins! Getting your seeds to germinate successfully is the first crucial step.
1. Prepare Your Seed Starting Tray: Fill your seed starting tray or small pots with seed starting mix. Moisten the mix thoroughly, but don’t let it get soggy. I like to use a spray bottle to gently dampen the soil.
2. Sow the Seeds: Sow 2-3 seeds per cell or pot, about ¼ inch deep. Gently cover the seeds with more seed starting mix.
3. Water Gently: Water the seeds again, being careful not to dislodge them. A spray bottle works best for this.
4. Provide Warmth and Light: Place the tray or pots in a warm location (around 70-75°F) and under your grow lights. If you don’t have grow lights, a sunny windowsill can work, but grow lights provide more consistent results.
5. Keep the Soil Moist: Check the soil daily and water as needed to keep it consistently moist. Don’t let it dry out completely.
6. Wait for Germination: Bok choy seeds typically germinate in 5-10 days. Be patient!
Phase 2: Transplanting Your Seedlings
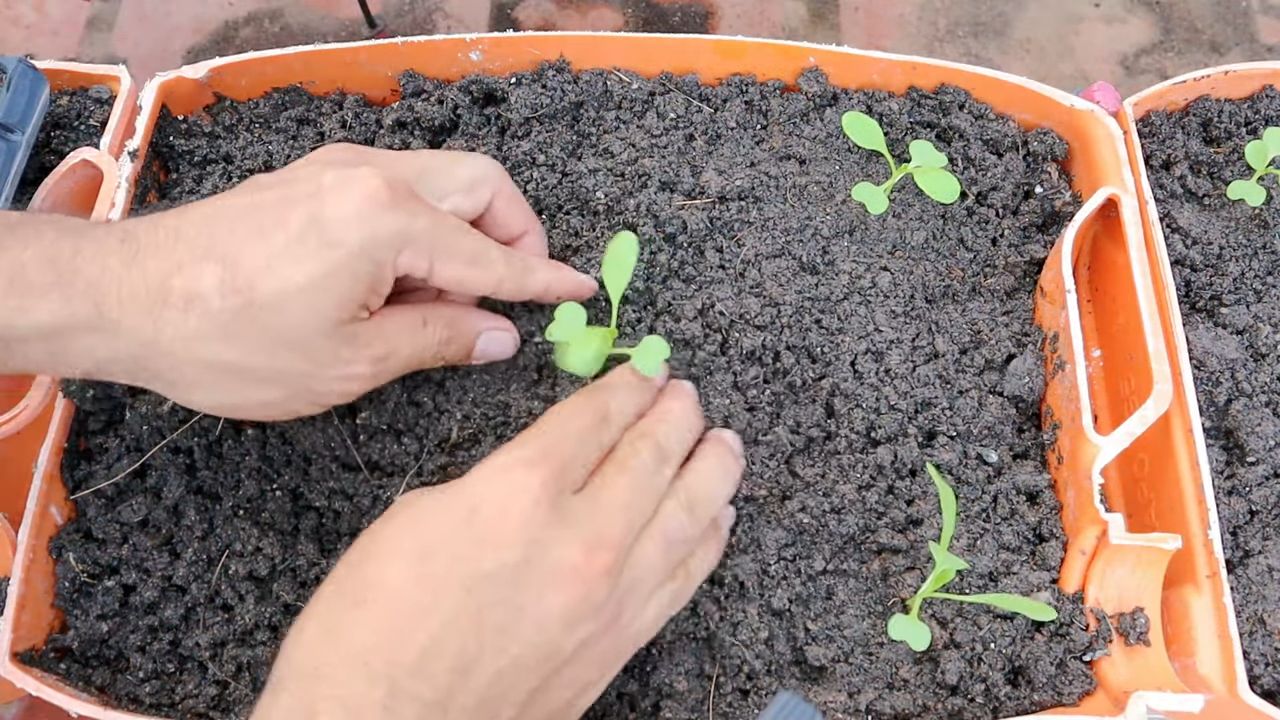
Once your seedlings have developed a few true leaves (the leaves that appear after the initial seed leaves), it’s time to transplant them into larger pots.
1. Prepare Your Larger Pots: Fill your 6-8 inch pots with potting soil. Make a small hole in the center of each pot, large enough to accommodate the seedling’s root ball.
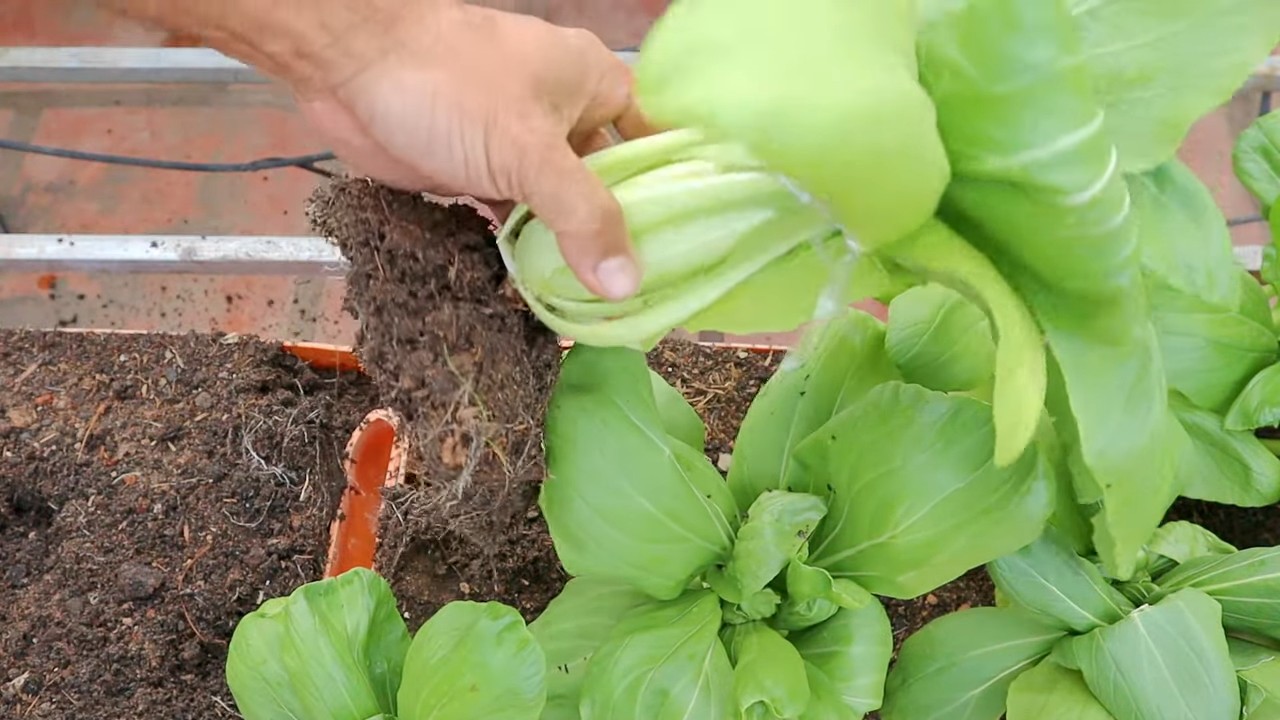
2. Carefully Remove the Seedlings: Gently loosen the soil around the seedlings in the seed starting tray or pots. Carefully lift the seedlings out, being mindful not to damage the roots. If you planted multiple seeds in one cell, you may need to thin them out, keeping only the strongest seedling.
3. Transplant the Seedlings: Place each seedling into the hole in the larger pot. Gently backfill with potting soil, making sure the top of the root ball is level with the soil surface.
4. Water Thoroughly: Water the transplanted seedlings thoroughly to help settle the soil.
5. Provide Light and Warmth: Place the pots under your grow lights or in a sunny location. Continue to provide warmth and consistent moisture.
Phase 3: Caring for Your Bok Choy
Now that your bok choy is happily transplanted, it’s time to focus on providing the right care to help it thrive.
1. Light: Bok choy needs at least 6 hours of direct light per day. If you’re using grow lights, keep them on for 12-14 hours a day. Adjust the height of the lights as your plants grow, keeping them a few inches above the foliage.
2. Watering: Water your bok choy regularly, keeping the soil consistently moist but not waterlogged. Check the soil moisture by sticking your finger into the soil. If the top inch feels dry, it’s time to water.
3. Fertilizing: Feed your bok choy with a balanced liquid fertilizer every 2-3 weeks. Follow the instructions on the fertilizer package. I like to use a fertilizer that’s specifically formulated for leafy greens.
4. Temperature: Bok choy prefers cooler temperatures, ideally between 60-70°F. Avoid exposing your plants to extreme heat or cold.
5. Air Circulation: Good air circulation is important to prevent fungal diseases. Make sure your plants have enough space between them, and consider using a small fan to circulate the air.
6. Pest Control: Keep an eye out for pests like aphids and cabbage worms. If you spot any pests, you can try spraying them with a mixture of water and a drop of dish soap. You can also manually remove them.
Phase 4: Harvesting Your Bok Choy
The best part! You can start harvesting your bok choy when the leaves are about 6-8 inches long.
1. Harvesting Individual Leaves: You can harvest individual leaves as needed, starting with the outer leaves. This will allow the plant to continue producing new leaves.
2. Harvesting the Entire Plant: Alternatively, you can harvest the entire plant at once. Simply cut the plant off at the base, leaving about an inch of stem.
3. Enjoy Your Harvest: Wash your bok choy thoroughly and enjoy it in salads, stir-fries, soups, or any other dish you like. Freshly harvested bok choy tastes amazing!
Troubleshooting
Even with the best care, you might encounter some challenges along the way. Here are a few common problems and how to address them:
* Yellowing Leaves: This could be a sign of overwatering, underwatering, or nutrient deficiency. Check the soil moisture and adjust your watering accordingly. If the soil is consistently moist, you may be overwatering. If the soil is dry, you may need to water more frequently. Also, make sure you’re fertilizing your plants regularly.
* Leggy Growth: This is usually a sign of insufficient light. Make sure your plants are getting enough light, either from grow lights or a sunny window. If you’re using grow lights, adjust the height so they’re closer to the plants.
* Pests: As mentioned earlier, keep an eye out for pests and take action promptly. A mixture of water and dish soap can be effective for many common pests.
* Bolting: Bolting is when the plant starts to produce flowers and seeds prematurely. This can happen if the plant is exposed to high temperatures or stress. Try to keep your plants in a cool, well-ventilated location.
Choosing the Right Bok Choy Variety
Not all bok choy varieties are created equal, especially when it comes to indoor growing. Here are a few that I’ve had success with:
* ‘Dwarf Pak Choi’: As the name suggests, this is a compact variety that’s perfect for containers. It matures quickly and produces tender, flavorful leaves.
* ‘Toy Choi’: Another dwarf variety that’s well-suited for indoor growing. It has a mild flavor and a crisp texture.
* ‘Mei Qing Choi’: This variety is known for its vibrant green leaves and white stems. It’s slightly larger than the dwarf varieties, but it can still be grown successfully in containers.
Tips for Success
Here are a few extra tips to help you succeed with growing bok choy indoors:
* Use a good quality potting mix: Don’t skimp on the potting mix. A good quality mix will provide the nutrients and drainage that your plants need.
* Don’t overwater: Overwatering is a common mistake that can lead to root rot. Let the soil dry out slightly between waterings.
* Provide adequate light: Bok choy needs plenty of light to thrive. If you don’t have enough natural light, invest in grow lights.
* Fertilize regularly: Bok choy is a heavy feeder, so fertilize it regularly with a balanced liquid fertilizer.
* Monitor for pests: Check your plants regularly for pests and take action promptly if you spot any.
* Harvest regularly: Harvesting regularly will encourage the plant to produce more leaves.
Growing bok choy indoors is a fun and rewarding experience. With a little bit of care and attention, you can enjoy fresh,
Conclusion
So, there you have it! Growing bok choy indoors is not only achievable, but it’s also a remarkably rewarding experience. Forget those wilted, overpriced greens at the supermarket. Imagine stepping into your kitchen and harvesting fresh, crisp bok choy whenever you need it. This DIY project brings the garden to your table, offering a continuous supply of this nutritious and versatile vegetable.
Why is this a must-try? Because it empowers you to control the quality and freshness of your food. You know exactly what goes into your bok choy – no pesticides, no long transport times, just pure, homegrown goodness. Plus, it’s incredibly satisfying to nurture a plant from seed to harvest, especially when that harvest ends up in a delicious stir-fry or soup.
But the benefits don’t stop there. Growing bok choy indoors is a fantastic way to add a touch of green to your living space, especially during the colder months when outdoor gardening is limited. It’s a therapeutic activity that can reduce stress and connect you with nature, even in the heart of the city.
Feeling adventurous? Try experimenting with different varieties of bok choy. Baby bok choy is perfect for quick salads, while larger varieties are ideal for stir-fries and braised dishes. You can also adjust the lighting to influence the flavor – more light generally leads to a sweeter taste. Consider adding companion plants like basil or chamomile to your indoor garden to deter pests and enhance the overall growing environment. Another variation is to use hydroponics for growing your bok choy. This method can accelerate growth and reduce the risk of soilborne diseases.
Don’t be intimidated if you’re a beginner. Growing bok choy indoors is surprisingly easy, and with a little attention and care, you’ll be enjoying your own homegrown greens in no time. The key is to provide adequate light, consistent moisture, and well-draining soil.
We wholeheartedly encourage you to give this DIY trick a try. It’s a simple, cost-effective way to enjoy fresh, healthy bok choy year-round. And once you’ve experienced the joy of harvesting your own greens, you’ll never look at store-bought bok choy the same way again.
We’re eager to hear about your experiences! Share your tips, tricks, and photos in the comments below. Let’s build a community of indoor bok choy enthusiasts and inspire others to embrace the joys of homegrown vegetables. What are you waiting for? Start growing bok choy indoors today!
Frequently Asked Questions (FAQ)
1. What are the best varieties of bok choy to grow indoors?
While most bok choy varieties can be grown indoors, some are better suited for container gardening due to their size and growth habits. Baby bok choy varieties, such as ‘Shanghai Green’ or ‘Mei Qing Choi,’ are excellent choices because they mature quickly and don’t require as much space as larger varieties. These compact varieties are also less prone to bolting (going to seed prematurely) in indoor conditions. Other suitable options include ‘Joi Choi’ and ‘Win-Win Choi.’ Consider the size of your growing space and the size of the mature plant when selecting your variety.
2. How much light does bok choy need when grown indoors?
Bok choy requires a significant amount of light to thrive. Ideally, it needs at least 6 hours of direct sunlight per day. However, if you don’t have a sunny windowsill, you can supplement with artificial grow lights. Fluorescent or LED grow lights are excellent options. Position the lights a few inches above the plants and keep them on for 12-14 hours per day. Insufficient light can lead to leggy growth and reduced yields. Observe your plants closely; if they appear stretched or pale, they likely need more light.
3. What type of soil is best for growing bok choy indoors?
Bok choy prefers well-draining, fertile soil. A good potting mix specifically designed for vegetables is ideal. You can also create your own mix by combining equal parts of potting soil, compost, and perlite or vermiculite. Compost provides essential nutrients, while perlite or vermiculite improves drainage and aeration. Avoid using garden soil, as it can be too heavy and may contain pests or diseases. Ensure your containers have drainage holes to prevent waterlogging, which can lead to root rot.
4. How often should I water my indoor bok choy plants?
Watering frequency depends on several factors, including the size of the container, the type of soil, and the ambient temperature. Generally, you should water your bok choy plants when the top inch of soil feels dry to the touch. Water thoroughly until excess water drains from the bottom of the container. Avoid overwatering, as this can lead to root rot. During warmer months or in drier environments, you may need to water more frequently. Check the soil moisture regularly and adjust your watering schedule accordingly.
5. What is the ideal temperature for growing bok choy indoors?
Bok choy prefers cool temperatures, ideally between 55°F and 75°F (13°C and 24°C). Avoid exposing your plants to extreme heat or cold drafts. If your indoor environment is too warm, consider moving your plants to a cooler location or using a fan to improve air circulation. Consistent temperatures within the ideal range will promote healthy growth and prevent bolting.
6. How do I fertilize my indoor bok choy plants?
Bok choy is a relatively heavy feeder, so regular fertilization is essential for optimal growth. Use a balanced liquid fertilizer diluted to half strength every 2-3 weeks. Look for a fertilizer with an NPK ratio (nitrogen, phosphorus, potassium) of around 10-10-10 or 20-20-20. Alternatively, you can use an organic fertilizer, such as compost tea or fish emulsion. Avoid over-fertilizing, as this can lead to nutrient burn. Follow the instructions on the fertilizer label carefully.
7. How long does it take to harvest bok choy grown indoors?
The time to harvest depends on the variety of bok choy and the growing conditions. Baby bok choy varieties can typically be harvested in as little as 30-45 days, while larger varieties may take 50-60 days. You can harvest bok choy at any stage of growth, depending on your preference. For baby bok choy, harvest when the leaves are about 4-6 inches long. For larger varieties, harvest when the heads are firm and well-formed.
8. What are some common pests and diseases that affect indoor bok choy?
Common pests that can affect indoor bok choy include aphids, spider mites, and whiteflies. Regularly inspect your plants for signs of infestation, such as small insects, webbing, or sticky residue. Treat infestations with insecticidal soap or neem oil. Diseases that can affect bok choy include damping-off, root rot, and fungal leaf spots. Prevent these diseases by providing good air circulation, avoiding overwatering, and using well-draining soil. If you notice signs of disease, remove affected leaves and treat with a fungicide if necessary.
9. Can I grow bok choy indoors year-round?
Yes, you can grow bok choy indoors year-round, provided you provide adequate light, temperature, and moisture. Indoor growing allows you to control the environment and avoid the seasonal limitations of outdoor gardening. With proper care, you can enjoy a continuous supply of fresh bok choy throughout the year.
10. How do I prevent bok choy from bolting indoors?
Bolting, or premature flowering, can occur when bok choy is exposed to stress, such as high temperatures or inconsistent watering. To prevent bolting indoors, maintain a consistent temperature between 55°F and 75°F (13°C and 24°C), provide adequate and consistent moisture, and avoid exposing your plants to extreme temperature fluctuations. Choose bolt-resistant varieties if possible.
Leave a Comment