
Backyard Ginger Growing: Unlock the secrets to cultivating your own spicy treasure! Have you ever dreamed of stepping into your backyard and harvesting fresh, fragrant ginger whenever you need it? Imagine the satisfaction of adding homegrown ginger to your favorite recipes, knowing exactly where it came from and how it was grown. This isn’t just a gardening project; it’s a culinary adventure waiting to happen!
Ginger, with its vibrant flavor and numerous health benefits, has been cherished for centuries. Originating in South Asia, it has a rich history, playing a vital role in traditional medicine and cuisine across various cultures. From ancient remedies to modern-day culinary delights, ginger’s versatility is undeniable.
But why should you bother with backyard ginger growing? Well, store-bought ginger can sometimes be expensive and lack the intense flavor of freshly harvested rhizomes. Plus, growing your own allows you to control the growing conditions, ensuring a healthy and organic crop. In this article, I’m going to share some simple yet effective DIY tricks and hacks that will empower you to successfully grow ginger right in your backyard, even if you’re a complete beginner. Get ready to transform your garden into a spice haven!
Growing Ginger in Your Backyard: A DIY Guide
Hey there, fellow gardening enthusiasts! Ever thought about growing your own ginger? It’s surprisingly easy and incredibly rewarding. Imagine having fresh, flavorful ginger right at your fingertips whenever you need it for cooking, teas, or even just a little health boost. I’m going to walk you through the whole process, from choosing the right ginger to harvesting your very own crop. Let’s get started!
Choosing Your Ginger Rhizome
Before we dive into the planting process, we need to select the perfect ginger rhizome. This is essentially the “seed” of the ginger plant.
* Look for plump, healthy rhizomes: You want ginger that looks fresh and vibrant, not shriveled or dried out.
* Multiple “eyes” are key: These are the little bumps or buds on the rhizome, and they’re where the new shoots will emerge. The more eyes, the better!
* Organic is best: Opt for organic ginger if possible, as it’s less likely to have been treated with growth inhibitors.
* Avoid smooth, perfect ginger: This is often treated to prevent sprouting, which is exactly what we want!
You can usually find ginger rhizomes at your local grocery store or farmers market. Once you’ve got your ginger, let’s move on to preparing it for planting.
Preparing the Ginger for Planting
This step is crucial for giving your ginger the best possible start.
* Soaking the rhizome: Soak the ginger rhizome in lukewarm water for 12-24 hours. This rehydrates it and encourages those “eyes” to start waking up.
* Cutting the rhizome (optional): If you have a large rhizome with multiple eyes, you can cut it into smaller pieces, ensuring each piece has at least one or two eyes. This allows you to grow multiple ginger plants from a single rhizome.
* Callousing the cut pieces: If you cut the rhizome, let the cut surfaces dry and callous over for a day or two before planting. This helps prevent rot.
Planting Your Ginger
Now for the fun part! Let’s get that ginger in the ground (or pot!).
* Choosing the right location: Ginger loves warmth and partial shade. A spot that gets morning sun and afternoon shade is ideal. If you live in a colder climate, you can grow ginger in a pot and bring it indoors during the winter.
* Preparing the soil: Ginger needs well-draining soil that’s rich in organic matter. A mix of potting soil, compost, and perlite works well.
* Planting depth: Plant the ginger rhizome about 2-4 inches deep, with the “eyes” facing upwards.
* Spacing: If you’re planting multiple pieces of ginger, space them about 8-12 inches apart.
* Watering: Water the soil thoroughly after planting, but be careful not to overwater. Ginger doesn’t like soggy soil.
Step-by-Step Instructions:
1. Gather your supplies: You’ll need a ginger rhizome, a pot (if you’re growing in a container), potting soil, compost, perlite (optional), and a watering can.
2. Soak the ginger: Place the ginger rhizome in a bowl of lukewarm water and let it soak for 12-24 hours.
3. Prepare the pot (or garden bed): Fill your pot (or prepare your garden bed) with a mixture of potting soil, compost, and perlite. Make sure the soil is loose and well-draining.
4. Plant the ginger: Dig a small hole about 2-4 inches deep. Place the ginger rhizome in the hole with the “eyes” facing upwards. Cover the rhizome with soil.
5. Water gently: Water the soil gently until it’s moist but not soggy.
6. Find the perfect spot: Place the pot (or mark the location in your garden) in a warm, partially shaded area.
Caring for Your Ginger Plant
Consistent care is key to a thriving ginger plant.
* Watering: Water regularly, keeping the soil consistently moist but not waterlogged. Allow the top inch of soil to dry out between waterings.
* Fertilizing: Feed your ginger plant with a balanced liquid fertilizer every 2-3 weeks during the growing season.
* Weeding: Keep the area around your ginger plant free of weeds.
* Mulching: Mulch around the plant with organic matter, such as straw or wood chips, to help retain moisture and suppress weeds.
* Temperature: Ginger thrives in warm temperatures (70-90°F). Protect your plant from frost and cold temperatures. If you’re growing in a pot, bring it indoors when temperatures drop below 50°F.
Dealing with Pests and Diseases
Ginger is generally pest-resistant, but it can be susceptible to a few problems.
* Root rot: This is the most common problem, and it’s usually caused by overwatering. Make sure your soil is well-draining and avoid letting the soil stay soggy.
* Spider mites: These tiny pests can suck the sap from the leaves. If you see signs of spider mites (fine webbing on the leaves), spray the plant with insecticidal soap.
* Aphids: These small, soft-bodied insects can also damage the leaves. You can control aphids with insecticidal soap or by handpicking them off the plant.
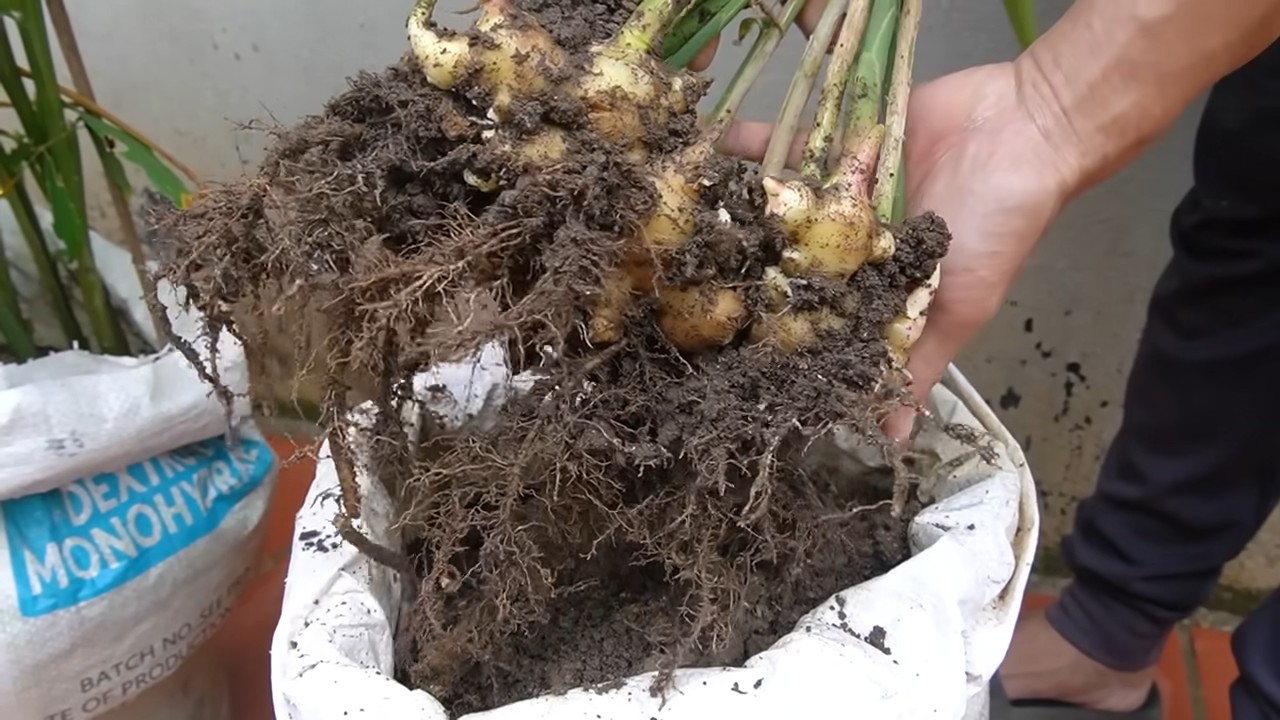
Harvesting Your Ginger
The moment we’ve all been waiting for! Harvesting your own homegrown ginger is incredibly satisfying.
* When to harvest: You can start harvesting ginger about 8-10 months after planting. The leaves will start to turn yellow and die back when the ginger is ready to harvest.
* How to harvest: Gently dig around the plant and lift the rhizomes out of the soil.
* Harvesting a little at a time: You don’t have to harvest the entire plant at once. You can dig up a few rhizomes as needed and leave the rest to continue growing.
* Storing your ginger: Freshly harvested ginger can be stored in the refrigerator for several weeks. You can also freeze it for longer storage.
Step-by-Step Harvesting Instructions:
1. Wait for the leaves to yellow: This is a sign that the ginger is mature and ready to harvest.
2. Loosen the soil: Use a garden fork or trowel to gently loosen the soil around the ginger plant.
3. Carefully lift the rhizomes: Gently lift the rhizomes out of the soil, being careful not to damage them.
4. Clean the ginger: Brush off any excess soil from the rhizomes.
5. Store or use immediately: You can use the ginger immediately or store it in the refrigerator or freezer.
Propagating Ginger
Want even more ginger? Propagating is easy!
* Dividing the rhizomes: When you harvest your ginger, you can divide the rhizomes into smaller pieces, ensuring each piece has at least one or two eyes.
* Replanting: Plant the divided rhizomes in fresh soil, following the same planting instructions as before.
Troubleshooting
Even with the best care, sometimes things don’t go as planned. Here are a few common problems and how to fix them:
* Yellowing leaves: This can be caused by overwatering, underwatering, nutrient deficiencies, or pests. Check the soil moisture and adjust your watering accordingly. Fertilize the plant with a balanced liquid fertilizer. Inspect the plant for pests and treat as needed.
* Slow growth: This can be caused by insufficient sunlight, cold temperatures, or poor soil. Move the plant to a sunnier location (if possible). Make sure the plant is warm enough. Amend the soil with compost to improve its fertility.
* Rotting rhizomes: This is usually caused by overwatering. Make sure the soil is well-draining and avoid letting the soil stay soggy. If you see signs of rot, remove the affected rhizomes and replant the healthy ones in fresh soil.
Enjoying Your Homegrown Ginger
Now that you’ve successfully grown your own ginger, it’s time to enjoy the fruits (or rather, rhizomes!) of your labor.
* Cooking: Fresh ginger adds a wonderful flavor to stir-fries, soups, curries, and other dishes.
* Tea: Ginger tea is a soothing and warming beverage that’s perfect for cold days.
* Juicing: Add a small piece of ginger to your juices for a spicy kick and a health boost.
* Baking: Ginger can be used in cookies, cakes, and other baked goods.
Growing ginger in your backyard is a fun and rewarding experience. With a little bit of care and attention, you can enjoy fresh, flavorful ginger all year round. Happy gardening

Conclusion
So, there you have it! Growing your own ginger in your backyard isn’t just a fun project; it’s a gateway to fresher, more flavorful ginger than you can ever find at the grocery store. Imagine the vibrant aroma filling your kitchen as you grate freshly harvested ginger into your stir-fries, teas, and baked goods. The difference in taste is truly remarkable – a zesty, spicy kick that store-bought ginger simply can’t match.
This simple DIY trick transforms your backyard into a sustainable source of this incredible spice. You’re not only saving money but also reducing your carbon footprint by cutting down on transportation and packaging. Plus, you have complete control over the growing process, ensuring your ginger is free from harmful pesticides and chemicals.
But the benefits don’t stop there. Growing ginger is surprisingly therapeutic. The act of nurturing a plant, watching it grow, and eventually harvesting its bounty is incredibly rewarding. It’s a fantastic way to connect with nature, de-stress, and add a touch of green to your outdoor space.
Don’t be afraid to experiment with different varieties of ginger. Some are spicier, some are sweeter, and some have unique citrusy notes. Try sourcing ginger rhizomes from different regions to discover your favorite flavor profile. You can also adjust the growing conditions to influence the taste and texture of your ginger. For example, providing more shade can result in a milder flavor, while increasing sunlight can intensify the spice.
Consider companion planting to further enhance your ginger’s growth and flavor. Plants like marigolds and basil can help deter pests and attract beneficial insects. You can also add organic matter to the soil to improve drainage and nutrient availability.
And if you’re feeling adventurous, why not try growing ginger in containers? This is a great option for those with limited backyard space or who live in colder climates. You can easily move the containers indoors during the winter months to protect your ginger from frost.
We wholeheartedly encourage you to give this DIY trick a try. It’s easier than you might think, and the rewards are well worth the effort. Imagine the satisfaction of serving a dish seasoned with ginger you grew yourself. It’s a conversation starter, a source of pride, and a testament to your green thumb.
Once you’ve harvested your first batch of homegrown ginger, we’d love to hear about your experience. Share your tips, tricks, and photos on social media using #BackyardGingerGrowing. Let’s create a community of ginger enthusiasts and inspire others to embrace the joys of growing their own food. So, grab some ginger rhizomes, get your hands dirty, and embark on this exciting culinary adventure. You won’t regret it!
Frequently Asked Questions (FAQ)
What kind of ginger should I plant?
The most common type of ginger to grow is *Zingiber officinale*, the culinary ginger you find in most grocery stores. However, you can also explore other varieties like galangal (also known as Thai ginger) or turmeric, which are related and have similar growing requirements. Look for organic ginger rhizomes at your local nursery or online to ensure they haven’t been treated with growth inhibitors. Avoid using ginger from the grocery store if possible, as it may have been treated to prevent sprouting.
How long does it take to grow ginger?
Ginger typically takes around 8-10 months to mature from planting to harvest. You’ll know it’s ready when the leaves start to turn yellow and die back. However, you can harvest small pieces of ginger throughout the growing season as needed. Just be careful not to disturb the entire plant.
What are the best growing conditions for ginger?
Ginger thrives in warm, humid conditions with partial shade. It prefers well-draining soil that is rich in organic matter. The ideal temperature range for growing ginger is between 68°F and 86°F (20°C and 30°C). Avoid planting ginger in direct sunlight, as this can scorch the leaves.
How do I prepare the soil for planting ginger?
Before planting, amend the soil with plenty of compost or well-rotted manure. This will improve drainage, add nutrients, and help retain moisture. Ginger prefers slightly acidic soil with a pH between 6.0 and 6.5. You can test your soil pH using a soil testing kit and adjust it accordingly.
How do I plant ginger rhizomes?
Cut the ginger rhizome into pieces, ensuring each piece has at least one “eye” or bud. Allow the cut pieces to dry for a day or two to prevent rotting. Plant the rhizomes about 2-4 inches deep and 8-12 inches apart. Water thoroughly after planting.
How often should I water ginger?
Ginger needs consistent moisture, but it doesn’t like to be waterlogged. Water deeply whenever the top inch of soil feels dry to the touch. During hot, dry weather, you may need to water more frequently. Avoid overwatering, as this can lead to root rot.
What kind of fertilizer should I use for ginger?
Feed your ginger plants with a balanced organic fertilizer every 4-6 weeks during the growing season. Look for a fertilizer that is high in phosphorus, which promotes root growth. You can also use compost tea or liquid seaweed extract to provide additional nutrients.
Are there any pests or diseases that affect ginger?
Ginger is relatively pest-resistant, but it can be susceptible to certain problems like aphids, spider mites, and root rot. Inspect your plants regularly for signs of infestation or disease. Treat any problems promptly with organic pest control methods or fungicides. Good air circulation and proper drainage can help prevent many common ginger problems.
Can I grow ginger indoors?
Yes, you can grow ginger indoors, especially if you live in a colder climate. Choose a large pot with drainage holes and fill it with well-draining potting mix. Place the pot in a warm, sunny location, such as a south-facing window. Water regularly and fertilize every 4-6 weeks. You may need to supplement with artificial light during the winter months.
How do I harvest ginger?
When the leaves start to turn yellow and die back, it’s time to harvest your ginger. Gently dig up the rhizomes, being careful not to damage them. Wash off any dirt and let them dry for a few days before storing. You can store fresh ginger in the refrigerator for several weeks or in the freezer for several months.
What are some ways to use homegrown ginger?
The possibilities are endless! Use fresh ginger in stir-fries, soups, stews, teas, and baked goods. You can also pickle it, candy it, or make ginger syrup. Freshly grated ginger adds a zesty kick to smoothies and juices. Experiment with different recipes and discover your favorite ways to enjoy your homegrown ginger.
Is growing ginger organically difficult?
Not at all! In fact, growing ginger organically is quite straightforward. By focusing on healthy soil, proper watering, and natural pest control methods, you can easily cultivate a thriving ginger patch without the use of harmful chemicals. The key is to create a balanced ecosystem in your backyard that supports healthy plant growth.
What if my ginger doesn’t sprout?
Patience is key! Sometimes ginger can take a while to sprout. Ensure the soil is consistently moist but not waterlogged, and that the temperature is warm enough. If after several weeks you see no signs of growth, gently dig up a rhizome to check for rot. If it’s healthy, replant it and continue to monitor. If it’s rotting, try a new rhizome in a different location.
Can I grow ginger in a raised bed?
Absolutely! Raised beds are an excellent option for growing ginger, as they provide good drainage and allow you to control the soil composition. Fill the raised bed with a mixture of compost, topsoil, and perlite to create a well-draining and nutrient-rich growing medium.
What is the best time of year to plant ginger?
The best time to plant ginger is in the early spring, after the last frost. This gives the ginger plenty of time to grow and mature during the warm summer months. If you live in a colder climate, you can start your ginger indoors a few weeks before the last frost and then transplant it outdoors once the weather warms up.
Leave a Comment