
Hanging Melon Growing Shortcut: Imagine biting into a juicy, sun-ripened melon that you grew yourself, not in a sprawling field, but right in your own backyard, balcony, or even patio! Sounds impossible? Not with this clever DIY trick! For centuries, gardeners have toiled to provide the perfect conditions for these sprawling vines, often dedicating significant space and resources. But what if I told you there’s a way to bypass the space constraints and potential ground pests, and still enjoy the sweet reward of homegrown melons?
This hanging melon growing shortcut isn’t just about convenience; it’s about accessibility. Many of us dream of fresh, organic produce but are limited by our living situations. This method opens up the possibility of melon cultivation to apartment dwellers, urban gardeners, and anyone with limited ground space. Plus, it’s a fantastic conversation starter! Think of the envy of your neighbors as they admire your suspended, fruit-laden vines.
This DIY guide will walk you through a simple, cost-effective method to support your melons as they grow, preventing them from rotting on the ground and maximizing their exposure to sunlight. We’ll cover everything from choosing the right melon variety to crafting the perfect support system. So, ditch the store-bought melons and get ready to experience the unparalleled flavor of homegrown goodness. Let’s get started on your hanging melon adventure!
DIY: Hängende Melonen – So sparst du Platz und erntest reiche Früchte!
Ich liebe Melonen, aber mein Garten ist nicht der größte. Deshalb habe ich mich nach einer platzsparenden Lösung umgesehen und bin auf die Idee gekommen, Melonen hängend anzubauen! Es klingt vielleicht verrückt, aber es funktioniert wirklich gut und sieht auch noch toll aus. Hier zeige ich dir, wie du das auch ganz einfach hinbekommst.
Warum Melonen hängend anbauen?
* Platzersparnis: Perfekt für kleine Gärten, Balkone oder Terrassen.
* Bessere Belüftung: Reduziert das Risiko von Pilzkrankheiten.
* Schutz vor Schädlingen: Schnecken und andere Bodenschädlinge haben es schwerer, an die Früchte zu kommen.
* Einfachere Ernte: Die Melonen hängen frei und sind leicht zu erreichen.
* Dekorativ: Hängende Melonen sind ein echter Hingucker!
Was du brauchst:
* Melonenpflanzen: Am besten eignen sich kleinere Melonensorten wie Zuckermelonen oder Mini-Wassermelonen. Ich habe ‘Sugar Baby’ Wassermelonen verwendet, die sind handlich und schmecken super.
* Stabile Hängekörbe oder Pflanzgefäße: Achte darauf, dass sie groß genug sind (mindestens 30 cm Durchmesser) und gute Drainagelöcher haben.
* Hochwertige Blumenerde: Eine Mischung aus Blumenerde, Kompost und etwas Sand ist ideal.
* Kokosfaser oder Jute: Zum Auskleiden der Körbe.
* Stabile Aufhängung: Ketten, Seile oder Haken, die das Gewicht der Körbe und der Melonen tragen können.
* Stützmaterial: Alte T-Shirts, Stoffreste oder spezielle Melonenhängematten. Das ist wichtig, um die wachsenden Melonen zu stützen.
* Dünger: Ein Langzeitdünger oder Flüssigdünger für Gemüse.
* Gießkanne oder Schlauch: Zum Bewässern.
* Schere oder Messer: Zum Beschneiden der Pflanzen.
* Geduld: Melonen brauchen Zeit zum Wachsen!
Vorbereitung der Hängekörbe
1. Korb auskleiden: Zuerst kleide ich die Hängekörbe mit Kokosfaser oder Jute aus. Das verhindert, dass die Erde herausfällt und hält die Feuchtigkeit besser im Korb. Schneide die Kokosfaser oder Jute so zu, dass sie den gesamten Korb bedeckt und etwas über den Rand hinausragt.
2. Erde einfüllen: Fülle die Körbe mit der Blumenerde-Mischung. Lass oben etwa 5 cm Platz, damit du beim Gießen nicht alles überschwemmst. Drücke die Erde leicht an.
3. Dünger hinzufügen: Mische einen Langzeitdünger unter die Erde oder gib später Flüssigdünger hinzu. Melonen sind Starkzehrer und brauchen ausreichend Nährstoffe.
Pflanzen der Melonen
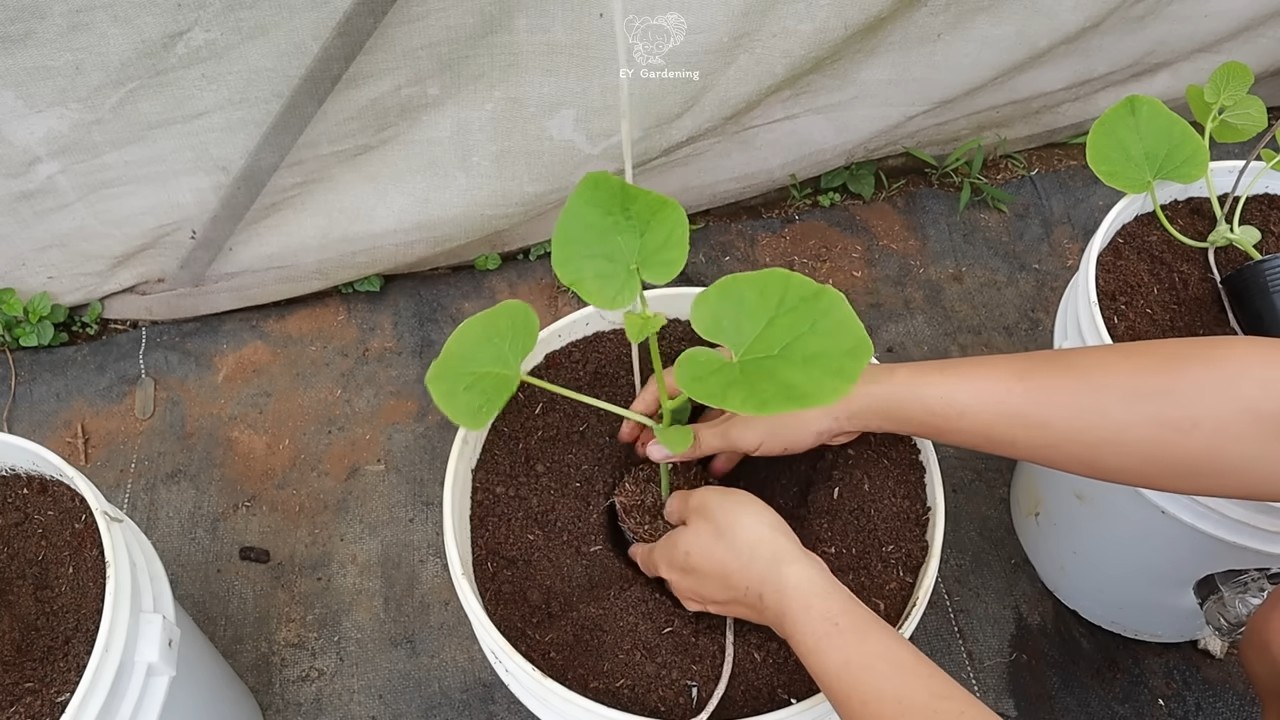
1. Pflanzen vorbereiten: Nimm die Melonenpflanzen vorsichtig aus ihren Töpfen. Lockere die Wurzeln etwas auf, damit sie besser anwachsen können.
2. Einpflanzen: Setze die Pflanzen in die vorbereiteten Körbe. Achte darauf, dass der Wurzelballen vollständig mit Erde bedeckt ist.
3. Angießen: Gieße die Pflanzen gründlich an. Das hilft ihnen, sich im neuen Zuhause zu etablieren.
Aufhängen der Körbe
1. Standort wählen: Wähle einen sonnigen Standort für die Hängekörbe. Melonen brauchen mindestens 6-8 Stunden Sonne pro Tag.
2. Aufhängung anbringen: Befestige die Aufhängung (Ketten, Seile oder Haken) an einem stabilen Balken, einer Pergola oder einem anderen geeigneten Ort. Achte darauf, dass die Aufhängung das Gewicht der Körbe und der Melonen tragen kann.
3. Körbe aufhängen: Hänge die Körbe vorsichtig an die Aufhängung. Stelle sicher, dass sie sicher befestigt sind und nicht herunterfallen können.
Pflege der hängenden Melonen
1. Bewässerung: Gieße die Melonen regelmäßig, besonders an heißen Tagen. Die Erde sollte immer leicht feucht sein, aber nicht nass. Vermeide Staunässe, da dies zu Wurzelfäule führen kann. Ich prüfe die Feuchtigkeit immer mit dem Finger.
2. Düngung: Dünge die Melonen alle zwei Wochen mit einem Flüssigdünger für Gemüse. Das fördert das Wachstum und die Fruchtbildung.
3. Beschneiden: Beschneide die Melonenpflanzen regelmäßig, um das Wachstum zu fördern und die Fruchtbildung anzuregen. Entferne überflüssige Triebe und Blätter.
4. Bestäubung: Melonen sind auf Bestäubung angewiesen, um Früchte zu bilden. Wenn du keine Bienen oder andere Bestäuber in deinem Garten hast, kannst du die Blüten von Hand bestäuben. Übertrage dazu mit einem Pinsel Pollen von den männlichen auf die weiblichen Blüten. Die weiblichen Blüten erkennst du an dem kleinen Fruchtansatz direkt unter der Blüte.
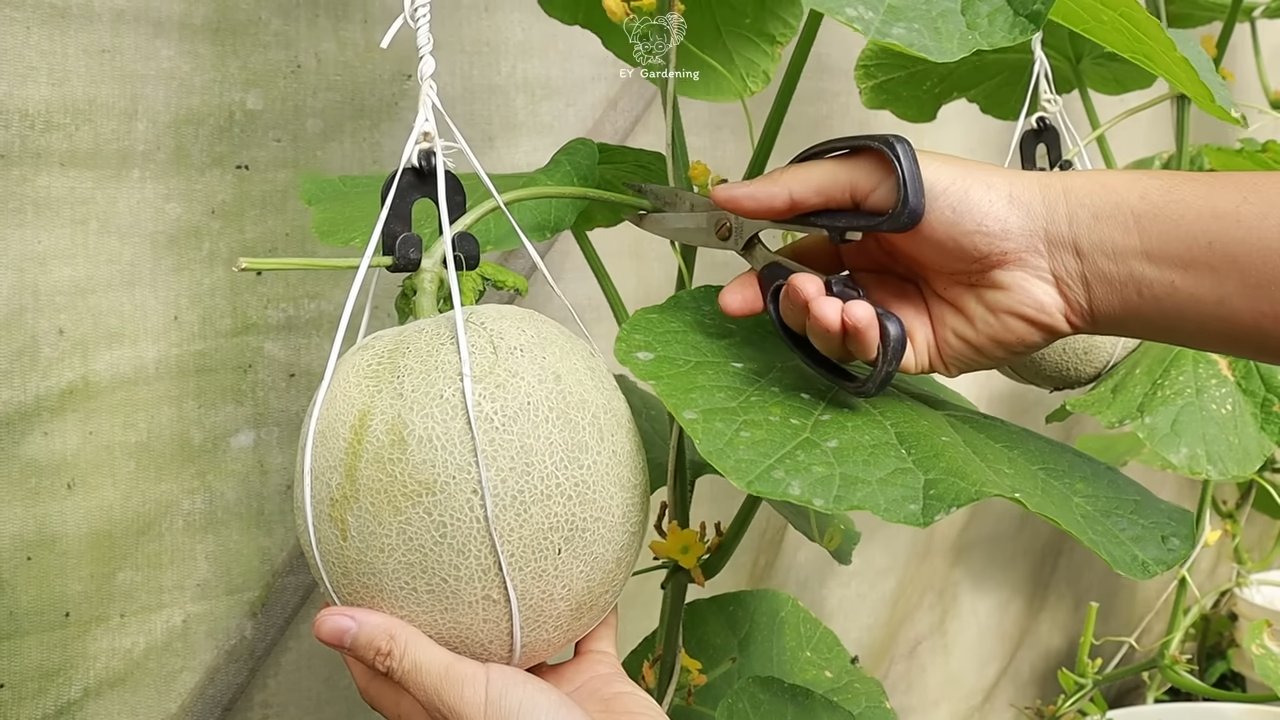
5. Stützung der Früchte: Das ist der wichtigste Schritt! Wenn die Melonen wachsen, werden sie schwer und brauchen Unterstützung. Hier kommen die alten T-Shirts, Stoffreste oder speziellen Melonenhängematten ins Spiel.
* Stoff-Hängematten basteln: Schneide aus alten T-Shirts oder Stoffresten kleine Hängematten zu. Sie sollten groß genug sein, um die Melonen zu stützen, aber nicht zu groß, um die Luftzirkulation zu behindern.
* Hängematten befestigen: Befestige die Hängematten unter den wachsenden Melonen. Du kannst sie mit Schnüren oder Kabelbindern an den Korbaufhängungen befestigen. Achte darauf, dass die Hängematten stabil sind und das Gewicht der Melonen tragen können.
* Regelmäßige Kontrolle: Überprüfe die Hängematten regelmäßig und passe sie an, wenn die Melonen größer werden.
Erntezeit!
1. Reife erkennen: Die Reife einer Melone erkennst du an verschiedenen Faktoren:
* Farbe: Die Farbe der Schale verändert sich. Bei Wassermelonen wird sie matter, bei Zuckermelonen gelblicher.
* Klang: Klopfe leicht auf die Melone. Eine reife Melone klingt dumpf und hohl.
* Stiel: Der Stiel, der die Melone mit der Pflanze verbindet, wird trocken und rissig.
* Duft: Reife Zuckermelonen duften oft süßlich.
2. Ernten: Schneide die reifen Melonen vorsichtig mit einem scharfen Messer oder einer Schere vom Stiel ab.
3. Genießen: Lass dir die selbst angebauten Melonen schmecken! Sie sind ein wahrer Genuss.
Zusätzliche Tipps
* Sortenwahl: Wähle Melonen-Sorten, die für den Anbau in Hängekörben geeignet sind. Kleinere Sorten sind besser geeignet als große Wassermelonen.
* Schädlinge und Krankheiten: Achte auf Schädlinge und Krankheiten. Bei Bedarf kannst du biologische Schädlingsbekämpfungsmittel einsetzen.
* Windschutz: Wenn dein Standort sehr windig ist, solltest du die Hängekörbe vor Wind schützen.
* Geduld: Melonen brauchen Zeit zum Wachsen. Sei geduldig und gib nicht auf!
Ich hoffe, diese Anleitung hilft dir dabei, deine eigenen hängenden Melonen anzubauen. Es ist ein tolles Projekt, das Spaß macht und mit leckeren Früchten belohnt wird. Viel Erfolg!
Conclusion
So, there you have it! This simple yet ingenious hanging melon growing shortcut is more than just a gardening hack; it’s a game-changer for anyone looking to maximize their yield, protect their precious melons from pests and ground rot, and add a touch of vertical elegance to their garden. We’ve walked you through the process, highlighting the benefits and offering practical tips to ensure your success.
Why is this a must-try? Because it addresses several common challenges faced by melon growers. Ground contact often leads to rot, especially in humid climates. Pests like squash bugs and vine borers have easier access to melons resting on the soil. And let’s not forget the space-saving aspect – hanging your melons allows you to cultivate more plants in a smaller area, making it ideal for urban gardeners or those with limited space.
But the beauty of this method lies in its adaptability. Feel free to experiment with different materials for your slings. Old t-shirts, burlap sacks, or even repurposed netting can all work wonders. Consider the size and weight of your melon variety when choosing your support system. Smaller melons like cantaloupes or personal-sized watermelons will require less robust support than larger varieties.
Variations and Enhancements
Don’t be afraid to get creative! You can even incorporate this technique into a vertical gardening system, creating a stunning display of hanging melons cascading down a trellis or wall. Think about adding decorative elements to your slings, such as colorful ribbons or painted designs, to enhance the visual appeal of your garden.
Another variation involves adjusting the height of the hanging melons. Experiment with different heights to see what works best for your specific melon variety and growing conditions. Some gardeners find that raising the melons slightly off the ground improves air circulation and reduces the risk of fungal diseases.
We’ve also found that providing extra support to the vine itself, especially as the melons grow larger, can be beneficial. Use soft ties or clips to secure the vine to a trellis or stake, preventing it from snapping under the weight of the fruit.
Ultimately, the key to success with this hanging melon growing shortcut is observation and adaptation. Pay close attention to your plants, monitor their growth, and adjust your techniques as needed.
We are confident that this method will revolutionize your melon-growing experience. It’s a simple, effective, and rewarding way to cultivate delicious, healthy melons while adding a unique touch to your garden.
Now, it’s your turn! We encourage you to try this hanging melon growing shortcut and share your experiences with us. Post photos of your hanging melons on social media using #HangingMelonMagic and tag us so we can see your amazing results. We can’t wait to see what you create! Your insights and feedback will help other gardeners discover the joys of this innovative technique. Happy gardening!
Frequently Asked Questions (FAQ)
Q: What types of melons are best suited for hanging?
A: While this method works well for many melon varieties, smaller to medium-sized melons like cantaloupes, honeydews, and personal-sized watermelons are generally the easiest to manage. Larger watermelon varieties can also be grown using this method, but they require a more robust support system. Consider the mature weight of your chosen variety when selecting your sling material and support structure.
Q: What materials can I use to make the slings?
A: The beauty of this method is its versatility. You can use a variety of materials for your slings, including old t-shirts, burlap sacks, netting, pantyhose, or even commercially available plant hangers. The key is to choose a material that is strong enough to support the weight of the melon and breathable enough to allow for air circulation. Avoid using materials that are too tightly woven, as this can trap moisture and increase the risk of rot.
Q: How high off the ground should I hang the melons?
A: The ideal height depends on the size of your melons and your personal preference. Generally, hanging the melons 6-12 inches off the ground is sufficient to prevent ground contact and improve air circulation. However, you may need to adjust the height as the melons grow larger. Make sure the melons are hanging freely and not rubbing against any surfaces, as this can cause damage.
Q: How do I know when the melons are ripe if they are hanging?
A: Determining ripeness in hanging melons is similar to determining ripeness in ground-grown melons. Look for the following signs:
* Color change: The skin of the melon should change color as it ripens. For example, cantaloupes will turn from green to tan, and watermelons will develop a dull sheen.
* Stem separation: The stem should begin to separate easily from the vine when the melon is ripe.
* Sound: Thumping the melon should produce a hollow sound when it is ripe.
* Aroma: Ripe melons often have a sweet, fragrant aroma.
Q: What if the sling starts to sag or break?
A: Regularly inspect your slings for signs of wear and tear. If you notice any sagging or fraying, reinforce the sling with additional material or replace it altogether. You can also add extra support by tying the sling to a nearby trellis or stake.
Q: Will hanging the melons affect their taste or texture?
A: No, hanging the melons should not negatively affect their taste or texture. In fact, many gardeners believe that hanging melons actually improves their flavor by allowing for better air circulation and sun exposure.
Q: Can I use this method for other types of fruits and vegetables?
A: While this method is primarily designed for melons, it can also be adapted for other types of fruits and vegetables, such as pumpkins, squash, and even tomatoes. Just be sure to choose a support system that is appropriate for the size and weight of the fruit or vegetable you are growing.
Q: What about watering and fertilizing? Do I need to adjust my routine?
A: Your watering and fertilizing routine should remain largely the same. Ensure the soil around the base of the plant stays consistently moist, but not waterlogged. Fertilize according to the needs of your specific melon variety. You might consider a slightly diluted foliar feeding directly to the leaves, especially as the melons are developing, to provide an extra boost of nutrients.
Q: What if I live in a windy area? Will the melons be damaged?
A: If you live in a windy area, it’s important to provide extra support to the vines and melons. You can use soft ties or clips to secure the vines to a trellis or stake, preventing them from being blown around. You can also create a windbreak using shade cloth or other materials. Consider the placement of your melon plants, choosing a location that is sheltered from the strongest winds.
Q: Is this method suitable for all climates?
A: This method is generally suitable for most climates, but it is particularly beneficial in humid climates where ground rot is a common problem. In colder climates, you may need to start your melon plants indoors and transplant them outdoors after the last frost. In very hot climates, you may need to provide shade to protect the melons from sunburn.
Q: Can I use this method in a container garden?
A: Yes, this method can be used in a container garden, but you will need to choose a large, sturdy container that can support the weight of the melon plant and the hanging melons. Make sure the container has good drainage to prevent waterlogging.
Q: What are the benefits of using this hanging melon growing shortcut compared to traditional ground growing?
A: The benefits are numerous:
* Reduced risk of ground rot: Hanging the melons prevents them from coming into contact with the soil, reducing the risk of rot and fungal diseases.
* Pest control: Hanging the melons makes it more difficult for pests to access them.
* Space saving: Hanging the melons allows you to grow more plants in a smaller area.
* Improved air circulation: Hanging the melons improves air circulation around the fruit, which can help to prevent diseases and improve flavor.
* Easier harvesting: Hanging the melons makes it easier to harvest them when they are ripe.
* Aesthetic appeal: Hanging melons add a unique and beautiful touch to your garden.
We hope these FAQs have answered your questions about the hanging melon growing shortcut. Remember to experiment, adapt, and most importantly, have fun! Happy growing!


Leave a Comment