
Growing peanuts at home might sound like a whimsical dream relegated to sprawling farms, but I’m here to tell you it’s an achievable and incredibly rewarding DIY project, even in a small garden or container! Forget trekking to the store for a bag of roasted peanuts; imagine the satisfaction of harvesting your own homegrown bounty.
Peanuts, also known as groundnuts, have a fascinating history, dating back thousands of years in South America. They weren’t just a snack; they were a vital source of protein and oil. Their journey across continents speaks to their resilience and adaptability, qualities that make them surprisingly well-suited to home gardens.
Why should you try this DIY trick? Well, for starters, the taste of freshly harvested, homegrown peanuts is simply unparalleled. But beyond the flavor, growing peanuts at home offers a unique connection to your food. You’ll witness the entire life cycle, from planting the seed to digging up the treasure beneath the soil. Plus, it’s a fantastic educational experience for kids (and adults!), teaching them about plant growth and where their food comes from. In this article, I’ll guide you through every step, from selecting the right variety to harvesting your peanut crop, ensuring you have a successful and delicious experience. Let’s get growing!
Erdnüsse zu Hause anbauen: Dein DIY-Leitfaden für eine erfolgreiche Ernte
Hallo liebe Gartenfreunde! Habt ihr euch jemals gefragt, ob man Erdnüsse auch im eigenen Garten oder sogar im Topf anbauen kann? Die Antwort ist: Ja, absolut! Es ist ein überraschend lohnendes Projekt, das nicht nur Spaß macht, sondern euch auch mit frischen, selbst angebauten Erdnüssen belohnt. Ich zeige euch, wie es geht!
Was du für den Erdnussanbau brauchst
Bevor wir loslegen, hier eine Liste der Dinge, die du benötigst:
* Erdnusskerne: Rohe, ungesalzene Erdnusskerne (am besten aus dem Bioladen oder Gartencenter). Geröstete Erdnüsse keimen nicht!
* Töpfe oder Beet: Große Töpfe (mindestens 30 cm Durchmesser und Tiefe) oder ein sonniges Beet mit lockerem, gut durchlässigem Boden.
* Erde: Hochwertige Blumenerde oder eine Mischung aus Gartenerde, Kompost und Sand.
* Dünger: Organischer Dünger wie Kompost oder Hornspäne.
* Gießkanne: Zum regelmäßigen Gießen.
* Geduld: Erdnüsse brauchen Zeit, um zu wachsen!
Schritt-für-Schritt-Anleitung zum Erdnussanbau
Hier ist eine detaillierte Anleitung, die dir hilft, deine eigenen Erdnüsse anzubauen:
1. Die Vorbereitung: Erdnüsse vorkeimen lassen
Dieser Schritt ist optional, aber er beschleunigt den Keimprozess und erhöht die Erfolgsrate.
1. Erdnüsse einweichen: Lege die Erdnusskerne für 24 Stunden in lauwarmes Wasser. Das Wasser hilft, die harte Schale aufzuweichen und den Keimprozess zu starten.
2. Keimung im feuchten Tuch: Wickle die eingeweichten Erdnüsse in ein feuchtes Papiertuch oder Küchenrolle. Lege das Tuch in einen Plastikbeutel oder eine Frischhaltebox und verschließe es.
3. Warm und dunkel lagern: Stelle den Beutel oder die Box an einen warmen, dunklen Ort (z.B. in einen Schrank oder eine Schublade).
4. Regelmäßig kontrollieren: Überprüfe die Erdnüsse täglich und befeuchte das Tuch bei Bedarf. Nach einigen Tagen sollten kleine Wurzeln sichtbar werden.
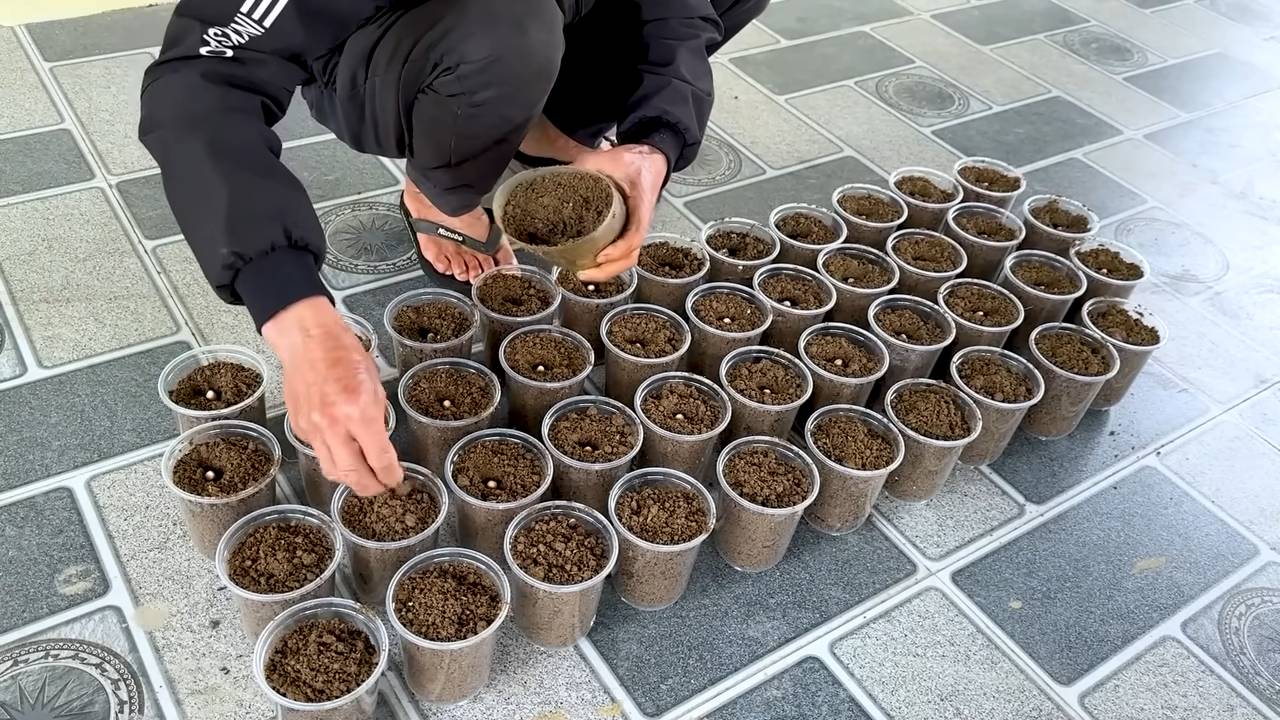
2. Die Aussaat: Erdnüsse in Töpfe oder ins Beet pflanzen
Sobald die Erdnüsse gekeimt sind (oder du dich entscheidest, sie direkt auszusäen), ist es Zeit, sie einzupflanzen.
1. Töpfe oder Beet vorbereiten: Fülle die Töpfe mit Erde oder lockere den Boden im Beet auf. Achte darauf, dass der Boden gut durchlässig ist, damit sich keine Staunässe bildet.
2. Erdnüsse pflanzen: Pflanze die Erdnüsse etwa 5 cm tief in die Erde. Wenn du mehrere Erdnüsse pflanzt, halte einen Abstand von etwa 15-20 cm zwischen den Pflanzen ein.
3. Angießen: Gieße die Erde nach dem Pflanzen gründlich an.
3. Die Pflege: Erdnüsse richtig gießen und düngen
Erdnüsse sind relativ pflegeleicht, aber regelmäßiges Gießen und Düngen sind wichtig für eine gute Ernte.
1. Regelmäßig gießen: Gieße die Erdnusspflanzen regelmäßig, besonders während trockener Perioden. Der Boden sollte immer leicht feucht sein, aber nicht nass.
2. Düngen: Dünge die Erdnusspflanzen alle paar Wochen mit organischem Dünger wie Kompost oder Hornspänen. Vermeide stickstoffhaltige Dünger, da diese das Wachstum der Blätter fördern, aber die Erdnussbildung behindern können.
3. Häufeln: Sobald die Pflanzen etwa 15-20 cm hoch sind, häufle Erde um die Basis der Pflanzen an. Dies fördert die Bildung von Seitentrieben, an denen sich die Erdnüsse entwickeln.
4. Die Blüte und Fruchtbildung: Ein faszinierender Prozess
Die Blüte und Fruchtbildung der Erdnusspflanze ist ein wirklich faszinierender Prozess.
1. Die Blüte: Erdnusspflanzen bilden kleine, gelbe Blüten. Diese Blüten sind selbstbestäubend, das heißt, sie benötigen keine Insekten zur Bestäubung.
2. Die Fruchtbildung: Nach der Bestäubung welken die Blüten und bilden sogenannte “Pegs”. Diese Pegs sind Stiele, die in den Boden wachsen und dort die Erdnüsse bilden.
3. Bodenkontakt: Es ist wichtig, dass die Pegs ungehindert in den Boden eindringen können. Halte den Boden daher locker und frei von Steinen oder anderen Hindernissen.
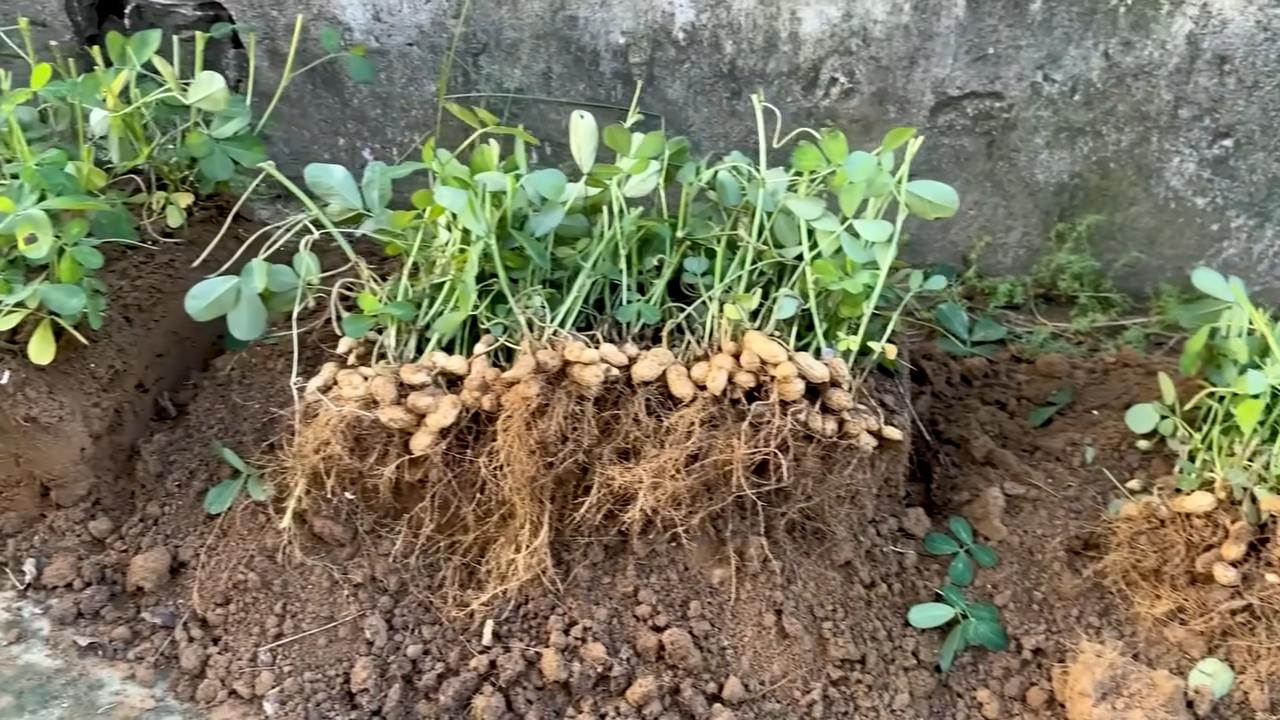
5. Die Ernte: Der Lohn deiner Mühe
Die Erntezeit ist der aufregendste Teil des Erdnussanbaus!
1. Erntezeitpunkt: Erdnüsse sind erntereif, wenn die Blätter der Pflanze gelb werden und absterben. Dies ist in der Regel etwa 4-5 Monate nach der Aussaat der Fall.
2. Pflanzen ausgraben: Grabe die Erdnusspflanzen vorsichtig aus. Schüttle die Erde ab und entferne die Erdnüsse von den Wurzeln.
3. Erdnüsse trocknen: Lege die Erdnüsse zum Trocknen an einen warmen, trockenen Ort. Dies kann einige Tage bis Wochen dauern. Die Erdnüsse sind trocken, wenn die Schalen hart und brüchig sind.
Zusätzliche Tipps und Tricks für den erfolgreichen Erdnussanbau
Hier sind noch ein paar zusätzliche Tipps, die dir helfen können, eine reiche Ernte zu erzielen:
* Sonniger Standort: Erdnüsse lieben die Sonne! Wähle einen sonnigen Standort für deine Pflanzen.
* Gute Drainage: Achte darauf, dass der Boden gut durchlässig ist, um Staunässe zu vermeiden.
* Schutz vor Schädlingen: Erdnusspflanzen können von Schädlingen wie Schnecken oder Blattläusen befallen werden. Kontrolliere deine Pflanzen regelmäßig und bekämpfe Schädlinge bei Bedarf mit natürlichen Mitteln.
* Sortenwahl: Es gibt verschiedene Erdnusssorten. Informiere dich über die verschiedenen Sorten und wähle eine Sorte, die für dein Klima geeignet ist.
* Geduld haben: Erdnüsse brauchen Zeit, um zu wachsen. Sei geduldig und lass dich nicht entmutigen, wenn es nicht sofort klappt.
Häufige Probleme und Lösungen beim Erdnussanbau
Auch beim Erdnussanbau können Probleme auftreten. Hier sind einige häufige Probleme und ihre Lösungen:
* Keine Keimung: Wenn die Erdnüsse nicht keimen, kann das verschiedene Ursachen haben. Möglicherweise sind die Erdnüsse zu alt oder wurden falsch gelagert. Achte darauf, frische, ungesalzene Erdnüsse zu verwenden und sie richtig zu lagern.
* Gelbe Blätter: Gelbe Blätter können ein Zeichen für Nährstoffmangel sein. Dünge die Pflanzen mit einem organischen Dünger.
* Schädlinge: Bekämpfe Schädlinge mit natürlichen Mitteln wie Neemöl oder Schmierseifenlösung.
* Staunässe: Staunässe kann zu Wurzelfäule führen. Achte auf eine gute Drainage und gieße die Pflanzen nicht zu viel.
Erdnüsse im Topf anbauen: Eine tolle Option für Balkon und Terrasse
Wenn du keinen Garten hast, kannst du Erdnüsse auch problemlos im Topf anbauen.
1. Große Töpfe verwenden: Verwende große Töpfe mit einem Durchmesser von mindestens 30 cm und einer Tiefe von mindestens 30 cm.
2. Gute Erde verwenden: Verwende hochwertige Blumenerde oder eine Mischung aus Gartenerde, Kompost und Sand.
3. Regelmäßig gießen und düngen: Gieße und dünge die Pflanzen regelmäßig.
4. Sonniger Standort: Stelle die Töpfe an einen sonnigen Standort.
Fazit: Erdnüsse selbst anbauen ist ein tolles Erlebnis!
Ich hoffe, dieser Leitfaden hat dir geholfen, deine eigenen Erdnüsse anzubauen. Es ist ein wirklich lohnendes Projekt, das nicht
Conclusion
So, there you have it! Growing peanuts at home is not only achievable but also a deeply rewarding experience. From the initial planting to the satisfying harvest, every step of the process connects you with nature and provides a unique sense of accomplishment. This DIY trick transforms your garden into a miniature peanut farm, offering a sustainable and delicious source of fresh, homegrown peanuts.
Why is this a must-try? Because beyond the novelty, you gain complete control over the growing process. You know exactly what goes into your peanuts – no hidden pesticides or questionable farming practices. You get to enjoy the freshest possible flavor, far superior to anything you can buy in a store. Plus, it’s an incredible educational opportunity for kids (and adults!), teaching them about plant life cycles and the origins of their food.
But the fun doesn’t stop there! Feel free to experiment with different peanut varieties. Virginia peanuts are known for their large size, while Spanish peanuts offer a sweeter flavor. You can also try growing them in raised beds or containers if you have limited garden space. Consider companion planting with herbs like basil or rosemary to deter pests and enhance the flavor of your peanuts.
Don’t be afraid to get your hands dirty and embrace the learning curve. Growing peanuts at home might seem daunting at first, but with a little patience and attention, you’ll be rewarded with a bountiful harvest. Imagine the satisfaction of roasting your own homegrown peanuts, making homemade peanut butter, or simply enjoying them as a healthy and delicious snack.
We wholeheartedly encourage you to give this DIY trick a try. It’s a fantastic way to connect with nature, learn new skills, and enjoy the unparalleled taste of homegrown peanuts. And most importantly, we want to hear about your experience! Share your photos, tips, and stories in the comments below. Let’s create a community of home peanut growers and inspire others to embark on this exciting journey. Let us know what challenges you faced and what worked best for you. Your insights will be invaluable to other aspiring peanut farmers. So, grab your seeds, prepare your soil, and get ready to experience the joy of growing your own peanuts at home!
Frequently Asked Questions (FAQ)
Q: What is the best time to plant peanuts?
A: Peanuts thrive in warm weather, so the best time to plant them is after the last frost, when the soil temperature consistently reaches at least 65°F (18°C). This typically falls in late spring or early summer, depending on your climate. Planting too early can lead to poor germination and stunted growth. In colder regions, you might consider starting your peanut plants indoors a few weeks before the last frost to give them a head start.
Q: What kind of soil is best for growing peanuts?
A: Peanuts prefer well-drained, sandy loam soil that is rich in organic matter. Good drainage is crucial because peanuts don’t tolerate soggy conditions. The soil should also be slightly acidic to neutral, with a pH between 6.0 and 7.0. If your soil is heavy clay, amend it with compost, sand, and other organic materials to improve drainage and aeration. Before planting, consider getting a soil test to determine its pH and nutrient levels. This will help you make any necessary amendments to ensure optimal growth.
Q: How much sunlight do peanuts need?
A: Peanuts require at least 6-8 hours of direct sunlight per day to thrive. Choose a planting location that receives plenty of sunshine throughout the day. Insufficient sunlight can lead to weak, leggy plants and reduced yields. If you’re growing peanuts in containers, make sure to place them in a sunny spot.
Q: How often should I water my peanut plants?
A: Water your peanut plants regularly, especially during dry periods. Keep the soil consistently moist, but avoid overwatering, which can lead to root rot. Water deeply and less frequently, rather than shallowly and more often. A good rule of thumb is to water when the top inch of soil feels dry to the touch. During flowering and pegging (when the pegs start to enter the soil), ensure adequate moisture to support pod development.
Q: What are “pegs,” and why are they important?
A: “Pegs” are the specialized stems that grow from the base of the peanut plant after flowering. These pegs contain the developing peanut pods and must enter the soil for the peanuts to mature. This is why it’s important to keep the soil loose and well-drained around the base of the plants. You can gently mound soil around the base of the plants to encourage pegging.
Q: How do I know when my peanuts are ready to harvest?
A: The best way to determine when your peanuts are ready to harvest is to check the maturity of the pods. Dig up a test plant and examine the pods. The inside of the shells should be dark brown, and the kernels should be plump and well-formed. Another sign is that the foliage will start to yellow and die back. This typically occurs about 120-150 days after planting, depending on the variety and growing conditions.
Q: How do I harvest peanuts?
A: To harvest peanuts, carefully dig up the entire plant, being careful not to damage the pods. Gently shake off any excess soil and hang the plants upside down in a well-ventilated area to dry for several weeks. This curing process helps to improve the flavor and shelf life of the peanuts.
Q: How do I store peanuts after harvesting?
A: Once the peanuts are fully dried, you can remove the pods from the plants. Store the peanuts in a cool, dry place in airtight containers. Properly stored peanuts can last for several months. You can also freeze peanuts for longer storage.
Q: Are there any common pests or diseases that affect peanut plants?
A: Yes, some common pests that can affect peanut plants include aphids, spider mites, and nematodes. Diseases such as leaf spot and root rot can also be a problem. To prevent pests and diseases, practice good garden hygiene, such as removing weeds and debris. You can also use organic pest control methods, such as insecticidal soap or neem oil. Ensure proper drainage to prevent root rot.
Q: Can I grow peanuts in containers?
A: Yes, you can grow peanuts in containers, but you’ll need to choose a large container that is at least 18 inches in diameter and 12 inches deep. Use a well-draining potting mix and provide plenty of sunlight and water. Container-grown peanuts may not produce as many peanuts as those grown in the ground, but it’s still a viable option for those with limited space.
Q: What are some creative ways to use homegrown peanuts?
A: The possibilities are endless! You can roast them for a healthy snack, make homemade peanut butter, add them to salads or stir-fries, or use them in baking. You can also experiment with different flavor combinations, such as adding spices or herbs to your roasted peanuts. Don’t forget to save some seeds for next year’s crop!
Leave a Comment