
Harvesting backyard celery can feel like unlocking a secret level in the game of home gardening! Imagine the satisfaction of snipping fresh, crisp stalks right from your own backyard, ready to elevate your soups, salads, and snacks. But let’s be honest, knowing *when* and *how* to harvest your celery can be a little tricky. That’s where this DIY guide comes in – your ultimate cheat sheet to celery-harvesting success!
Celery, with its origins tracing back to the Mediterranean, has been enjoyed for centuries, not just for its flavor but also for its medicinal properties. Ancient Greeks even used it to crown victors in athletic games! Today, while we might not be crowning athletes with celery, we certainly appreciate its versatility in the kitchen. But store-bought celery can sometimes be limp and lacking in flavor. That’s why growing your own and mastering the art of harvesting backyard celery is a game-changer.
I’m here to show you simple, effective DIY tricks that will ensure you’re picking your celery at its peak, maximizing its flavor and freshness. No more guessing games or disappointing harvests! We’ll cover everything from identifying the right time to harvest to the best techniques for cutting and storing your celery, so you can enjoy the fruits (or rather, vegetables!) of your labor for weeks to come. Let’s get started and turn your garden into a celery-lover’s paradise!
DIY-Anleitung: Sellerie aus dem eigenen Garten ernten und vermehren
Hallo liebe Gartenfreunde! Ich freue mich, euch heute zu zeigen, wie ihr euren selbst angebauten Sellerie ernten und sogar vermehren könnt. Es ist einfacher als ihr denkt und das Ergebnis ist ein frischer, aromatischer Sellerie, der jeden Einkauf im Supermarkt in den Schatten stellt. Los geht’s!
Wann ist der richtige Zeitpunkt für die Sellerieernte?
Der Zeitpunkt der Ernte ist entscheidend für den Geschmack und die Qualität eures Selleries. Hier sind einige Anzeichen, auf die ihr achten solltet:
* Größe der Knolle: Die Knolle sollte einen Durchmesser von mindestens 8-10 cm haben. Das ist ein guter Richtwert, aber es hängt natürlich auch von der Sorte ab.
* Festigkeit: Die Knolle sollte sich fest anfühlen, wenn ihr sie leicht drückt. Wenn sie weich oder schwammig ist, ist sie möglicherweise überreif oder hat Probleme.
* Farbe: Die Knolle sollte eine gleichmäßige, helle Farbe haben. Verfärbungen können auf Krankheiten oder Schädlingsbefall hindeuten.
* Blätter: Die äußeren Blätter können gelb werden, aber das ist kein Problem, solange die inneren Blätter noch grün und knackig sind.
Generell könnt ihr Sellerie ernten, sobald er die gewünschte Größe erreicht hat. In der Regel ist das ab September oder Oktober der Fall, je nachdem, wann ihr ihn ausgesät habt.
Benötigtes Werkzeug
Bevor wir loslegen, stellt sicher, dass ihr alles griffbereit habt:
* Eine Grabegabel oder einen Spaten
* Ein scharfes Messer oder eine Gartenschere
* Einen Eimer oder eine Schubkarre zum Transport des Selleries
* Gartenhandschuhe (optional, aber empfehlenswert)
Schritt-für-Schritt-Anleitung zur Sellerieernte
1. Vorbereitung: Zieht eure Gartenhandschuhe an (wenn ihr welche benutzt) und nehmt eure Grabegabel oder den Spaten zur Hand.
2. Lockerung des Bodens: Stecht mit der Grabegabel oder dem Spaten vorsichtig um die Sellerieknolle herum in den Boden. Achtet darauf, die Knolle nicht zu beschädigen. Lockert den Boden rundherum, um das Herausziehen zu erleichtern.
3. Herausziehen der Knolle: Fasst die Sellerieknolle am Stielansatz fest und zieht sie vorsichtig, aber bestimmt aus dem Boden. Wenn sie sich nicht leicht lösen lässt, lockert den Boden noch etwas mehr.
4. Entfernen von Erde: Klopft die Erde vorsichtig von der Knolle ab. Ihr könnt auch eine Bürste verwenden, um hartnäckigen Schmutz zu entfernen.
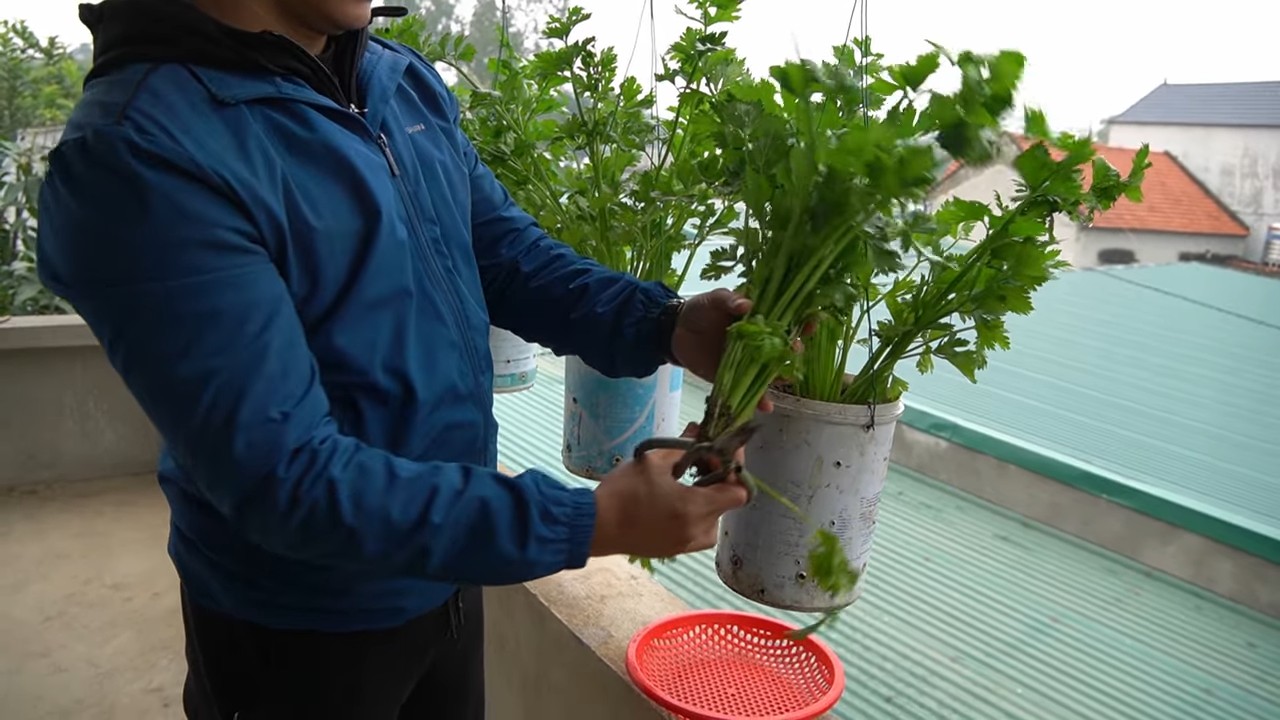
5. Abschneiden der Blätter und Wurzeln: Schneidet die Blätter etwa 5-10 cm oberhalb der Knolle ab. Die Blätter könnt ihr zum Würzen von Suppen und Eintöpfen verwenden oder sie trocknen und als Gewürz aufbewahren. Schneidet auch die Wurzeln kurz ab.
6. Reinigung: Wascht die Sellerieknolle gründlich unter fließendem Wasser ab.
7. Lagerung: Lagert den Sellerie an einem kühlen, dunklen und feuchten Ort. Im Kühlschrank hält er sich in einem Plastikbeutel oder einem feuchten Tuch gewickelt mehrere Wochen.
Sellerie vermehren: So geht’s!
Sellerie zu vermehren ist eine tolle Möglichkeit, um jedes Jahr frischen Sellerie aus dem eigenen Garten zu ernten, ohne immer wieder Samen kaufen zu müssen. Es gibt verschiedene Methoden, aber ich zeige euch hier eine einfache und effektive Methode:
Methode: Aus dem Strunk ziehen
Diese Methode ist besonders einfach und funktioniert gut, wenn ihr einen Sellerie aus dem Supermarkt oder vom Markt habt.
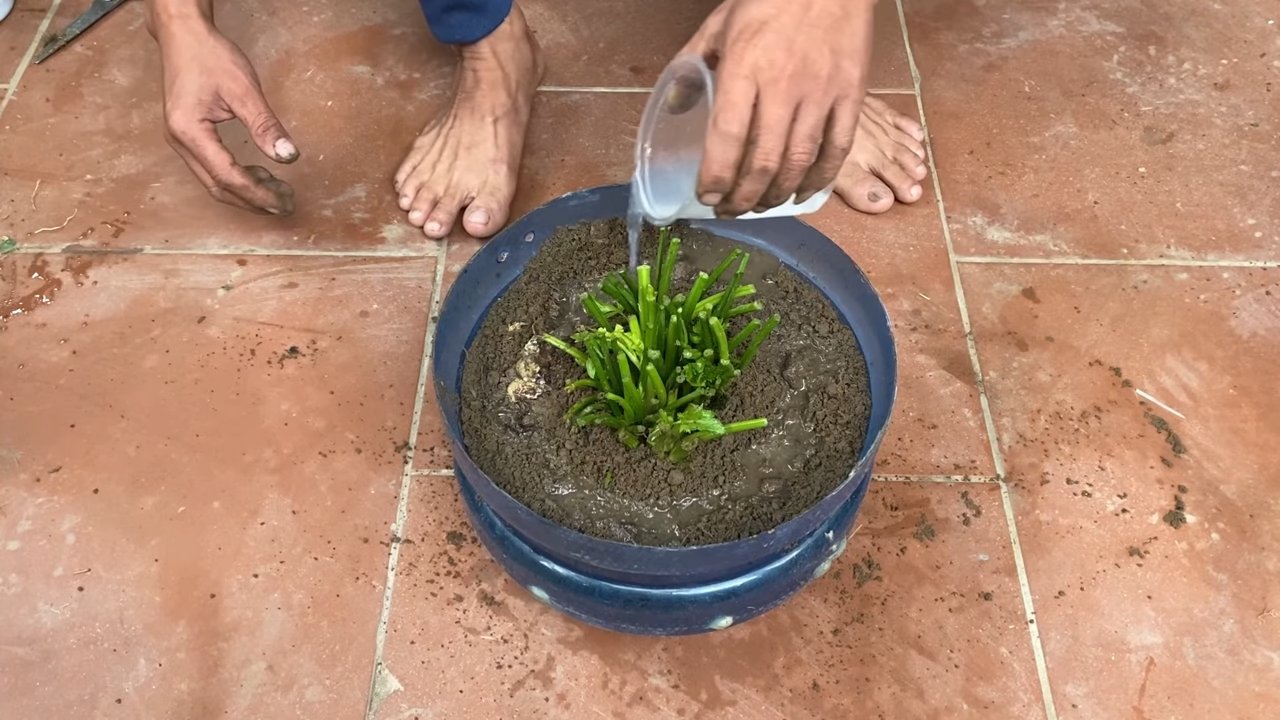
1. Sellerie vorbereiten: Schneidet den Strunk des Selleries (das untere Ende, wo die Wurzeln waren) etwa 5-7 cm oberhalb des Wurzelansatzes ab. Achtet darauf, dass die inneren Blätter noch intakt sind.
2. In Wasser stellen: Stellt den Strunk in ein Glas oder eine Schale mit Wasser. Das Wasser sollte etwa 2-3 cm hoch stehen.
3. Standort: Stellt das Glas an einen hellen, aber nicht direkten Sonnenplatz.
4. Wasser wechseln: Wechselt das Wasser alle 1-2 Tage, um Fäulnis zu vermeiden.
5. Wurzelbildung: Nach einigen Tagen oder Wochen (es kann bis zu 3 Wochen dauern) sollten sich kleine Wurzeln bilden.
6. Einpflanzen: Sobald die Wurzeln etwa 5 cm lang sind, könnt ihr den Strunk in einen Topf mit Erde pflanzen. Verwendet eine gute, nährstoffreiche Blumenerde.
7. Pflege: Gießt den Sellerie regelmäßig und stellt ihn an einen hellen, aber nicht direkten Sonnenplatz.
8. Auspflanzen ins Beet: Sobald der Sellerie groß genug ist (etwa 15-20 cm hoch), könnt ihr ihn ins Beet auspflanzen. Achtet darauf, dass der Boden gut vorbereitet ist und der Standort sonnig bis halbschattig ist.
Zusätzliche Tipps für die Sellerievermehrung
* Selleriesorte: Nicht alle Selleriesorten eignen sich gleich gut zur Vermehrung. Am besten funktionieren Sorten, die nicht hybrid sind.
* Geduld: Die Vermehrung von Sellerie kann etwas Zeit in Anspruch nehmen. Habt Geduld und gebt nicht auf, wenn es nicht sofort klappt.
* Düngung: Düngt den Sellerie regelmäßig mit einem organischen Dünger, um das Wachstum zu fördern.
* Schutz vor Schädlingen: Achtet auf Schädlinge wie Schnecken oder Blattläuse und bekämpft sie gegebenenfalls.
Sellerie richtig lagern: So bleibt er frisch
Damit ihr möglichst lange Freude an eurem geernteten Sellerie habt, ist die richtige Lagerung entscheidend. Hier sind einige Tipps:
* Im Kühlschrank: Wickelt den Sellerie in ein feuchtes Tuch oder legt ihn in einen Plastikbeutel. Lagert ihn im Gemüsefach des Kühlschranks. So hält er sich mehrere Wochen.
* Einfrieren: Sellerie kann auch eingefroren werden. Schneidet ihn dazu in kleine Stücke und blanchiert ihn kurz in kochendem Wasser. Lasst ihn abkühlen und friert ihn dann in Gefrierbeuteln oder -dosen ein.
* Trocknen: Die Blätter des Selleries können getrocknet und als Gewürz verwendet werden. Hängt sie dazu an einem luftigen Ort auf oder trocknet sie im Backofen bei niedriger Temperatur.
Verwendungsmöglichkeiten für selbst geernteten Sellerie
Selbst geernteter Sellerie ist unglaublich vielseitig und kann in vielen verschiedenen Gerichten verwendet werden. Hier sind einige Ideen:
* Roh: Sellerie kann roh als Snack gegessen werden oder in Salaten verwendet werden.
* Gekocht: Sellerie kann gekocht, gedünstet, gebraten oder gegrillt werden. Er passt gut zu Suppen, Eintöpfen, Aufläufen und Gemüsepfannen.
* Saft: Selleriesaft ist ein gesunder und erfrischender Drink.
* Gewürz: Die Blätter des Selleries können getrocknet und als Gewürz verwendet werden.
Ich hoffe, diese Anleitung hat euch geholfen, euren eigenen Sellerie zu ernten und zu vermehren. Viel Spaß beim Gärtnern und guten Appetit!
Conclusion
So, there you have it! Harvesting your own backyard celery isn’t just a whimsical gardening project; it’s a gateway to fresher, more flavorful meals and a deeper connection with the food you consume. We’ve walked through the simple steps, from identifying the right time to harvest to the best methods for ensuring a clean and productive yield. But why is this DIY trick a must-try?
Firstly, the taste difference is undeniable. Store-bought celery, often transported long distances and stored for extended periods, simply can’t compete with the vibrant, crisp flavor of freshly harvested celery from your own garden. The subtle sweetness and intense celery aroma are a revelation, transforming everything from soups and stews to salads and crudités.
Secondly, you have complete control over the growing process. No more worrying about pesticides or unknown chemicals. You can cultivate your celery organically, knowing exactly what goes into nurturing your plants and, ultimately, your body. This peace of mind is invaluable in today’s world.
Thirdly, it’s incredibly rewarding! There’s a unique satisfaction in nurturing a plant from seed (or seedling) to harvest, and then using your own homegrown produce in your cooking. It’s a tangible connection to nature and a reminder of the simple pleasures in life.
But the journey doesn’t end with the basic harvest. Feel free to experiment with different celery varieties. Try growing ‘Utah Tall’ for its classic flavor and sturdy stalks, or ‘Golden Self-Blanching’ for its milder taste and beautiful pale color. You can also explore different harvesting techniques. For a continuous supply, try harvesting individual stalks as needed, rather than the entire plant at once. This allows the plant to continue producing, extending your harvest season.
Consider using the celery leaves, often discarded, in pesto, salads, or as a flavorful addition to stocks and broths. They pack a powerful celery punch and add a vibrant green color to your dishes. Don’t forget the celery root (celeriac), which can be harvested and used in soups, stews, or mashed as a delicious alternative to potatoes.
Ultimately, harvesting backyard celery is more than just a gardening task; it’s an investment in your health, your culinary creativity, and your connection to the natural world. We wholeheartedly encourage you to give it a try. Start small, learn as you go, and don’t be afraid to experiment.
And most importantly, we want to hear about your experiences! Share your photos, tips, and recipes in the comments below. Let’s build a community of backyard celery enthusiasts and inspire others to discover the joys of homegrown produce. What variety did you grow? What was your biggest challenge? What’s your favorite way to use your freshly harvested celery? We can’t wait to hear from you! So get out there, get your hands dirty, and start harvesting your own delicious, homegrown celery today!
Frequently Asked Questions (FAQ)
Q: When is the best time to harvest my backyard celery?
A: The ideal time to harvest celery is when the stalks are at least 6-8 inches long and have reached a good size, typically around 75-100 days after planting seedlings. The stalks should be firm and crisp, not thin or flimsy. You can also gently squeeze the base of the plant; if it feels solid and well-developed, it’s likely ready for harvest. Keep an eye on the weather as well. Harvesting before a frost is generally recommended, as frost can damage the stalks and affect their flavor.
Q: How do I harvest celery without damaging the plant?
A: There are two main methods for harvesting celery: harvesting the entire plant or harvesting individual stalks. To harvest the entire plant, use a sharp knife to cut the stalks at the base, just below the soil line. For individual stalks, carefully select the outer stalks that are the largest and most mature. Use a sharp knife to cut them off at the base, being careful not to disturb the remaining stalks. This method allows the plant to continue producing, providing a continuous harvest over a longer period.
Q: My celery stalks are bitter. What could be the reason?
A: Bitter celery can be caused by several factors. Insufficient watering is a common culprit, as celery needs consistent moisture to develop properly. Lack of nutrients, particularly nitrogen, can also contribute to bitterness. Soil pH that is too high or too low can also affect the flavor. Finally, excessive heat or stress during the growing season can also lead to bitter stalks. Ensure your celery receives adequate water and fertilizer, and consider testing your soil pH to ensure it’s within the optimal range (6.0-6.8).
Q: Can I eat the celery leaves?
A: Absolutely! Celery leaves are often overlooked, but they are packed with flavor and nutrients. They can be used in a variety of ways, such as adding them to salads, soups, stews, or stocks. You can also dry them and use them as a seasoning. Celery leaves have a stronger flavor than the stalks, so use them sparingly at first until you get used to their intensity.
Q: How do I store freshly harvested celery?
A: To store freshly harvested celery, wrap the stalks in a damp paper towel and place them in a plastic bag in the refrigerator. This will help keep them crisp and hydrated. You can also store celery stalks in a container of water in the refrigerator, changing the water every few days. Properly stored celery can last for up to two weeks in the refrigerator.
Q: Can I grow celery from the base of a store-bought stalk?
A: Yes, you can! This is a fun and easy way to propagate celery. Cut off the base of a store-bought celery stalk, leaving about 2 inches of the root end intact. Place the base in a shallow dish of water, ensuring that the cut end is submerged. Place the dish in a sunny location and change the water every day. After a few days, you should start to see new roots and leaves emerging. Once the roots are well-developed, you can transplant the celery base into a pot or directly into your garden.
Q: What are some common pests and diseases that affect celery?
A: Celery can be susceptible to several pests and diseases, including aphids, celery leaf tiers, and celery blight. Aphids can be controlled with insecticidal soap or by introducing beneficial insects like ladybugs. Celery leaf tiers can be handpicked or controlled with Bacillus thuringiensis (Bt). Celery blight is a fungal disease that can be prevented by ensuring good air circulation and avoiding overhead watering. If blight does occur, remove affected leaves and apply a fungicide.
Q: How much sun does celery need?
A: Celery thrives in full sun, which means at least 6-8 hours of direct sunlight per day. However, in hot climates, it can benefit from some afternoon shade to prevent the stalks from becoming bitter.
Q: What kind of soil is best for growing celery?
A: Celery prefers rich, well-drained soil that is high in organic matter. Amend your soil with compost or well-rotted manure before planting to improve its fertility and drainage. Celery also prefers a slightly acidic soil pH of 6.0-6.8.
Q: Can I grow celery in containers?
A: Yes, you can grow celery in containers, but you’ll need to choose a large container that is at least 12 inches deep and wide to accommodate the plant’s root system. Use a high-quality potting mix and ensure that the container has good drainage. Water regularly and fertilize every few weeks.
Leave a Comment