
Growing Kale in Soil Bags: Unlock the secrets to a bountiful harvest, even without a traditional garden! Have you ever dreamt of fresh, vibrant kale gracing your dinner table, but felt limited by space or soil conditions? Well, dream no more! This DIY guide will empower you to cultivate your own thriving kale patch using a surprisingly simple and effective method: soil bags.
For centuries, humans have sought innovative ways to nurture plants, adapting to diverse environments and resources. From ancient hanging gardens to modern-day vertical farms, the spirit of ingenuity in gardening has always thrived. Growing kale in soil bags is a testament to this enduring spirit, offering a practical solution for urban dwellers, apartment residents, and anyone looking to maximize their gardening potential.
Why should you embrace this DIY trick? Because it’s a game-changer! It eliminates the need for extensive digging, weeding, and soil preparation. Plus, soil bags provide excellent drainage and aeration, creating the perfect environment for your kale to flourish. Imagine the satisfaction of harvesting your own organic, nutrient-rich kale, knowing you nurtured it from seed to table with your own two hands. I’m excited to share these simple steps that will transform your gardening experience and bring the joy of fresh, homegrown kale into your life. Let’s get started with growing kale in soil bags!
Kohl Anbauen in Pflanzsäcken: Eine Einfache DIY Anleitung
Hallo Gartenfreunde! Ich liebe es, frisches Gemüse direkt vor der Haustür zu haben, und Kohl ist da keine Ausnahme. Aber nicht jeder hat einen riesigen Garten, oder? Deshalb zeige ich euch heute, wie ihr Kohl ganz einfach in Pflanzsäcken anbauen könnt. Das ist platzsparend, superpraktisch und funktioniert wirklich gut!
Warum Kohl in Pflanzsäcken?
* Platzsparend: Ideal für Balkone, Terrassen oder kleine Gärten.
* Flexibel: Du kannst die Säcke leicht umstellen, um das beste Sonnenlicht zu nutzen.
* Gute Drainage: Pflanzsäcke sorgen für eine gute Drainage, was Kohl liebt.
* Weniger Unkraut: Weniger Unkraut als im Gartenbeet.
* Einfache Ernte: Du musst dich nicht so tief bücken, um deinen Kohl zu ernten.
Was du brauchst:
* Pflanzsäcke: Am besten solche aus robustem Gewebe (Geotextil) mit einem Volumen von mindestens 40 Litern pro Kohlpflanze.
* Kohlpflanzen: Entweder vorgezogene Jungpflanzen aus dem Gartencenter oder selbstgezogene Sämlinge. Achte auf gesunde, kräftige Pflanzen.
* Pflanzerde: Hochwertige Gemüseerde ist ideal. Du kannst auch deine eigene Mischung aus Gartenerde, Kompost und etwas Sand herstellen.
* Kompost: Für eine gute Nährstoffversorgung.
* Organischer Dünger: Zum Beispiel Hornspäne oder Gemüsedünger.
* Gießkanne oder Gartenschlauch: Zum Bewässern.
* Schere oder Messer: Zum Öffnen der Pflanzerde-Säcke.
* Handschuhe: Um deine Hände sauber zu halten.
* Optional: Mulchmaterial (Stroh, Holzhackschnitzel) zur Feuchtigkeitsspeicherung und Unkrautunterdrückung.
Schritt-für-Schritt Anleitung:
1. Vorbereitung der Pflanzsäcke
1. Pflanzsäcke auswählen: Wähle Pflanzsäcke, die groß genug für deine Kohlpflanzen sind. Ich empfehle mindestens 40 Liter pro Pflanze, damit die Wurzeln genügend Platz haben. Größere Säcke sind natürlich auch möglich.
2. Standort bestimmen: Suche einen sonnigen Standort für deine Pflanzsäcke. Kohl braucht mindestens 6 Stunden Sonne pro Tag. Achte darauf, dass der Standort auch windgeschützt ist, da Kohlpflanzen bei starkem Wind leicht umknicken können.
3. Pflanzsäcke vorbereiten: Stelle die leeren Pflanzsäcke an den gewählten Standort. Das ist wichtig, da sie nach dem Befüllen sehr schwer sind und sich nur schwer bewegen lassen.
4. Drainage verbessern (optional): Wenn du Bedenken wegen der Drainage hast, kannst du eine Schicht Kies oder Blähton auf den Boden der Pflanzsäcke geben. Das ist aber normalerweise nicht notwendig, da die meisten Pflanzsäcke bereits eine gute Drainage haben.
2. Befüllen der Pflanzsäcke
1. Erde vorbereiten: Mische die Pflanzerde mit Kompost und organischem Dünger. Das sorgt für eine gute Nährstoffversorgung der Kohlpflanzen. Ich nehme meistens ein Verhältnis von 2 Teilen Pflanzerde, 1 Teil Kompost und eine Handvoll organischen Dünger pro Pflanzsack.
2. Pflanzsäcke befüllen: Fülle die Pflanzsäcke mit der vorbereiteten Erde. Lasse oben etwa 5-10 cm Platz, damit du beim Gießen nicht die Erde überschwemmst.
3. Erde leicht andrücken: Drücke die Erde leicht an, damit sie sich setzt. Achte aber darauf, sie nicht zu stark zu verdichten, da die Wurzeln sonst Schwierigkeiten haben, sich auszubreiten.
3. Einpflanzen der Kohlpflanzen
1. Pflanzlöcher vorbereiten: Grabe in jeden Pflanzsack ein oder mehrere Pflanzlöcher, je nachdem, wie viele Kohlpflanzen du pro Sack pflanzen möchtest. Der Abstand zwischen den Pflanzen sollte etwa 40-50 cm betragen.
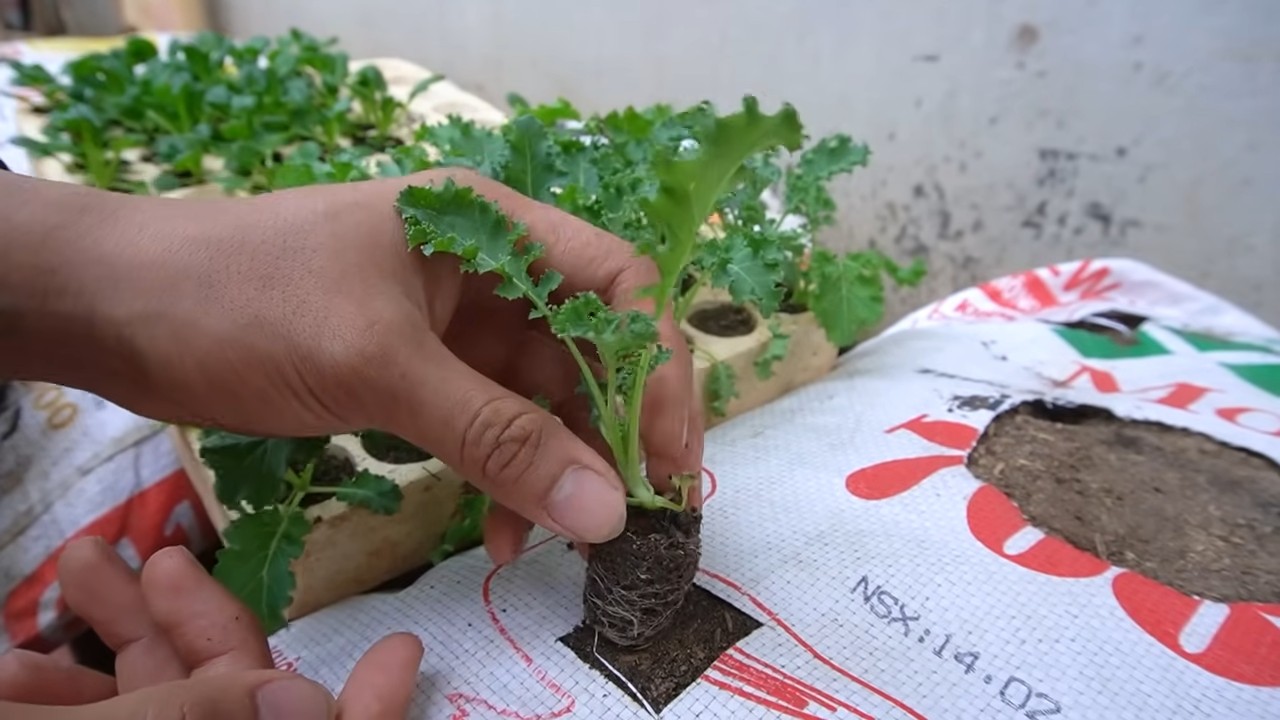
2. Kohlpflanzen aus dem Topf nehmen: Nimm die Kohlpflanzen vorsichtig aus ihren Töpfen. Lockere die Wurzeln etwas auf, damit sie sich besser in der neuen Erde ausbreiten können.
3. Kohlpflanzen einsetzen: Setze die Kohlpflanzen in die Pflanzlöcher ein. Die Oberkante des Wurzelballens sollte mit der Erdoberfläche abschließen.
4. Pflanzlöcher auffüllen: Fülle die Pflanzlöcher mit Erde auf und drücke sie leicht an.
5. Angießen: Gieße die Kohlpflanzen gründlich an. Das hilft ihnen, sich in der neuen Erde zu etablieren.
4. Pflege der Kohlpflanzen
1. Regelmäßig gießen: Kohl braucht viel Wasser, besonders während der Wachstumsphase. Gieße die Pflanzen regelmäßig, besonders bei trockenem Wetter. Achte darauf, dass die Erde immer leicht feucht ist, aber nicht nass.
2. Düngen: Dünge die Kohlpflanzen regelmäßig mit organischem Dünger. Ich dünge meine Pflanzen alle 2-3 Wochen mit einem Gemüsedünger.
3. Unkraut entfernen: Entferne regelmäßig Unkraut, das in den Pflanzsäcken wächst. Unkraut konkurriert mit den Kohlpflanzen um Nährstoffe und Wasser.
4. Schutz vor Schädlingen: Kohl ist anfällig für verschiedene Schädlinge, wie zum Beispiel Kohlweißlinge, Erdflöhe und Blattläuse. Kontrolliere die Pflanzen regelmäßig auf Schädlinge und bekämpfe sie bei Bedarf mit biologischen Mitteln. Du kannst auch ein Insektenschutznetz über die Pflanzen spannen, um sie vor Schädlingen zu schützen.
5. Mulchen (optional): Mulche die Erde um die Kohlpflanzen mit Stroh oder Holzhackschnitzeln. Das hilft, die Feuchtigkeit im Boden zu halten, Unkraut zu unterdrücken und den Boden vor Erosion zu schützen.
6. Stützen (optional): Wenn die Kohlköpfe sehr groß werden, kann es notwendig sein, die Pflanzen zu stützen, damit sie nicht umknicken. Du kannst dafür Bambusstäbe oder andere geeignete Stützen verwenden.
5. Ernte
1. Erntezeitpunkt bestimmen: Der Erntezeitpunkt hängt von der Kohlsorte ab. In der Regel sind Kohlköpfe erntereif, wenn sie fest und prall sind.
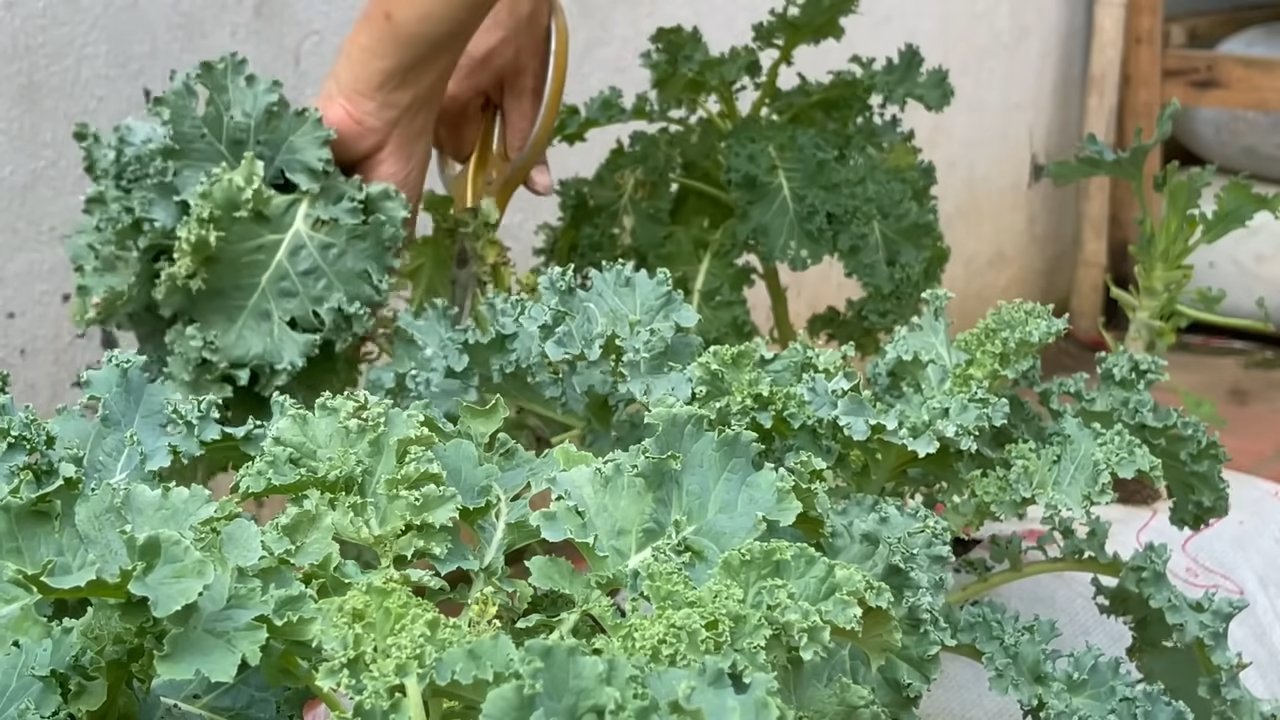
2. Kohl ernten: Schneide die Kohlköpfe mit einem scharfen Messer oder einer Gartenschere ab. Lasse dabei einige Blätter an der Pflanze, damit sie weiterwachsen kann.
3. Lagerung: Kohl kann im Kühlschrank mehrere Wochen gelagert werden. Wickle die Kohlköpfe in Frischhaltefolie oder lege sie in einen Plastikbeutel.
Zusätzliche Tipps:
* Sortenwahl: Wähle Kohlsorten, die für den Anbau in Pflanzsäcken geeignet sind. Kleine bis mittelgroße Sorten sind ideal.
* Fruchtfolge beachten: Pflanze Kohl nicht jedes Jahr am selben Standort, um Krankheiten und Schädlingen vorzubeugen.
* Beipflanzung: Pflanze Kohl zusammen mit anderen Pflanzen, die ihn vor Schädlingen schützen oder sein Wachstum fördern. Gute Nachbarn sind zum Beispiel Ringelblumen, Kapuzinerkresse und Dill.
* Kohl im Winter: Einige Kohlsorten, wie zum Beispiel Grünkohl, können auch im Winter angebaut werden. Schütze die Pflanzen bei Bedarf vor Frost mit einem Vlies oder einer Folie.
* Eigene Samen gewinnen: Wenn du möchtest, kannst du auch deine eigenen Samen von deinen Kohlpflanzen gewinnen. Lasse dafür einige Pflanzen blühen und Samen bilden.
Ich hoffe, diese Anleitung hilft dir dabei, deinen eigenen Kohl in Pflanzsäcken anzubauen. Es ist wirklich einfacher als du denkst und es macht Spaß, sein eigenes Gemüse zu ernten. Viel Erfolg und guten Appetit!
Conclusion
So, there you have it! Growing kale in soil bags is not just a gardening hack; it’s a game-changer for anyone looking to enjoy fresh, nutritious greens with minimal effort and maximum yield. We’ve explored the simplicity, the space-saving benefits, and the sheer joy of harvesting your own vibrant kale leaves right from your patio, balcony, or even a sunny corner of your yard.
Why is this a must-try? Because it democratizes gardening. You don’t need acres of land or years of experience to cultivate a thriving kale patch. Soil bags provide a contained, nutrient-rich environment that simplifies the entire process, from planting to watering to harvesting. They also offer superior drainage compared to traditional garden beds, reducing the risk of root rot and other common kale ailments. Plus, the portability of soil bags means you can easily move your kale plants to chase the sun or protect them from harsh weather.
But the beauty of this method lies not only in its practicality but also in its adaptability. Feel free to experiment with different kale varieties. Try planting Tuscan kale (also known as Lacinato or dinosaur kale) for its robust flavor and striking appearance, or go for Red Russian kale for a touch of color and a slightly sweeter taste. You can even interplant your kale with companion herbs like rosemary or thyme to deter pests and enhance the overall flavor profile of your garden.
Consider adding a layer of mulch, such as straw or wood chips, to the top of your soil bag to help retain moisture and suppress weeds. For an extra boost, incorporate a slow-release organic fertilizer into the soil mix at planting time. And don’t be afraid to get creative with your soil bag setup. You can arrange them in rows, stack them to create a vertical garden, or even decorate them with paint or stencils to add a personal touch to your outdoor space.
The key to success with growing kale in soil bags is consistent care and attention. Regularly check the moisture level of the soil and water accordingly, especially during hot, dry periods. Monitor your plants for signs of pests or diseases and take action promptly to prevent them from spreading. And most importantly, don’t forget to harvest your kale leaves regularly to encourage continued growth and enjoy the fruits (or rather, the leaves) of your labor.
We are confident that once you experience the ease and satisfaction of growing your own kale in soil bags, you’ll be hooked. It’s a rewarding and sustainable way to connect with nature, nourish your body, and add a touch of green to your life.
So, grab a soil bag, some kale seeds or seedlings, and get ready to embark on a gardening adventure. We encourage you to try this DIY trick and share your experiences with us. Let us know what varieties you planted, what challenges you faced, and what successes you celebrated. Your feedback will not only inspire other gardeners but also help us refine and improve this method for everyone. Happy gardening!
Frequently Asked Questions (FAQ)
What type of soil bag should I use for growing kale?
The ideal soil bag for growing kale is a large, durable bag made of woven polypropylene or a similar material. Look for bags that are at least 15-20 gallons in size to provide ample space for the kale roots to develop. Ensure the bag has drainage holes to prevent waterlogging. You can purchase pre-filled soil bags or fill your own with a high-quality potting mix that is rich in organic matter. Avoid using garden soil directly in the bags, as it can become compacted and hinder drainage.
How often should I water my kale plants in soil bags?
The watering frequency will depend on several factors, including the weather, the size of the soil bag, and the growth stage of the kale plants. As a general rule, water deeply whenever the top inch of soil feels dry to the touch. During hot, dry periods, you may need to water daily or even twice a day. Avoid overwatering, as this can lead to root rot. A good way to check the moisture level is to insert your finger into the soil near the base of the plant. If the soil feels cool and moist, you don’t need to water. If it feels dry, it’s time to give your kale a drink.
What kind of fertilizer should I use for kale grown in soil bags?
Kale is a heavy feeder, so it’s important to provide it with adequate nutrients throughout the growing season. A slow-release organic fertilizer is a great option for soil bags, as it will gradually release nutrients over time. Look for a fertilizer that is specifically formulated for leafy greens or vegetables. You can also supplement with liquid fertilizers, such as fish emulsion or seaweed extract, every few weeks. Be sure to follow the instructions on the fertilizer packaging to avoid over-fertilizing, which can burn the roots of your kale plants.
How do I protect my kale plants from pests and diseases in soil bags?
Growing kale in soil bags can actually help reduce the risk of pests and diseases, as the contained environment makes it easier to monitor and control potential problems. However, it’s still important to take preventative measures. Regularly inspect your plants for signs of aphids, cabbage worms, or other common kale pests. You can handpick these pests off the plants or use an organic insecticide, such as neem oil or insecticidal soap. To prevent diseases, ensure good air circulation around your plants and avoid overhead watering. If you notice any signs of fungal diseases, such as powdery mildew, treat them promptly with a fungicide.
Can I grow kale in soil bags during the winter?
Yes, kale is a cold-hardy vegetable that can be grown in soil bags during the winter in many regions. In areas with mild winters, you can simply leave your kale plants outdoors and continue to harvest them throughout the season. In colder climates, you may need to provide some protection from frost and freezing temperatures. You can cover your soil bags with a layer of mulch or move them to a sheltered location, such as a greenhouse or cold frame. You can also use row covers or frost blankets to protect your plants from the cold.
How do I harvest kale from soil bags?
Harvesting kale from soil bags is easy. Simply cut off the outer leaves of the plant, leaving the inner leaves to continue growing. Start harvesting when the leaves are about 6-8 inches long. Avoid harvesting more than one-third of the plant at a time, as this can stress the plant and reduce its yield. Regular harvesting will encourage the plant to produce more leaves. You can harvest kale throughout the growing season, from spring to fall, and even into the winter in mild climates.
What are some good companion plants for kale in soil bags?
Companion planting can help improve the growth and health of your kale plants. Some good companion plants for kale include:
* **Herbs:** Rosemary, thyme, sage, and dill can help deter pests and attract beneficial insects.
* **Flowers:** Marigolds and nasturtiums can also help deter pests and add color to your garden.
* **Vegetables:** Onions, garlic, and carrots can help improve the soil and deter pests.
Avoid planting kale near other members of the brassica family, such as broccoli, cabbage, and cauliflower, as they can attract the same pests and diseases.
Can I reuse the soil bags for growing kale again next year?
Yes, you can reuse the soil bags for growing kale again next year, but it’s important to replenish the soil with nutrients. After harvesting your kale, remove any remaining plant debris and add compost or other organic matter to the soil. You can also add a slow-release organic fertilizer to provide the plants with a boost of nutrients. If the soil is heavily compacted, you may need to replace some of it with fresh potting mix. Store the soil bags in a dry place over the winter and they’ll be ready to use again in the spring.

Leave a Comment