
Upside down eggplant growing might sound like something out of a Dr. Seuss book, but trust me, it’s a real and surprisingly effective way to cultivate these delicious, glossy vegetables! Forget sprawling vines and staking nightmares; we’re flipping the script (literally!) on traditional gardening. For centuries, gardeners have sought innovative ways to maximize space and yield, and while the exact origins of upside-down gardening are debated, the spirit of ingenuity is undeniable.
Why should you consider this quirky method? Well, imagine harvesting plump, unblemished eggplants without battling ground pests or wrestling with cumbersome supports. Upside down eggplant growing offers a fantastic solution for those with limited space, like apartment balconies or small patios. Plus, it’s a conversation starter! Your neighbors will be green with envy (pun intended!) when they see your unique and thriving eggplant display. This DIY guide will walk you through every step, from choosing the right container to nurturing your upside-down eggplant to a bountiful harvest. Get ready to turn your gardening world upside down – in the best way possible!
Kopfstehende Auberginen: So erntest du den Erfolg!
Hallo liebe Gartenfreunde! Habt ihr schon mal darüber nachgedacht, Auberginen kopfüber anzubauen? Klingt verrückt, oder? Aber glaubt mir, es ist eine super Methode, besonders wenn ihr wenig Platz habt oder einfach mal was Neues ausprobieren wollt. Ich habe es selbst ausprobiert und war begeistert von den Ergebnissen! In diesem Artikel zeige ich euch Schritt für Schritt, wie ihr eure eigenen hängenden Auberginen züchten könnt. Lasst uns loslegen!
Warum Auberginen kopfüber anbauen?
Bevor wir ins Detail gehen, lasst uns kurz klären, warum diese Methode überhaupt sinnvoll ist. Hier sind ein paar Vorteile:
* Platzsparend: Ideal für Balkone, Terrassen oder kleine Gärten.
* Weniger Schädlinge: Die Pflanzen sind besser belüftet und weniger anfällig für Schädlinge, die im Boden leben.
* Bessere Ernte: Durch die bessere Belüftung und Sonneneinstrahlung können die Auberginen gleichmäßiger reifen.
* Einfache Bewässerung: Das Wasser kann direkt in den Topf gegossen werden und sickert langsam durch die Erde.
* Ein echter Hingucker: Mal ehrlich, hängende Auberginen sind einfach cool und ziehen alle Blicke auf sich!
Was du brauchst: Die Materialliste
Bevor wir loslegen, solltest du sicherstellen, dass du alles parat hast. Hier ist eine Liste der Dinge, die du benötigst:
* Auberginenpflanzen: Wähle am besten kompakte Sorten, die nicht zu groß werden. Ich habe gute Erfahrungen mit ‘Black Beauty’ oder ‘Little Fingers’ gemacht.
* Töpfe oder Eimer: Am besten eignen sich Kunststofftöpfe oder -eimer mit einem Durchmesser von mindestens 25 cm. Sie sollten stabil sein und Löcher im Boden haben.
* Erde: Verwende hochwertige Blumenerde oder eine spezielle Erde für Gemüse.
* Schere oder Messer: Zum Schneiden der Pflanzlöcher.
* Gießkanne oder Schlauch: Zum Bewässern der Pflanzen.
* Dünger: Ein organischer Dünger oder Flüssigdünger für Gemüse.
* Haken oder Kette: Zum Aufhängen der Töpfe.
* Vlies oder Jute: Um die Pflanze beim Einsetzen zu schützen.
* Handschuhe: Um deine Hände sauber zu halten.
Schritt-für-Schritt-Anleitung: So geht’s!
Jetzt geht es ans Eingemachte! Hier ist eine detaillierte Anleitung, wie du deine Auberginen kopfüber anbaust:
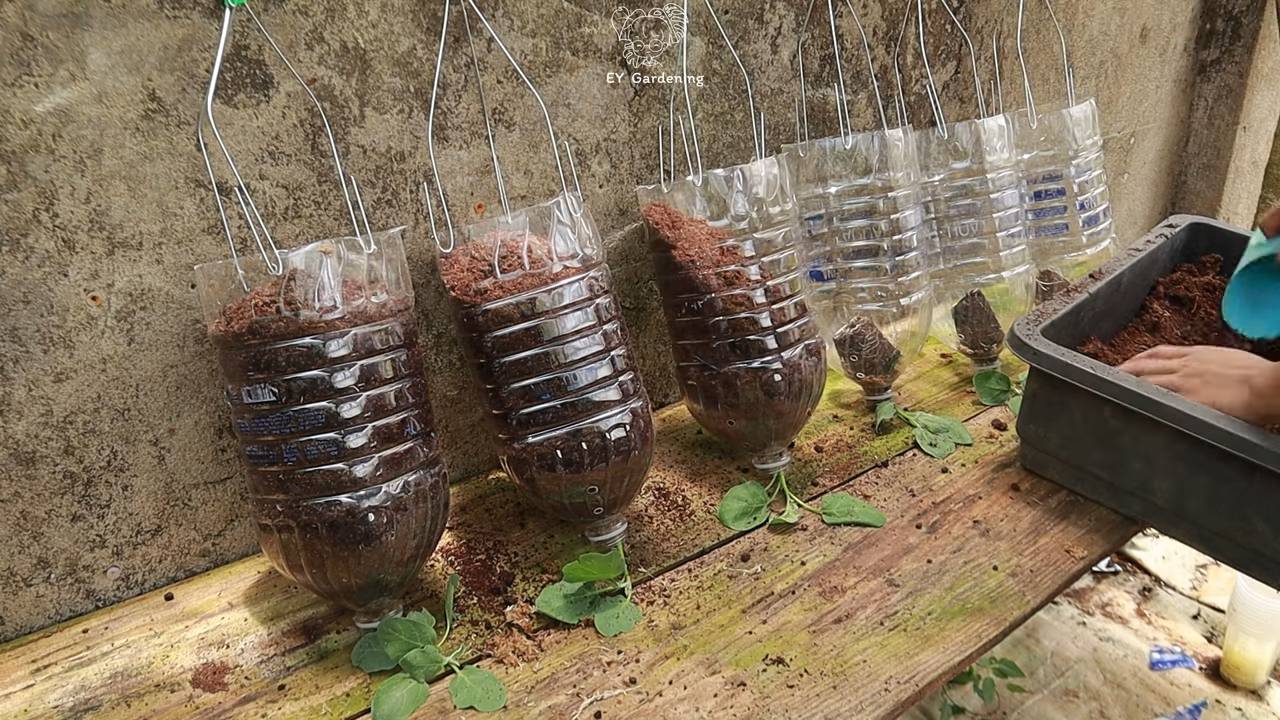
1. Vorbereitung der Töpfe
1. Löcher bohren: Zuerst musst du ein Loch in den Boden des Topfes bohren. Das Loch sollte groß genug sein, damit die Auberginenpflanze hindurchpasst, aber nicht zu groß, damit die Erde nicht herausfällt. Ein Durchmesser von etwa 5-7 cm ist ideal.
2. Drainage: Lege eine Schicht Kieselsteine oder Tonscherben auf den Boden des Topfes, um eine gute Drainage zu gewährleisten. Das verhindert Staunässe, die Auberginen gar nicht mögen.
3. Vlies oder Jute: Schneide ein Stück Vlies oder Jute zu, das etwas größer ist als das Loch. Das dient dazu, die Pflanze beim Einsetzen zu schützen und zu verhindern, dass Erde herausfällt.
2. Einsetzen der Auberginenpflanzen
1. Pflanze vorbereiten: Nimm die Auberginenpflanze vorsichtig aus ihrem Anzuchttopf. Lockere die Wurzeln etwas auf, damit sie besser anwachsen können.
2. Vlies platzieren: Lege das zugeschnittene Vlies oder Jute über das Loch im Boden des Topfes.
3. Pflanze einführen: Führe die Auberginenpflanze vorsichtig von unten durch das Loch. Achte darauf, die Blätter und Stängel nicht zu beschädigen. Die Wurzeln sollten nun nach oben zeigen.
4. Fixieren: Ziehe das Vlies oder die Jute vorsichtig um den Stängel der Pflanze, um sie zu fixieren und zu verhindern, dass Erde herausfällt.
3. Befüllen der Töpfe mit Erde
1. Erde einfüllen: Fülle den Topf vorsichtig mit Erde. Achte darauf, die Wurzeln der Auberginenpflanze gut zu bedecken.
2. Andrücken: Drücke die Erde leicht an, damit die Pflanze stabil steht.
3. Gießen: Gieße die Pflanze gründlich, damit sich die Erde setzt.
4. Aufhängen der Töpfe
1. Haken oder Kette befestigen: Befestige Haken oder eine Kette an den Seiten des Topfes, um ihn aufzuhängen. Achte darauf, dass die Aufhängung stabil ist und das Gewicht des Topfes tragen kann.
2. Aufhängen: Hänge den Topf an einem sonnigen und windgeschützten Ort auf. Ein Balkon oder eine Terrasse mit Südausrichtung ist ideal.
5. Pflege der hängenden Auberginen
1. Bewässerung: Auberginen brauchen regelmäßig Wasser, besonders an heißen Tagen. Gieße die Pflanzen, sobald die Erde sich trocken anfühlt. Achte darauf, Staunässe zu vermeiden.
2. Düngung: Dünge die Auberginen alle zwei Wochen mit einem organischen Dünger oder Flüssigdünger für Gemüse. Das sorgt für eine reiche Ernte.
3. Sonneneinstrahlung: Auberginen lieben die Sonne! Stelle sicher, dass die Pflanzen mindestens sechs Stunden Sonne pro Tag bekommen.
4. Schädlinge: Kontrolliere die Pflanzen regelmäßig auf Schädlinge wie Blattläuse oder Spinnmilben. Bei Bedarf kannst du natürliche Schädlingsbekämpfungsmittel einsetzen.
5. Ausgeizen: Entferne regelmäßig Seitentriebe, die sich in den Blattachseln bilden. Das fördert das Wachstum der Haupttriebe und sorgt für eine bessere Belüftung.
Häufige Probleme und Lösungen
Auch beim kopfüber Anbau von Auberginen können Probleme auftreten. Hier sind ein paar häufige Probleme und wie du sie lösen kannst:
* Pflanze hängt schlaff: Das kann an Wassermangel liegen. Gieße die Pflanze gründlich und stelle sicher, dass die Erde feucht ist.
* Blätter werden gelb: Das kann an Nährstoffmangel liegen. Dünge die Pflanze mit einem organischen Dünger oder Flüssigdünger.
* Schädlinge: Kontrolliere die Pflanzen regelmäßig auf Schädlinge und setze bei Bedarf natürliche Schädlingsbekämpfungsmittel ein.
* Früchte fallen ab: Das kann an unzureichender Bestäubung liegen. Du kannst die Blüten vorsichtig mit einem Pinsel bestäuben, um die Fruchtbildung zu fördern.
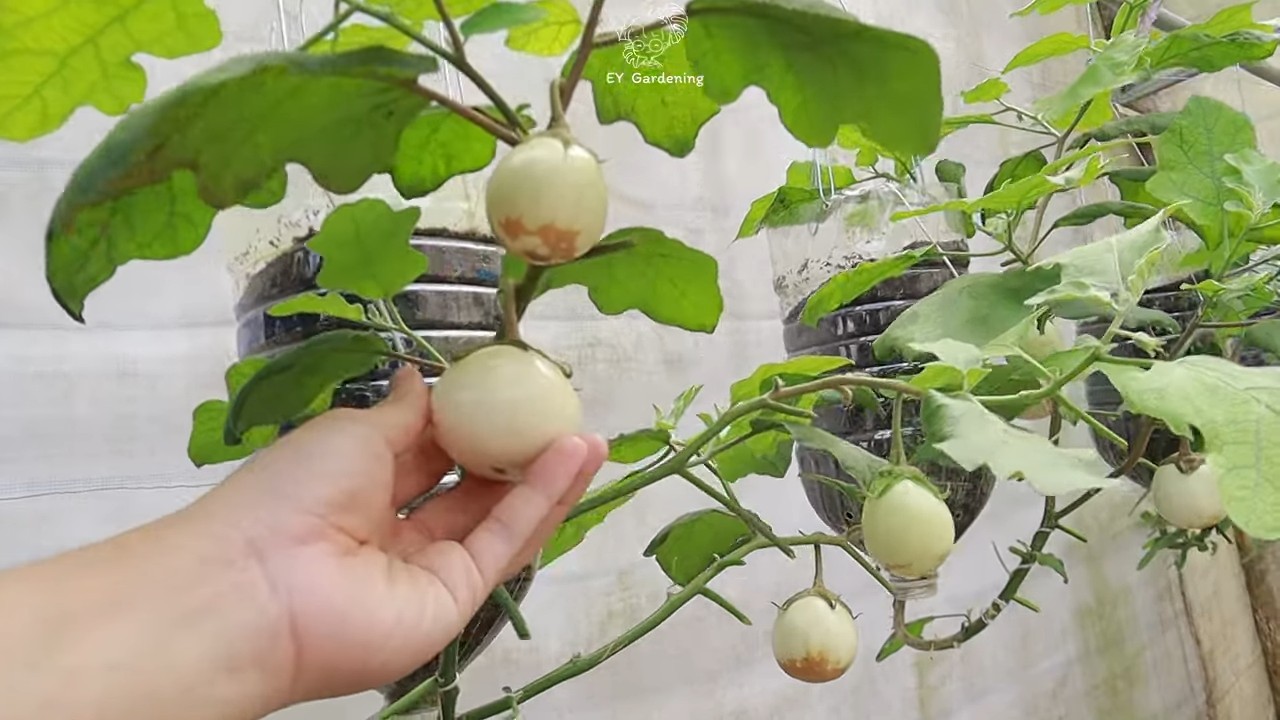
Erntezeit!
Nach etwa 70-80 Tagen kannst du deine ersten Auberginen ernten. Die Früchte sind reif, wenn sie eine glänzende Farbe haben und sich leicht eindrücken lassen. Schneide die Auberginen mit einem scharfen Messer ab, um die Pflanze nicht zu beschädigen.
Zusätzliche Tipps für den Erfolg
* Wähle die richtige Sorte: Kompakte Auberginensorten eignen sich besser für den kopfüber Anbau als große, buschige Sorten.
* Verwende hochwertige Erde: Eine gute Erde ist entscheidend für das Wachstum und die Gesundheit der Pflanzen.
* Achte auf eine gute Drainage: Staunässe kann zu Wurzelfäule führen.
* Dünge regelmäßig: Auberginen sind Starkzehrer und brauchen ausreichend Nährstoffe.
* Schütze die Pflanzen vor Wind: Ein windgeschützter Standort ist ideal für den kopfüber Anbau.
* Sei geduldig: Es kann etwas dauern, bis die Auberginen Früchte tragen.
Ich hoffe, diese Anleitung hilft dir dabei, deine eigenen hängenden Auberginen zu züchten. Es ist ein tolles Projekt, das nicht nur Spaß macht, sondern auch eine reiche Ernte verspricht. Viel Erfolg und guten Appetit!
Conclusion
So, there you have it! Growing eggplants upside down isn’t just a quirky gardening trend; it’s a genuinely effective method for boosting your yield, combating pests, and maximizing space, especially if you’re working with a limited garden area or balcony. This DIY trick offers a unique approach to cultivating these delicious vegetables, and the benefits speak for themselves.
Think about it: fewer ground-dwelling pests reaching your precious eggplants, better air circulation reducing the risk of fungal diseases, and the sheer visual appeal of cascading eggplant vines. It’s a win-win-win! Plus, the reduced need for staking and support makes this method surprisingly low-maintenance once you’ve got your system set up.
But the beauty of this DIY project lies in its adaptability. Feel free to experiment with different container sizes and materials. While hanging buckets work wonderfully, you could also repurpose old tires, sturdy fabric grow bags, or even create a custom hanging planter from reclaimed wood. Consider the weight capacity of your chosen hanging structure and ensure it’s strong enough to support the mature eggplant and its fruit.
For variations, try companion planting directly in the container with your eggplant. Herbs like basil and thyme can deter pests and attract beneficial insects, creating a healthier and more productive growing environment. Marigolds are another excellent choice for their pest-repelling properties.
Don’t be afraid to get creative with your soil mix, too. While a standard potting mix will work, amending it with compost, worm castings, or other organic matter will provide your eggplant with the nutrients it needs to thrive. Remember, eggplants are heavy feeders, so a nutrient-rich soil is essential for optimal growth and fruit production.
We understand that trying something new in the garden can be a little daunting, but we wholeheartedly encourage you to give this upside down eggplant growing method a try. The results are often surprising and incredibly rewarding. Imagine harvesting your own fresh, homegrown eggplants, knowing that you’ve successfully implemented a clever and efficient gardening technique.
And most importantly, we want to hear about your experiences! Share your photos, tips, and challenges in the comments below. Let’s create a community of upside down eggplant enthusiasts and learn from each other’s successes and failures. Your insights could help other gardeners discover the joys of this unique growing method. So, grab your containers, your eggplant seedlings, and get ready to turn your gardening world upside down! Happy growing!
Frequently Asked Questions (FAQ)
What type of eggplant is best for upside down growing?
While you can technically grow any eggplant variety upside down, smaller, more compact varieties tend to perform best. These varieties are less likely to become overly heavy and strain the hanging container. Look for bush-type eggplants or those specifically bred for container gardening. Some popular choices include ‘Patio Baby,’ ‘Fairy Tale,’ and ‘Hansel.’ These varieties produce smaller, more manageable fruits that are well-suited for hanging containers. Larger varieties can still be grown, but you’ll need to ensure your container and hanging structure are exceptionally sturdy to support the added weight. Also, consider the mature size of the plant when choosing your variety. A smaller plant will be easier to manage and less prone to breakage.
How often should I water my upside down eggplant?
Watering frequency depends on several factors, including the size of your container, the weather conditions, and the type of soil you’re using. However, as a general rule, you should water your upside down eggplant whenever the top inch of soil feels dry to the touch. Eggplants are thirsty plants, especially when grown in containers, so regular watering is crucial. During hot, dry weather, you may need to water daily, or even twice a day. Conversely, during cooler, wetter periods, you can reduce the watering frequency. Be sure to check the soil moisture regularly to avoid overwatering, which can lead to root rot. A well-draining soil mix is essential to prevent waterlogging.
What kind of soil should I use for upside down eggplant growing?
A well-draining, nutrient-rich potting mix is ideal for growing eggplants upside down. Avoid using garden soil, as it tends to be too heavy and compact, which can restrict root growth and drainage. A good potting mix will provide adequate aeration and drainage while retaining enough moisture to keep your eggplant hydrated. You can also amend your potting mix with compost, worm castings, or other organic matter to boost its nutrient content. Eggplants are heavy feeders, so a nutrient-rich soil is essential for optimal growth and fruit production. Consider adding a slow-release fertilizer to your soil mix at planting time to provide a steady supply of nutrients throughout the growing season.
How do I fertilize my upside down eggplant?
Eggplants are heavy feeders and require regular fertilization to thrive. You can use a balanced liquid fertilizer, such as a 10-10-10 or 20-20-20, diluted to half strength. Fertilize your eggplant every two to three weeks, or as directed on the fertilizer label. You can also use a slow-release fertilizer, which will provide a steady supply of nutrients over a longer period. Be sure to follow the instructions on the fertilizer label carefully to avoid over-fertilizing, which can damage your plant. Look for fertilizers specifically formulated for vegetables or tomatoes, as these typically contain the nutrients that eggplants need.
How do I protect my upside down eggplant from pests and diseases?
Growing eggplants upside down can help reduce the risk of some pests and diseases, but it’s still important to take precautions. Regularly inspect your plant for signs of pests, such as aphids, flea beetles, and spider mites. If you find any pests, you can try spraying them with insecticidal soap or neem oil. You can also use physical barriers, such as row covers, to protect your plant from pests. To prevent fungal diseases, ensure good air circulation around your plant and avoid overwatering. If you notice any signs of disease, such as leaf spots or wilting, remove the affected leaves immediately. You can also treat your plant with a fungicide if necessary. Companion planting with herbs like basil and thyme can also help deter pests and attract beneficial insects.
How much sunlight does an upside down eggplant need?
Eggplants need at least six to eight hours of direct sunlight per day to thrive. Choose a location for your upside down eggplant that receives plenty of sunlight throughout the day. If you live in a particularly hot climate, you may need to provide some afternoon shade to prevent your plant from overheating. Insufficient sunlight can lead to stunted growth, reduced fruit production, and increased susceptibility to pests and diseases. Monitor your plant closely and adjust its location as needed to ensure it receives adequate sunlight.
What do I do if my upside down eggplant starts to droop?
Drooping can be caused by several factors, including underwatering, overwatering, heat stress, or pest infestation. First, check the soil moisture to determine if your plant is getting enough water. If the soil is dry, water thoroughly. If the soil is waterlogged, allow it to dry out before watering again. If the drooping is caused by heat stress, move your plant to a shadier location or provide some afternoon shade. Inspect your plant for signs of pests and treat accordingly. If the drooping persists despite these measures, it could be a sign of root rot or other disease. In this case, you may need to repot your plant with fresh soil and treat it with a fungicide.
How long does it take for an upside down eggplant to produce fruit?
The time it takes for an upside down eggplant to produce fruit depends on the variety, growing conditions, and climate. However, as a general rule, you can expect to harvest your first eggplants about 60 to 80 days after transplanting. Be patient and continue to provide your plant with proper care, and you’ll be rewarded with a bountiful harvest of delicious eggplants.


Leave a Comment