
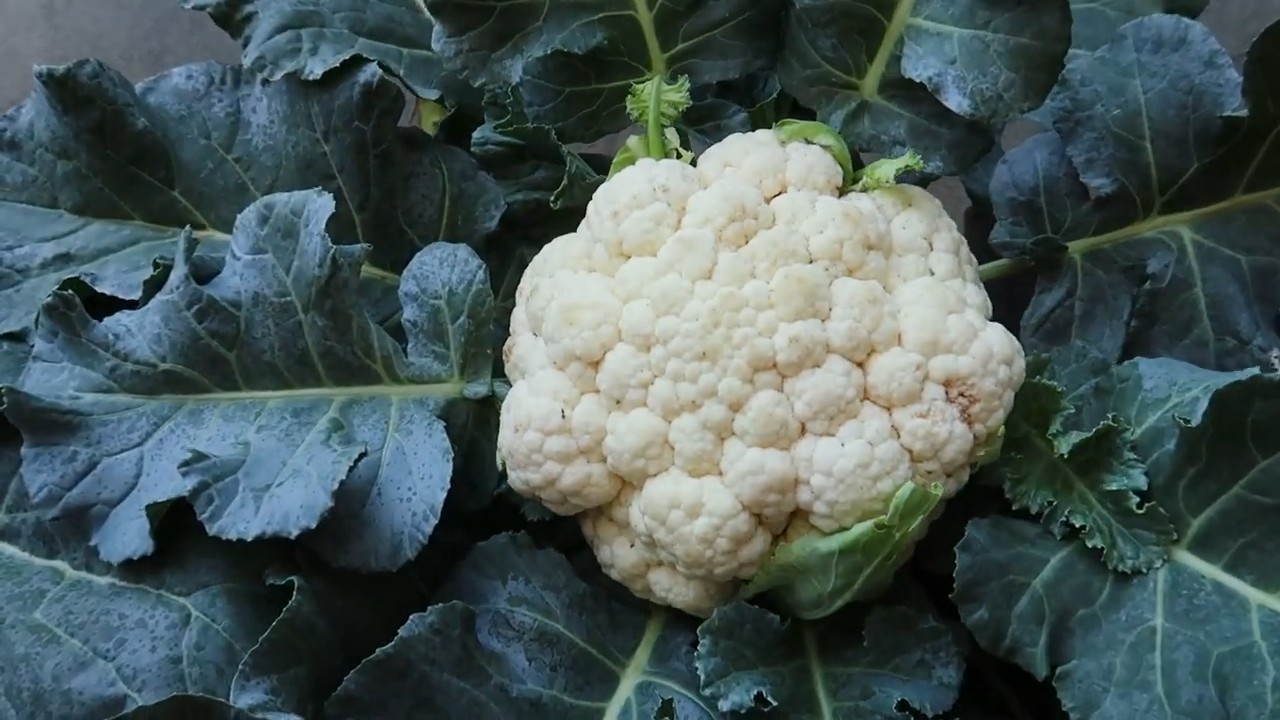
Grow Cauliflower at Home, you say? Absolutely! Imagine stepping into your backyard and harvesting your own crisp, creamy cauliflower – fresher and tastier than anything you’ll find at the grocery store. Forget those bland, pre-packaged florets; we’re talking about vibrant, homegrown goodness. This isn’t just about gardening; it’s about connecting with nature, enjoying the fruits (or rather, vegetables!) of your labor, and knowing exactly where your food comes from.
Cauliflower has a rich history, dating back to ancient times in the Mediterranean region. It was a prized vegetable among the Romans and has since become a staple in cuisines worldwide. But let’s be honest, buying cauliflower can be a gamble. Sometimes it’s perfect, other times it’s bruised, discolored, or just plain flavorless. That’s where our DIY guide comes in!
In this article, I’m going to share some simple yet effective tricks and hacks to help you successfully grow cauliflower at home, even if you’re a complete beginner. We’ll cover everything from choosing the right variety and preparing your soil to protecting your precious plants from pests and diseases. So, ditch the store-bought disappointment and get ready to cultivate your own cauliflower patch. Let’s get growing!
Blumenkohl selbst anbauen: Dein umfassender DIY-Leitfaden
Hallo Gartenfreunde! Habt ihr euch jemals gefragt, wie man diesen köstlichen, vielseitigen Blumenkohl selbst anbauen kann? Ich habe es ausprobiert und es ist gar nicht so schwer, wie man denkt! Mit ein wenig Geduld und den richtigen Schritten könnt auch ihr bald euren eigenen, frischen Blumenkohl ernten. Lasst uns gemeinsam in die Welt des Blumenkohlanbaus eintauchen!
Was du für den Blumenkohlanbau brauchst
Bevor wir loslegen, hier eine Liste der Dinge, die du benötigen wirst:
* Blumenkohlsamen oder Jungpflanzen (ich empfehle, mit Jungpflanzen zu beginnen, besonders wenn du Anfänger bist)
* Anzuchterde (für die Anzucht aus Samen)
* Gartenerde (gut durchlässig und nährstoffreich)
* Kompost oder organischer Dünger
* Gießkanne oder Gartenschlauch
* Gartenwerkzeuge (Spaten, Harke, Pflanzkelle)
* Mulch (Stroh, Holzhackschnitzel oder Grasschnitt)
* Pflanzgefäße (optional, für den Anbau im Topf)
* Schutznetz (optional, gegen Schädlinge)
Der richtige Zeitpunkt für den Blumenkohlanbau
Der Zeitpunkt ist entscheidend! Blumenkohl mag es kühl, daher ist es wichtig, ihn zur richtigen Zeit zu pflanzen.
* Frühjahrspflanzung: In den meisten Regionen ist das Frühjahr (März/April) eine gute Zeit, um Blumenkohl zu pflanzen. Achte darauf, dass keine starken Fröste mehr zu erwarten sind.
* Herbstpflanzung: Eine weitere Option ist die Herbstpflanzung (Juli/August). So kannst du im Herbst oder Winter ernten.
Blumenkohl aus Samen ziehen (optional)
Wenn du Blumenkohl aus Samen ziehen möchtest, hier die Schritte:
1. Aussaat: Fülle kleine Anzuchttöpfe mit Anzuchterde. Säe die Samen etwa 1 cm tief in die Erde.
2. Bewässerung: Halte die Erde feucht, aber nicht nass.
3. Standort: Stelle die Töpfe an einen hellen, warmen Ort.
4. Pikieren: Sobald die Sämlinge einige Blätter haben, kannst du sie in größere Töpfe pikieren.
5. Abhärten: Bevor du die Jungpflanzen ins Freie pflanzt, solltest du sie einige Tage lang abhärten, indem du sie tagsüber nach draußen stellst und nachts wieder hereinholst.
Blumenkohl pflanzen: Schritt-für-Schritt-Anleitung
Egal, ob du Jungpflanzen gekauft oder selbst gezogen hast, hier ist, wie du sie richtig pflanzt:
1. Bodenvorbereitung: Wähle einen sonnigen Standort mit gut durchlässigem Boden. Lockere den Boden mit einem Spaten auf und entferne Unkraut.
2. Bodenverbesserung: Mische Kompost oder organischen Dünger in den Boden, um ihn mit Nährstoffen anzureichern. Blumenkohl ist ein Starkzehrer und benötigt viele Nährstoffe.
3. Pflanzlöcher: Grabe Pflanzlöcher im Abstand von etwa 45-60 cm zueinander.
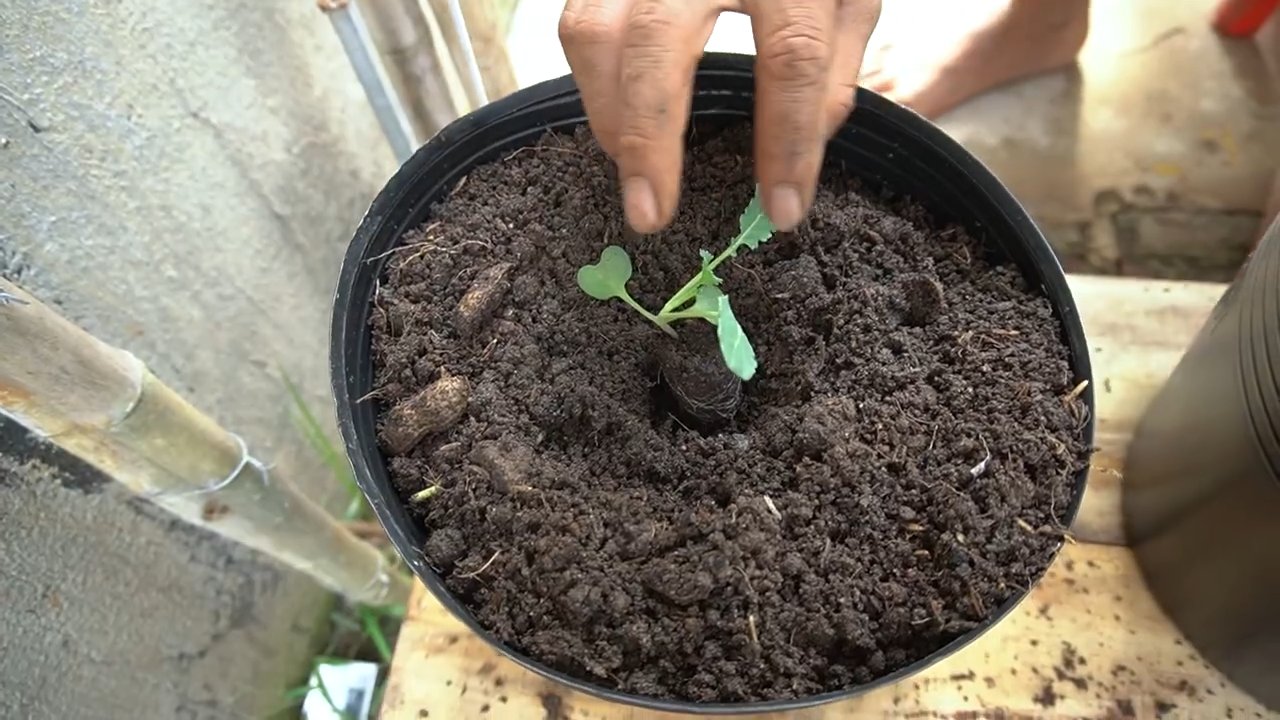
4. Pflanzen: Setze die Blumenkohlpflanzen in die Löcher und fülle sie mit Erde auf. Achte darauf, dass der Wurzelballen vollständig bedeckt ist.
5. Bewässerung: Gieße die Pflanzen gründlich an.
6. Mulchen: Trage eine Schicht Mulch um die Pflanzen auf, um die Feuchtigkeit im Boden zu halten und Unkrautwachstum zu unterdrücken.
Blumenkohl pflegen: Tipps und Tricks
Die Pflege ist entscheidend für eine reiche Ernte. Hier sind einige Tipps, die ich gelernt habe:
* Bewässerung: Blumenkohl benötigt regelmäßige Bewässerung, besonders während trockener Perioden. Achte darauf, dass der Boden immer leicht feucht ist.
* Düngung: Dünge die Pflanzen alle paar Wochen mit einem organischen Dünger oder Komposttee.
* Unkrautbekämpfung: Entferne regelmäßig Unkraut, um die Nährstoffkonkurrenz zu minimieren.
* Schädlingsbekämpfung: Achte auf Schädlinge wie Kohlweißlinge, Blattläuse und Kohlfliegen. Du kannst ein Schutznetz verwenden oder natürliche Schädlingsbekämpfungsmittel einsetzen.
* Kopfbildung: Sobald sich der Blumenkohlkopf zu bilden beginnt, solltest du ihn vor direkter Sonneneinstrahlung schützen, um Verfärbungen zu vermeiden. Du kannst die Blätter über den Kopf binden oder ihn mit einem Tuch abdecken.
Schutz vor Schädlingen und Krankheiten
Blumenkohl kann anfällig für verschiedene Schädlinge und Krankheiten sein. Hier sind einige häufige Probleme und wie du sie bekämpfen kannst:
* Kohlweißling: Die Raupen des Kohlweißlings fressen gerne an den Blättern. Du kannst sie absammeln oder ein biologisches Insektizid verwenden.
* Blattläuse: Blattläuse saugen Pflanzensaft und können die Pflanzen schwächen. Du kannst sie mit einem Wasserstrahl abspülen oder ein Insektizid auf Basis von Kaliseife verwenden.
* Kohlfliege: Die Larven der Kohlfliege fressen an den Wurzeln. Du kannst ein Schutznetz verwenden oder Nematoden einsetzen.
* Falscher Mehltau: Falscher Mehltau ist eine Pilzkrankheit, die sich durch gelbe Flecken auf den Blättern äußert. Du kannst die befallenen Blätter entfernen und ein Fungizid verwenden.
* Knollenfuß: Knollenfuß ist eine weitere Pilzkrankheit, die die Wurzeln befällt. Du kannst den Boden mit Kalk anreichern und resistente Sorten anbauen.
Blumenkohl ernten: Wann und wie
Die Ernte ist der aufregendste Teil!
1. Reifezeit: Blumenkohl ist in der Regel 60-80 Tage nach der Pflanzung erntereif.
2. Erntezeitpunkt: Der Blumenkohlkopf sollte fest und kompakt sein. Die Röschen sollten noch geschlossen sein.
3. Erntemethode: Schneide den Blumenkohlkopf mit einem scharfen Messer ab. Lasse einige Blätter am Kopf, um ihn vor dem Austrocknen zu schützen.
Blumenkohl lagern
Nach der Ernte solltest du den Blumenkohl richtig lagern, um seine Frische zu bewahren.
* Kühlschrank: Du kannst den Blumenkohl im Kühlschrank lagern. Wickle ihn in ein feuchtes Tuch oder lege ihn in einen Plastikbeutel. Er hält sich so etwa eine Woche.
* Einfrieren: Du kannst den Blumenkohl auch einfrieren. Blanchiere ihn dazu kurz in kochendem Wasser und friere ihn dann ein.
Blumenkohl im Topf anbauen: Eine Alternative für kleine Gärten
Wenn du keinen Garten hast, kannst du Blumenkohl auch im Topf anbauen.
1. Topfgröße: Wähle einen großen Topf mit einem Durchmesser von mindestens 30 cm.
2. Erde: Verwende eine hochwertige Blumenerde.
3. Pflanzung: Pflanze eine Blumenkohlpflanze pro Topf.
4. Pflege: Gieße und dünge die Pflanzen regelmäßig. Stelle den Topf an einen sonnigen Standort.
Sortenempfehlungen
Es gibt viele verschiedene Blumenkohlsorten. Hier sind einige, die ich empfehlen kann:
* ‘Snowball’: Eine klassische, weiße Sorte.
* ‘Romanesco’: Eine grüne, spiralförmige Sorte mit einem milden Geschmack.
* ‘Purple of Sicily’: Eine violette Sorte mit einem süßen Geschmack.
* ‘Cheddar’: Eine orangefarbene Sorte mit einem nussigen Geschmack.
Häufige Fehler beim Blumenkohlanbau (und wie man sie vermeidet)
Auch ich habe Fehler gemacht, als ich angefangen habe. Hier sind einige häufige Fehler und wie du sie vermeiden kannst:
* Falscher Zeitpunkt: Blumenkohl zur falschen Zeit pflanzen.
Conclusion
So, there you have it! Growing cauliflower at home, while it might seem daunting at first, is an incredibly rewarding experience that brings the freshest, most flavorful produce right to your table. We’ve walked through the key steps, from selecting the right variety and starting seeds to nurturing your plants and harvesting that beautiful, creamy head. But why should you bother with all this effort when you can just buy cauliflower at the store? The answer lies in the unparalleled taste, the satisfaction of nurturing something from seed to harvest, and the control you have over the growing process.
Think about it: store-bought cauliflower often travels long distances, losing freshness and flavor along the way. By growing your own, you’re enjoying cauliflower at its peak, bursting with nutrients and a delicate sweetness that you simply can’t find anywhere else. Plus, you know exactly what went into growing it – no harmful pesticides or herbicides, just good old-fashioned care and attention.
Beyond the superior taste and health benefits, growing cauliflower at home is also a fantastic learning experience. You’ll gain a deeper understanding of the natural world, develop your gardening skills, and connect with the food you eat in a more meaningful way. It’s a truly enriching hobby that can bring joy and satisfaction for years to come.
Don’t be afraid to experiment! Try different varieties of cauliflower to find your favorites. Purple cauliflower adds a vibrant splash of color to your dishes, while Romanesco cauliflower boasts a stunning geometric pattern. You can also try succession planting, sowing seeds every few weeks to ensure a continuous harvest throughout the growing season. Consider companion planting too! Marigolds can help deter pests, while herbs like rosemary and thyme can improve the flavor of your cauliflower.
And if you’re feeling adventurous, why not try growing cauliflower in containers? This is a great option for those with limited space or poor soil. Just make sure to choose a large container with good drainage and use a high-quality potting mix.
We understand that growing cauliflower can seem intimidating, but with a little patience and attention, you’ll be amazed at what you can achieve. Don’t be discouraged by initial setbacks – every gardener faces challenges along the way. The key is to learn from your mistakes, adapt your approach, and keep on growing.
We are confident that with the knowledge you’ve gained from this guide, you’re well-equipped to embark on your own cauliflower-growing adventure. So, grab your seeds, get your hands dirty, and prepare to enjoy the delicious rewards of your labor.
We encourage you to try growing cauliflower at home and share your experiences with us! Let us know what varieties you’re growing, what challenges you’ve faced, and what tips you’ve discovered along the way. Your insights can help other gardeners succeed and inspire even more people to embrace the joy of growing their own food. Share your photos and stories on our social media pages using #HomeGrownCauliflower. We can’t wait to see what you create!
Frequently Asked Questions (FAQ)
Q: How much space does cauliflower need to grow?
A: Cauliflower plants need ample space to develop their heads properly. Generally, you should space your cauliflower plants about 18 to 24 inches apart in rows that are 30 to 36 inches apart. This allows for good air circulation, which helps prevent diseases, and provides enough room for the plants to mature without competing for resources. If you’re growing in containers, choose a pot that is at least 12 inches in diameter and depth for each plant. Remember, adequate spacing is crucial for healthy growth and maximizing your yield.
Q: What are the most common pests and diseases that affect cauliflower, and how can I prevent them?
A: Cauliflower is susceptible to several pests and diseases, including cabbage worms, aphids, flea beetles, clubroot, and black rot. Prevention is key! To prevent cabbage worms, use row covers to protect your plants or handpick them off the leaves regularly. Attract beneficial insects like ladybugs and lacewings, which prey on aphids. For flea beetles, use sticky traps or diatomaceous earth. To prevent clubroot and black rot, ensure good soil drainage, practice crop rotation, and use disease-resistant varieties. Regularly inspect your plants for signs of infestation or disease and take action promptly to prevent problems from escalating. Organic pest control methods, such as neem oil or insecticidal soap, can be effective for managing pests.
Q: How often should I water my cauliflower plants?
A: Cauliflower requires consistent moisture, especially during head formation. Water deeply and regularly, aiming for about 1 to 1.5 inches of water per week. Check the soil moisture regularly by sticking your finger about an inch deep into the soil. If it feels dry, it’s time to water. Avoid overhead watering, as this can promote fungal diseases. Instead, water at the base of the plants. Mulching around the plants can help retain moisture and suppress weeds. During hot, dry weather, you may need to water more frequently.
Q: When is the best time to harvest cauliflower?
A: Cauliflower is ready to harvest when the head is firm, compact, and reaches the desired size (usually 6 to 8 inches in diameter, depending on the variety). The curds should be tightly packed and white (or the color specific to the variety). Check the maturity date on your seed packet as a general guideline, but rely on visual cues to determine ripeness. If the curds start to separate or the head becomes loose, it’s time to harvest. To harvest, cut the stem just below the head, leaving a few leaves attached for protection.
Q: Can I grow cauliflower in containers?
A: Yes, you can absolutely grow cauliflower in containers! Choose a large container that is at least 12 inches in diameter and depth. Use a high-quality potting mix that drains well. Ensure the container has drainage holes to prevent waterlogging. Place the container in a sunny location that receives at least 6 hours of sunlight per day. Water regularly and fertilize every few weeks with a balanced fertilizer. Container-grown cauliflower may require more frequent watering and fertilization than plants grown in the ground.
Q: What kind of fertilizer should I use for cauliflower?
A: Cauliflower is a heavy feeder and benefits from regular fertilization. Use a balanced fertilizer with a ratio of 10-10-10 or 14-14-14. Apply fertilizer at planting time and then again every 3 to 4 weeks during the growing season. You can also use organic fertilizers, such as compost tea or fish emulsion. Follow the instructions on the fertilizer package for application rates. Avoid over-fertilizing, as this can lead to excessive foliage growth and delayed head formation.
Q: My cauliflower head is turning yellow. What should I do?
A: Yellowing of the cauliflower head can be caused by several factors, including sun exposure, nutrient deficiencies, or disease. To prevent sun scalding, blanch the head by tying the outer leaves together over the developing head when it reaches about 2 to 3 inches in diameter. This will protect it from direct sunlight. Ensure your plants are receiving adequate nutrients by fertilizing regularly. If you suspect a disease, inspect the plant for other symptoms and take appropriate action.
Q: Can I eat the leaves of the cauliflower plant?
A: Yes, the leaves of the cauliflower plant are edible! They are similar to collard greens or kale and can be cooked in the same way. They are a good source of vitamins and minerals. Just make sure to wash them thoroughly before cooking. You can sauté them, steam them, or add them to soups and stews.
Q: What are some creative ways to use my homegrown cauliflower?
A: The possibilities are endless! You can roast it with olive oil and herbs, steam it and serve it with cheese sauce, or use it to make cauliflower rice. You can also add it to soups, stews, and stir-fries. For a healthier alternative to mashed potatoes, try mashed cauliflower. You can even grill cauliflower steaks for a delicious vegetarian main course. Don’t be afraid to experiment and get creative in the kitchen!

Leave a Comment