
Kale plastic bottle gardening: Ever dreamt of a thriving garden bursting with fresh, leafy greens, but thought you lacked the space or the green thumb? Well, dream no more! I’m about to share a super simple, incredibly effective, and eco-friendly way to grow your own delicious kale, even if you only have a sunny windowsill.
For centuries, humans have cultivated kale, recognizing its nutritional powerhouse status. From ancient Roman gardens to medieval European fields, kale has been a staple, providing essential vitamins and minerals. Now, we’re bringing this ancient superfood into the modern age with a clever twist!
In today’s fast-paced world, access to fresh, healthy produce can be a challenge. Store-bought kale can be expensive and may have traveled long distances, losing some of its nutritional value along the way. That’s where this DIY trick comes in. With kale plastic bottle gardening, you can recycle those unwanted plastic bottles and transform them into mini-gardens, providing you with a constant supply of fresh, organic kale right at your fingertips. Not only is it budget-friendly and sustainable, but it’s also incredibly rewarding to watch your own food grow. So, let’s dive in and discover how easy it is to create your own thriving kale oasis!
Upcycling-Projekt: Dein eigener Mini-Kohl-Garten aus Plastikflaschen
Hey Leute! Habt ihr auch genug von leeren Plastikflaschen, die nur Platz wegnehmen? Ich habe da eine super Idee, wie wir diese Dinger in etwas Nützliches verwandeln können – einen eigenen kleinen Kohl-Garten! Das ist nicht nur nachhaltig, sondern macht auch noch Spaß und spart Geld. Los geht’s!
Was du brauchst:
* Leere Plastikflaschen (am besten 1,5 oder 2 Liter)
* Ein scharfes Messer oder eine Schere
* Erde (am besten Bio-Gemüseerde)
* Kohl-Samen (Grünkohl, Palmkohl, Rosenkohl – was immer dein Herz begehrt!)
* Optional: Anzuchterde für die Voranzucht
* Optional: Sprühflasche mit Wasser
* Optional: Kleine Steine oder Kies für die Drainage
* Optional: Permanentmarker
Schritt-für-Schritt-Anleitung:
1. Vorbereitung der Plastikflaschen
1. Reinigung: Zuerst müssen wir die Plastikflaschen gründlich reinigen. Entferne alle Etiketten und spüle sie mit warmem Wasser und etwas Spülmittel aus. Achte darauf, dass keine Spülmittelreste zurückbleiben.
2. Zuschneiden: Jetzt kommt der spannende Teil! Wir schneiden die Flaschen so zu, dass sie als Pflanzgefäße dienen können. Es gibt verschiedene Möglichkeiten:
* Variante 1: Horizontaler Schnitt: Schneide die Flasche horizontal in der Mitte durch. Der untere Teil wird zum Pflanzgefäß, der obere Teil kann als eine Art Mini-Gewächshaus verwendet werden (später mehr dazu).
* Variante 2: Vertikaler Schnitt: Schneide die Flasche vertikal auf einer Seite auf. So entsteht eine Art “Tasche”, in die du die Erde füllen kannst. Diese Variante eignet sich gut, wenn du die Flaschen aufhängen möchtest.
* Variante 3: Mehrere kleine Löcher: Schneide oder bohre mehrere kleine Löcher in die Seiten der Flasche. Diese Variante ist ideal, wenn du die Flasche liegend verwenden und mehrere Kohlpflanzen darin anbauen möchtest.
Ich persönlich finde die horizontale Variante am einfachsten und effektivsten.
3. Drainagelöcher: Unabhängig davon, für welche Variante du dich entscheidest, solltest du unbedingt Drainagelöcher in den Boden der Flasche bohren oder schneiden. So kann überschüssiges Wasser ablaufen und Staunässe vermieden werden. Staunässe ist der Feind jeder Pflanze!
2. Befüllen der Pflanzgefäße
1. Drainage: Wenn du möchtest, kannst du eine Schicht kleine Steine oder Kies auf den Boden der Flasche geben. Das verbessert die Drainage zusätzlich und verhindert, dass die Erde die Löcher verstopft.
2. Erde: Fülle die Flasche mit Erde. Verwende am besten Bio-Gemüseerde, da diese speziell auf die Bedürfnisse von Gemüse abgestimmt ist und wichtige Nährstoffe enthält. Lass oben etwa 2-3 cm Platz, damit das Gießen einfacher ist.
3. Optional: Beschriftung: Wenn du verschiedene Kohlsorten anbauen möchtest, kannst du die Flaschen mit einem Permanentmarker beschriften. So behältst du den Überblick.
3. Aussaat der Kohl-Samen
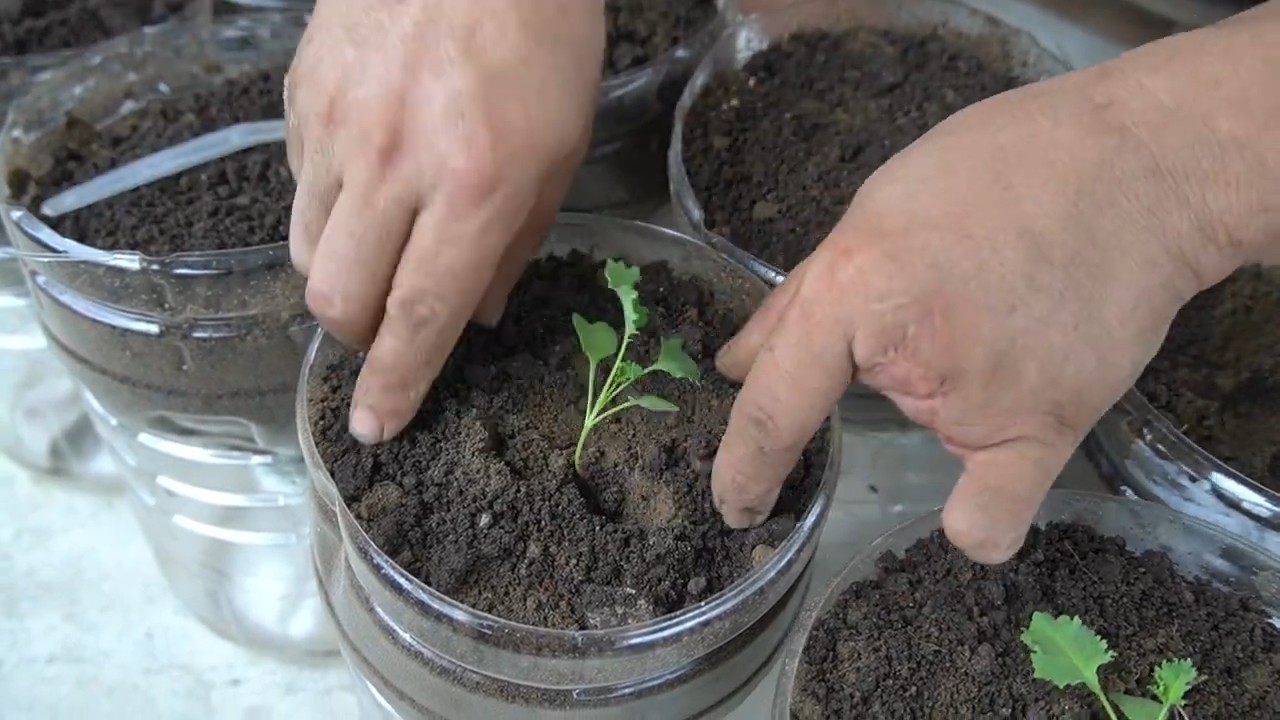
1. Aussaat: Drücke mit dem Finger kleine Mulden in die Erde (etwa 1-2 cm tief). Lege in jede Mulde 2-3 Kohl-Samen. Bedecke die Samen mit Erde und drücke sie leicht an.
2. Gießen: Gieße die Erde vorsichtig mit einer Sprühflasche oder einer Gießkanne mit Brauseaufsatz. Die Erde sollte feucht, aber nicht nass sein.
3. Mini-Gewächshaus (optional): Wenn du die horizontale Schnittvariante gewählt hast, kannst du den oberen Teil der Flasche als Mini-Gewächshaus verwenden. Setze ihn einfach umgekehrt auf den unteren Teil. Das sorgt für ein feuchtwarmes Klima, das die Keimung der Samen fördert. Achte aber darauf, dass du regelmäßig lüftest, um Schimmelbildung zu vermeiden.
4. Pflege der Kohlpflanzen
1. Standort: Stelle die bepflanzten Flaschen an einen hellen und sonnigen Standort. Kohl braucht viel Licht, um gut zu wachsen.
2. Gießen: Gieße die Pflanzen regelmäßig, aber vermeide Staunässe. Die Erde sollte immer leicht feucht sein.
3. Düngen: Nach etwa 2-3 Wochen, wenn die ersten Blätter erscheinen, kannst du mit dem Düngen beginnen. Verwende einen organischen Flüssigdünger für Gemüse.
4. Vereinzeln: Wenn mehrere Samen in einer Mulde gekeimt sind, solltest du die schwächsten Pflanzen entfernen, damit die stärksten genug Platz zum Wachsen haben.
5. Schutz vor Schädlingen: Kohl ist leider anfällig für Schädlinge wie Kohlweißlinge oder Blattläuse. Kontrolliere die Pflanzen regelmäßig und bekämpfe Schädlinge bei Bedarf mit natürlichen Mitteln (z.B. Brennnesseljauche oder Neemöl).
5. Ernte
1. Erntezeitpunkt: Je nach Kohlsorte dauert es unterschiedlich lange, bis du ernten kannst. Grünkohl kann oft schon nach wenigen Wochen geerntet werden, während Rosenkohl etwas länger braucht.
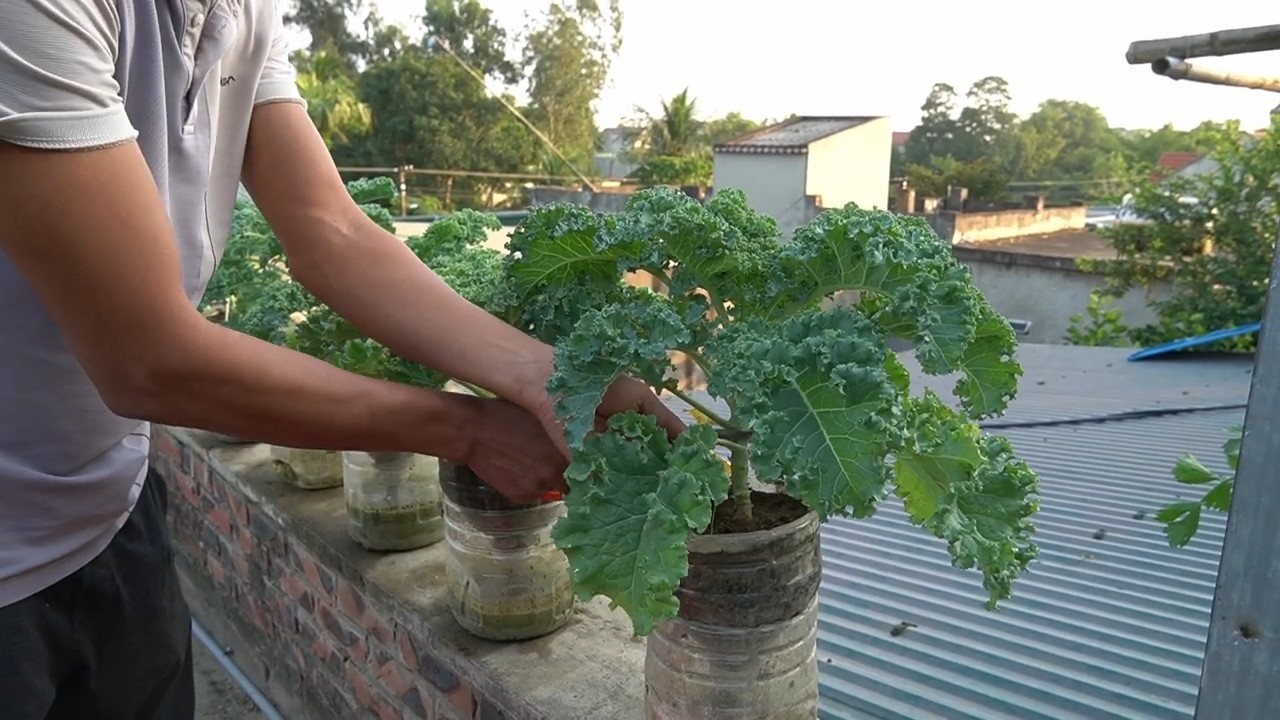
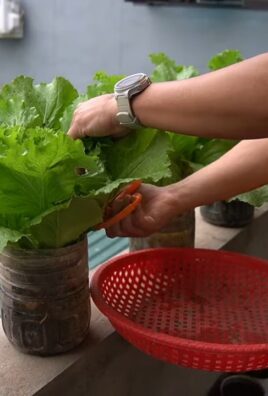
2. Erntemethode: Ernte die Blätter oder Köpfe, wenn sie die gewünschte Größe erreicht haben. Bei Grünkohl kannst du einfach die äußeren Blätter abzupfen. Bei Rosenkohl erntest du die Röschen, wenn sie fest und geschlossen sind.
Zusätzliche Tipps und Tricks:
* Verschiedene Kohlsorten: Probiere verschiedene Kohlsorten aus! Grünkohl ist super robust und einfach anzubauen, Palmkohl sieht toll aus und ist sehr gesund, und Rosenkohl ist ein echter Klassiker.
* Voranzucht: Du kannst die Kohl-Samen auch in Anzuchtschalen vorziehen und die Jungpflanzen dann in die Plastikflaschen umsetzen. Das ist besonders dann sinnvoll, wenn du früh im Jahr mit dem Anbau beginnen möchtest.
* Vertikaler Garten: Wenn du wenig Platz hast, kannst du die Plastikflaschen auch zu einem vertikalen Garten umfunktionieren. Befestige die Flaschen einfach an einer Wand oder einem Zaun.
* Dekoration: Du kannst die Plastikflaschen auch bemalen oder bekleben, um sie optisch aufzuwerten. So wird dein Kohl-Garten zu einem echten Hingucker!
* Nachhaltigkeit: Denke daran, dass du mit diesem Projekt nicht nur deinen eigenen Kohl anbaust, sondern auch einen Beitrag zur Nachhaltigkeit leistest. Indem du Plastikflaschen upcycelst, reduzierst du Müll und schonst Ressourcen.
Ich hoffe, diese Anleitung hilft dir dabei, deinen eigenen Mini-Kohl-Garten aus Plastikflaschen anzulegen. Es ist wirklich einfacher als es klingt und macht unglaublich viel Spaß! Viel Erfolg und guten Appetit!
Conclusion
So, there you have it! Transforming a simple plastic bottle into a thriving kale garden is not just a fun project; it’s a sustainable, space-saving, and incredibly rewarding way to enjoy fresh, homegrown greens. We’ve walked you through the process, highlighting the ease and accessibility of this DIY trick. But why is this method a must-try?
Firstly, it’s incredibly economical. Instead of discarding those plastic bottles, you’re giving them a new lease on life, reducing waste and saving money on expensive planters. Secondly, it’s perfect for small spaces. Whether you have a sprawling backyard or a tiny balcony, these vertical kale gardens can be easily adapted to fit your needs. Imagine fresh, organic kale just steps away from your kitchen, ready to be added to your smoothies, salads, or stir-fries.
Beyond the practical benefits, this project offers a unique connection to your food. Watching your kale seedlings sprout and flourish is a deeply satisfying experience, fostering a greater appreciation for the natural world. It’s also a fantastic educational opportunity, especially for children, teaching them about plant life cycles and the importance of sustainability.
But the beauty of this DIY trick lies in its versatility. Feel free to experiment with different bottle sizes and configurations. You could create a cascading kale wall by hanging multiple bottles at varying heights, or try painting the bottles with vibrant colors to add a touch of personality to your garden. Consider using different types of soil mixes to see which works best for your local climate and kale variety.
For those looking to expand their green thumb horizons, why not try growing other leafy greens like spinach, lettuce, or even herbs like parsley and basil using the same method? The possibilities are endless! You can also explore different watering techniques, such as using a self-watering system with a wick to draw water from a reservoir at the bottom of the bottle. This is especially useful if you tend to forget to water your plants regularly.
Ultimately, this **kale plastic bottle gardening** project is more than just a gardening hack; it’s a step towards a more sustainable and self-sufficient lifestyle. It’s a chance to reconnect with nature, reduce waste, and enjoy the delicious rewards of homegrown produce.
We strongly encourage you to give this DIY trick a try. Don’t be afraid to get your hands dirty and experiment. And most importantly, we want to hear about your experience! Share your photos, tips, and challenges in the comments below. Let’s create a community of passionate gardeners who are committed to making a positive impact on the planet, one plastic bottle at a time. What are you waiting for? Grab a bottle, some soil, and some kale seeds, and let’s get growing!
Frequently Asked Questions (FAQ)
What type of plastic bottle is best for kale plastic bottle gardening?
Ideally, you should use food-grade plastic bottles, such as those that previously contained water, juice, or soda. These are generally made from PET (polyethylene terephthalate) or HDPE (high-density polyethylene), which are considered safe for growing plants. Avoid using bottles that contained harsh chemicals or cleaning products, as these could contaminate the soil and harm your kale. Thoroughly wash and rinse the bottles before using them. Also, consider the size of the bottle. Larger bottles will provide more space for the kale roots to grow, but smaller bottles are easier to handle and hang.
How often should I water my kale plants in plastic bottles?
The frequency of watering depends on several factors, including the climate, the type of soil you’re using, and the size of the bottle. As a general rule, check the soil moisture daily. If the top inch of soil feels dry to the touch, it’s time to water. Water thoroughly until you see water draining from the bottom of the bottle. Avoid overwatering, as this can lead to root rot. During hot and dry weather, you may need to water more frequently. Consider using a moisture meter to get a more accurate reading of the soil moisture levels.
What kind of soil should I use for growing kale in plastic bottles?
A well-draining potting mix is essential for growing healthy kale in plastic bottles. Avoid using garden soil, as it can be too heavy and compact, hindering drainage and potentially suffocating the roots. A good potting mix should contain a blend of peat moss, perlite, and vermiculite. You can also add compost to enrich the soil with nutrients. Consider adding a slow-release fertilizer to provide your kale plants with a steady supply of nutrients throughout the growing season.
How much sunlight does kale need when grown in plastic bottles?
Kale thrives in full sun, which means it needs at least 6 hours of direct sunlight per day. However, it can also tolerate partial shade, especially in hotter climates. If you’re growing your kale indoors, place the bottles near a sunny window or use grow lights to supplement the natural light. Rotate the bottles regularly to ensure that all sides of the plant receive adequate sunlight. Insufficient sunlight can lead to leggy growth and reduced yields.
How do I prevent pests and diseases from affecting my kale plants in plastic bottles?
Regularly inspect your kale plants for signs of pests and diseases. Common pests that affect kale include aphids, cabbage worms, and flea beetles. You can control these pests by handpicking them off the plants, using insecticidal soap, or introducing beneficial insects like ladybugs. To prevent diseases, ensure good air circulation around the plants and avoid overwatering. If you notice any signs of disease, such as yellowing leaves or spots, remove the affected leaves immediately. Consider using organic fungicides if necessary.
Can I grow kale in plastic bottles indoors during the winter?
Yes, you can grow kale in plastic bottles indoors during the winter, provided you have adequate light and temperature. Place the bottles near a sunny window or use grow lights to supplement the natural light. Maintain a consistent temperature between 60-70°F (15-21°C). Water regularly and fertilize as needed. You may need to adjust your watering schedule depending on the humidity levels in your home. Growing kale indoors during the winter can provide you with a fresh supply of greens even when the weather outside is cold and snowy.
How do I harvest kale from plastic bottles?
You can start harvesting kale leaves when they are about 4-6 inches long. Harvest the outer leaves first, leaving the inner leaves to continue growing. Avoid harvesting more than one-third of the plant at a time, as this can stress the plant and reduce its yield. Use a sharp knife or scissors to cut the leaves cleanly. Regular harvesting will encourage the plant to produce more leaves.
What are some variations I can try with this kale plastic bottle gardening method?
There are many variations you can try to personalize your kale plastic bottle garden. You can paint the bottles with different colors or designs to add a decorative touch. You can also create a vertical garden by hanging multiple bottles on a wall or fence. Consider using different types of soil mixes or adding compost to enrich the soil. You can also experiment with different watering techniques, such as using a self-watering system. Another variation is to grow different varieties of kale, such as curly kale, lacinato kale, or red Russian kale.
How long will my kale plants last in plastic bottles?
With proper care, your kale plants can last for several months in plastic bottles. Kale is a biennial plant, which means it typically lives for two years. However, in some climates, it may only last for one growing season. To prolong the life of your kale plants, provide them with adequate sunlight, water, and nutrients. Regularly harvest the leaves to encourage new growth. Protect the plants from extreme temperatures and pests.
Is kale plastic bottle gardening environmentally friendly?
Yes, kale plastic bottle gardening is an environmentally friendly practice. It reduces waste by repurposing plastic bottles that would otherwise end up in landfills. It also promotes sustainable gardening by encouraging people to grow their own food, reducing their reliance on commercially grown produce. Growing your own kale also reduces the carbon footprint associated with transporting food from farms to grocery stores. By using organic gardening practices, you can further minimize your environmental impact.
Leave a Comment