
Growing carrots in bottles might sound like something out of a science fiction movie, but trust me, it’s a surprisingly simple and incredibly rewarding DIY project! Have you ever dreamt of harvesting perfectly formed, vibrant orange carrots without battling rocky soil, pesky pests, or limited garden space? Well, dream no more! This ingenious technique allows you to cultivate these root vegetables in a controlled environment, ensuring a bountiful harvest even if you only have a balcony or a small patio.
The concept of container gardening, in general, has roots stretching back centuries, with evidence suggesting ancient civilizations utilized pots and raised beds to cultivate plants in challenging environments. While the specific history of growing carrots in bottles is more recent, it taps into that same spirit of resourcefulness and innovation. It’s about adapting to our surroundings and finding creative solutions to enjoy fresh, homegrown produce.
So, why should you try this? Let’s face it, traditional carrot gardening can be tricky. Rocky soil often leads to stunted, misshapen carrots, and pests can decimate your crop before you even get a chance to enjoy it. Growing carrots in bottles eliminates many of these common problems. Plus, it’s a fantastic way to recycle plastic bottles, making it an eco-friendly and budget-friendly project. I’m excited to share this easy-to-follow guide with you, so you can experience the joy of harvesting your own delicious, homegrown carrots, no matter where you live!
Karotten im Flaschengarten: Dein DIY-Guide für Mini-Möhren
Hey Gärtnerfreunde! Habt ihr Lust auf eine etwas andere Art des Gemüseanbaus? Ich zeige euch heute, wie ihr Karotten in Flaschen ziehen könnt – ein super Projekt für kleine Gärten, Balkone oder einfach nur, um etwas Neues auszuprobieren. Es ist einfacher, als ihr denkt, und macht richtig Spaß!
Was du brauchst:
* Plastikflaschen: Am besten eignen sich 1,5-Liter- oder 2-Liter-Flaschen. Je größer die Flasche, desto länger können deine Karotten werden. Achtet darauf, dass sie sauber sind.
* Karottensamen: Wählt eine Sorte, die für den Anbau in Containern geeignet ist. Kurze, runde Sorten wie ‘Parisienne’ oder ‘Thumbelina’ sind ideal.
* Erde: Eine lockere, gut durchlässige Blumenerde ist perfekt. Ihr könnt auch etwas Sand oder Perlit untermischen, um die Drainage zu verbessern.
* Wasser: Zum Gießen, natürlich!
* Messer oder Schere: Zum Zuschneiden der Flaschen.
* Sprühflasche: Für die Bewässerung der Samen.
* Optional: Kleine Steine oder Kies für die Drainage am Boden der Flasche.
Flaschen vorbereiten: Der Grundstein für deinen Mini-Karottengarten
1. Flaschen reinigen: Zuerst müsst ihr die Plastikflaschen gründlich reinigen. Entfernt alle Etiketten und spült sie mit warmem Seifenwasser aus. Achtet darauf, dass keine Seifenreste zurückbleiben.
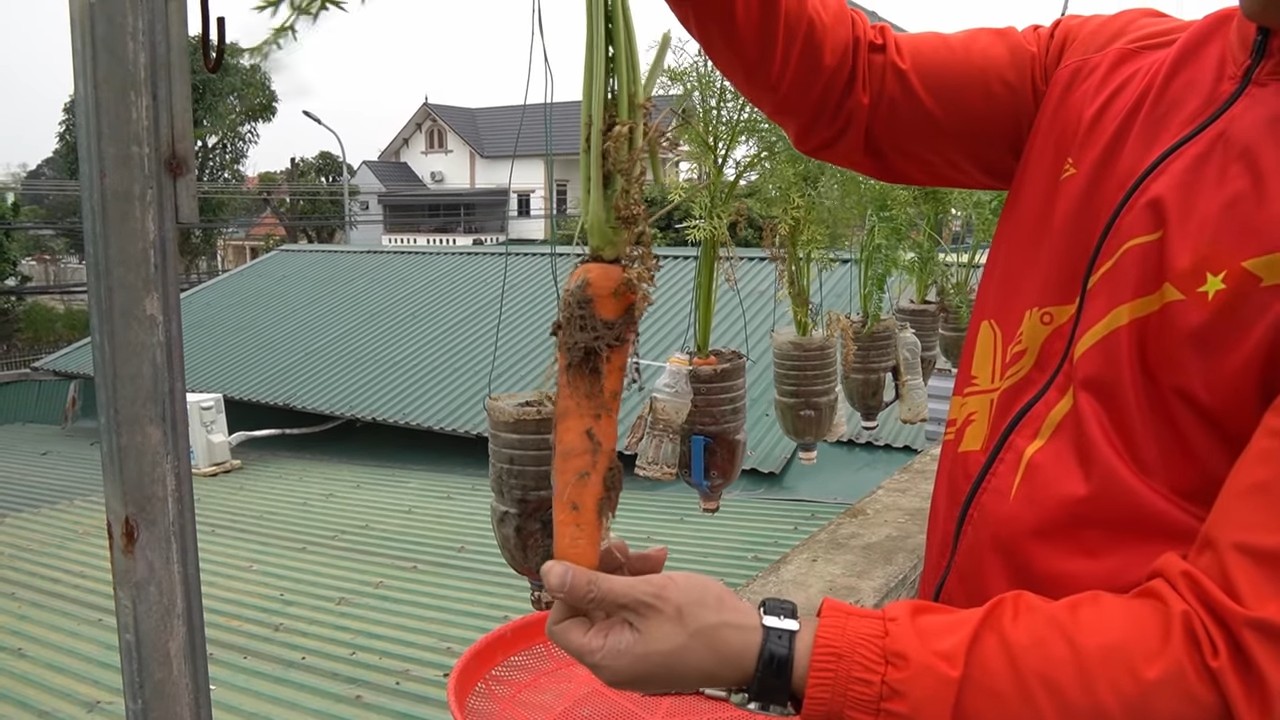
2. Flaschen zuschneiden: Jetzt kommt der spannende Teil! Schneidet die Flaschen so zu, dass ihr einen Behälter habt, der tief genug für eure Karotten ist. Ich empfehle, die Flasche etwa 15-20 cm vom Boden entfernt abzuschneiden. So haben die Karotten genug Platz zum Wachsen.
3. Drainagelöcher bohren: Damit das Wasser gut ablaufen kann und sich keine Staunässe bildet, bohrt ihr ein paar kleine Löcher in den Boden der Flaschen. Das ist super wichtig, denn Staunässe mögen Karotten gar nicht!
4. Drainageschicht anlegen (optional): Wenn ihr wollt, könnt ihr eine kleine Schicht Steine oder Kies auf den Boden der Flasche legen. Das verbessert die Drainage zusätzlich und verhindert, dass die Erde die Löcher verstopft.
Aussaat der Karottensamen: Der Start ins Karotten-Glück
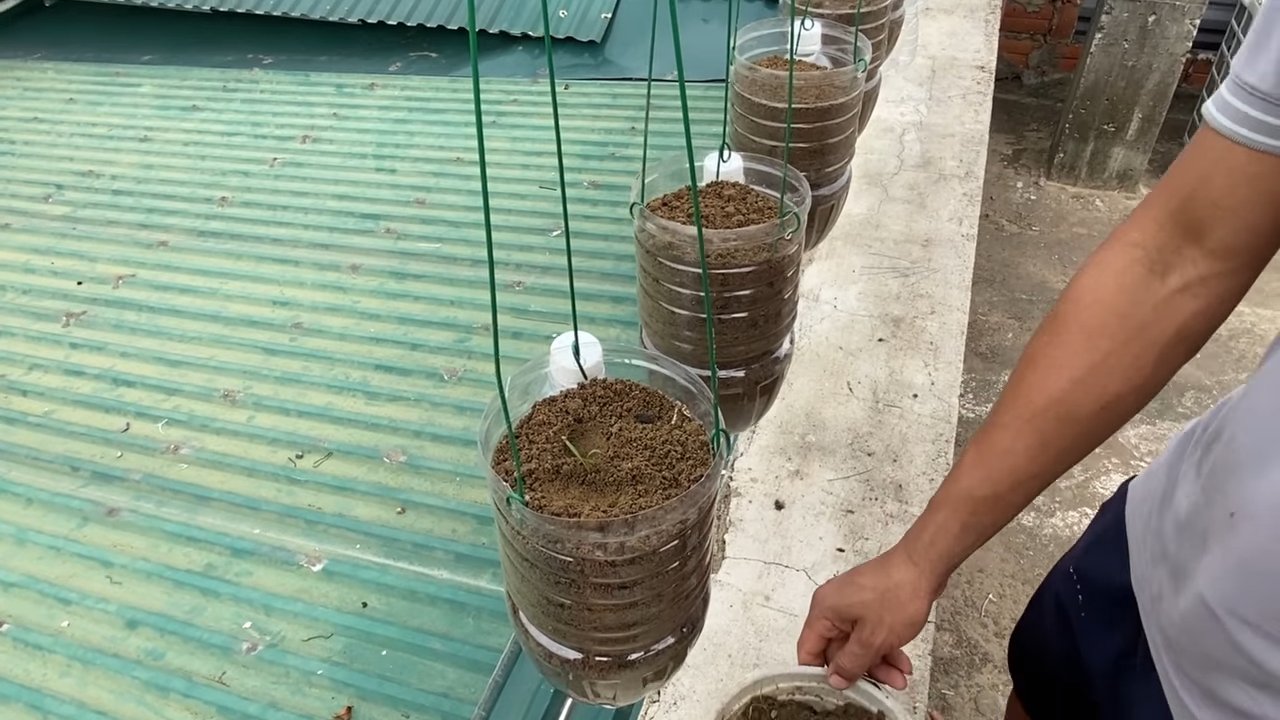
1. Erde einfüllen: Füllt die vorbereiteten Flaschen mit eurer Blumenerde. Lasst etwa 2-3 cm Platz bis zum Rand. Drückt die Erde leicht an, aber nicht zu fest. Sie sollte locker und luftig bleiben.
2. Samen aussäen: Verteilt die Karottensamen gleichmäßig auf der Erde. Achtet darauf, dass sie nicht zu dicht beieinander liegen. Karotten brauchen Platz zum Wachsen. Ich säe meistens 3-4 Samen pro Flasche.
3. Samen bedecken: Bedeckt die Samen mit einer dünnen Schicht Erde (ca. 0,5 cm). Drückt die Erde leicht an.
4. Bewässern: Befeuchtet die Erde vorsichtig mit einer Sprühflasche. Die Erde sollte feucht, aber nicht nass sein. Vermeidet es, die Samen wegzuspülen.
Pflege deiner Karotten: Geduld wird belohnt
1. Standort: Stellt die Flaschen an einen sonnigen Standort. Karotten brauchen mindestens 6 Stunden Sonne pro Tag, um gut zu wachsen.
2. Bewässerung: Haltet die Erde feucht, aber nicht nass. Gießt regelmäßig, besonders an heißen Tagen. Überprüft die Feuchtigkeit der Erde, indem ihr mit dem Finger in die Erde stecht. Wenn sie sich trocken anfühlt, ist es Zeit zum Gießen.
3. Ausdünnen: Wenn die Karottenpflänzchen etwa 2-3 cm groß sind, müsst ihr sie ausdünnen. Entfernt die schwächsten Pflänzchen, so dass nur noch 1-2 kräftige Pflänzchen pro Flasche übrig bleiben. Das gibt den verbleibenden Karotten genug Platz zum Wachsen.
4. Düngen (optional): Wenn ihr wollt, könnt ihr eure Karotten während der Wachstumsphase mit einem Flüssigdünger für Gemüse düngen. Achtet darauf, die Anweisungen auf der Verpackung zu befolgen.
5. Beobachten: Beobachtet eure Karotten regelmäßig. Achtet auf Schädlinge oder Krankheiten. Wenn ihr etwas Ungewöhnliches bemerkt, handelt schnell.
Erntezeit: Die Früchte deiner Arbeit genießen
1. Erntezeitpunkt: Die Erntezeit hängt von der Karottensorte ab. In der Regel sind Karotten nach etwa 60-80 Tagen erntereif. Ihr könnt den Reifegrad überprüfen, indem ihr vorsichtig an einer Karotte zieht. Wenn sie sich leicht aus der Erde ziehen lässt, ist sie reif.
2. Ernten: Um die Karotten zu ernten, zieht ihr sie vorsichtig aus der Erde. Wenn sie sich nicht leicht ziehen lassen, könnt ihr die Erde etwas auflockern.
3. Genießen: Wascht die Karotten gründlich und genießt sie frisch aus dem Garten! Sie schmecken besonders lecker in Salaten, als Snack oder als Beilage zu euren Lieblingsgerichten.
Zusätzliche Tipps und Tricks:
* Sortenwahl: Wie bereits erwähnt, eignen sich kurze, runde Karottensorten am besten für den Anbau in Flaschen. Informiert euch vor dem Kauf über die Eigenschaften der verschiedenen Sorten.
* Erde: Eine gute Drainage ist entscheidend für den Erfolg. Mischt etwas Sand oder Perlit unter die Blumenerde, um die Drainage zu verbessern.
* Sonne: Karotten brauchen viel Sonne. Stellt die Flaschen an einen sonnigen Standort, an dem sie mindestens 6 Stunden Sonne pro Tag bekommen.
* Bewässerung: Gießt regelmäßig, aber vermeidet Staunässe. Die Erde sollte feucht, aber nicht nass sein.
* Schädlinge: Achtet auf Schädlinge wie Karottenfliegen. Ihr könnt die Flaschen mit einem Netz abdecken, um die Fliegen fernzuhalten.
* Rotation: Baut Karotten nicht jedes Jahr am selben Standort an. Wechselt den Standort, um Krankheiten und Schädlingen vorzubeugen.
* Upcycling: Nutzt alte Plastikflaschen, um euren Beitrag zum Umweltschutz zu leisten.
* Kreativität: Bemalt die Flaschen oder beklebt sie mit Aufklebern, um euren Mini-Karottengarten zu verschönern.
Häufige Probleme und Lösungen:
* Keine Keimung: Wenn die Samen nicht keimen, kann das verschiedene Ursachen haben. Möglicherweise sind die Samen zu alt, die Erde zu trocken oder zu kalt. Achtet darauf, frische Samen zu verwenden, die Erde feucht zu halten und die Flaschen an einen warmen Standort zu stellen.
* Gelbe Blätter: Gelbe Blätter können ein Zeichen für Nährstoffmangel sein. Düngt die Karotten mit einem Flüssigdünger für Gemüse.
* Krumme Karotten: Krumme Karotten können durch Steine oder andere Hindernisse in der Erde verursacht werden. Achtet darauf, eine lockere, steinfreie Erde zu verwenden.
* Schädlinge: Achtet auf Schädlinge wie Karottenfliegen. Ihr könnt die Flaschen mit einem Netz abdecken, um die Fliegen fernzuhalten.
Fazit:
Karotten im Flaschengarten sind ein tolles Projekt für alle, die wenig Platz haben oder einfach nur etwas Neues ausprobieren möchten. Mit ein wenig Geduld und Pflege könnt ihr eure eigenen Mini-Möhren ernten und genießen. Probiert es aus und lasst euch überraschen! Viel Spaß beim Gärtnern!
Conclusion
So, there you have it! Growing carrots in bottles isn’t just a quirky gardening experiment; it’s a genuinely effective way to cultivate these root vegetables, especially when space is limited or soil conditions are less than ideal. We’ve walked through the process, highlighting the benefits and addressing potential challenges. Now, it’s time to ditch the traditional garden bed and embrace this innovative method.
Why is this a must-try? Because it offers a level of control and convenience that traditional gardening simply can’t match. You’re minimizing pest problems, maximizing space utilization, and creating a visually appealing display all at once. Plus, the satisfaction of harvesting perfectly formed, vibrant carrots from a recycled bottle is an experience in itself.
But don’t stop there! Experiment with different carrot varieties. Shorter, rounder varieties like ‘Parisian’ or ‘Thumbelina’ are particularly well-suited for bottle growing. You can also play around with the growing medium. While we recommended a well-draining potting mix, consider adding compost or other organic matter to boost nutrient content. Try different bottle sizes too! Smaller bottles for baby carrots, larger ones for standard-sized varieties. The possibilities are endless.
Consider a tiered system using multiple bottles stacked or arranged creatively. This not only maximizes vertical space but also adds a decorative element to your balcony, patio, or even indoor space. You could even paint the bottles to match your décor or create a vibrant, eye-catching display.
Remember to monitor the moisture levels regularly and adjust your watering schedule accordingly. Overwatering can lead to root rot, while underwatering can stunt growth. A little attention and care will go a long way in ensuring a successful harvest.
We’re confident that you’ll find growing carrots in bottles to be a rewarding and enjoyable experience. It’s a fantastic way to connect with nature, learn about the growing process, and enjoy fresh, homegrown produce. So, gather your bottles, prepare your potting mix, and get ready to embark on this exciting gardening adventure.
Don’t forget to share your experiences with us! We’d love to see your bottle carrot gardens and hear about your successes (and any challenges you encounter along the way). Post photos and stories on social media using #BottleCarrots or leave a comment below. Let’s build a community of bottle carrot enthusiasts and inspire others to try this innovative gardening technique. Your insights and experiences will be invaluable to fellow gardeners. Let’s revolutionize the way we grow carrots, one bottle at a time! This method of growing carrots in bottles is a game changer for urban gardeners.
Frequently Asked Questions (FAQ)
What type of bottles are best for growing carrots?
The ideal bottles are clear or translucent plastic bottles, as they allow sunlight to reach the soil. Two-liter soda bottles or larger water bottles work well for standard-sized carrots. For smaller varieties like baby carrots, you can use smaller bottles. Ensure the bottles are clean and have had any labels removed. The most important thing is that the bottle is deep enough to accommodate the carrot’s root growth. A minimum depth of 8 inches is recommended, but 10-12 inches is preferable for longer varieties.
What kind of soil should I use?
A well-draining potting mix is essential. Carrots need loose soil to grow properly, and heavy soil can lead to stunted or misshapen roots. You can also amend the potting mix with compost or other organic matter to improve drainage and nutrient content. Avoid using garden soil directly, as it can be too dense and may contain pests or diseases. A mix of peat moss, perlite, and vermiculite is a good starting point.
How often should I water my bottle carrots?
Watering frequency depends on the climate, the type of potting mix, and the size of the bottle. Generally, you should water when the top inch of soil feels dry to the touch. Avoid overwatering, as this can lead to root rot. Ensure the bottle has drainage holes to allow excess water to escape. During hot weather, you may need to water more frequently. Check the moisture levels daily and adjust your watering schedule accordingly.
How much sunlight do bottle carrots need?
Carrots need at least six hours of sunlight per day to thrive. Place your bottle carrots in a sunny location, such as a south-facing window or a balcony. If you don’t have enough natural light, you can supplement with grow lights. Rotate the bottles regularly to ensure even sunlight exposure on all sides. Insufficient sunlight can result in leggy growth and poor root development.
How do I fertilize my bottle carrots?
Carrots are not heavy feeders, but they do benefit from regular fertilization. Use a balanced liquid fertilizer diluted to half strength every two to three weeks. Avoid fertilizers that are high in nitrogen, as this can promote leafy growth at the expense of root development. Look for a fertilizer with a higher phosphorus and potassium content. You can also add compost tea to the soil to provide a boost of nutrients.
How long does it take for carrots to grow in bottles?
The time it takes for carrots to mature depends on the variety and the growing conditions. Generally, carrots take 60 to 80 days to reach maturity. Baby carrots can be harvested sooner, typically around 50 to 60 days. Check the seed packet for specific information on the variety you are growing. You can also gently feel the top of the carrot to gauge its size.
What are some common problems when growing carrots in bottles?
Some common problems include root rot, pests, and nutrient deficiencies. Root rot can be prevented by using well-draining soil and avoiding overwatering. Pests can be controlled with organic insecticides or by handpicking them off the plants. Nutrient deficiencies can be addressed by fertilizing regularly. Monitor your plants closely for any signs of problems and take action promptly.
Can I grow other vegetables in bottles using the same method?
Yes, you can grow other root vegetables in bottles, such as radishes, beets, and turnips. You can also grow herbs and leafy greens in bottles. The key is to choose varieties that are well-suited for container gardening and to provide them with the appropriate growing conditions. Experiment with different vegetables and herbs to see what works best for you.
How do I harvest my bottle carrots?
Harvesting is easy! Gently loosen the soil around the carrot and pull it out of the bottle. If the carrot is difficult to pull, you can use a small trowel to help loosen the soil. Wash the carrots thoroughly before eating. Enjoy your homegrown bottle carrots!
What do I do with the bottles after harvesting?
You can reuse the bottles for future plantings or recycle them. If you choose to reuse them, be sure to clean them thoroughly to remove any soil or debris. You can also use the bottles for other gardening projects, such as starting seeds or propagating cuttings. Get creative and find new ways to repurpose your bottles!
Leave a Comment