
DIY hanging celery garden: Ever dreamed of snipping fresh, crisp celery right from your own kitchen, even if you’re short on space? I know I have! Forget those sprawling vegetable patches; we’re taking gardening vertical! This isn’t just about growing food; it’s about adding a touch of green elegance to your home, a splash of freshness to your meals, and a whole lot of satisfaction to your day.
Celery, with its crunchy stalks and subtle flavor, has been enjoyed for centuries. Originating in the Mediterranean, it was initially valued for its medicinal properties before becoming a culinary staple. Now, we’re giving this ancient vegetable a modern twist with a DIY project that’s as practical as it is visually appealing.
Let’s face it, not everyone has a sprawling backyard to dedicate to gardening. Apartment dwellers, balcony enthusiasts, and anyone looking to maximize their space can benefit from this simple yet ingenious hack. A DIY hanging celery garden not only saves space but also adds a unique decorative element to your home. Plus, imagine the bragging rights when you tell your friends you grew that celery in your salad yourself! So, grab your supplies, and let’s get started on creating your own little slice of edible paradise.
DIY Hängender Staudensellerie-Garten: Frischer Sellerie direkt über dir!
Hey Leute! Habt ihr auch genug davon, ständig Sellerie im Supermarkt zu kaufen, der schon nach ein paar Tagen schlappmacht? Ich auch! Deshalb habe ich mir überlegt, wie ich meinen eigenen Sellerie anbauen kann, und zwar platzsparend und super cool: einen hängenden Staudensellerie-Garten! Klingt verrückt? Ist es vielleicht ein bisschen, aber es macht mega Spaß und liefert frischen Sellerie direkt vor deine Nase. Los geht’s!
Was du brauchst:
* Staudensellerie-Stiele mit Wurzelansatz: Das Wichtigste! Am besten vom Biomarkt oder aus dem eigenen Garten. Achte darauf, dass die Stiele noch einen kleinen Wurzelansatz haben.
* Plastikflaschen (mindestens 2 Liter): Je nachdem, wie viele Selleriepflanzen du aufhängen möchtest.
* Schere oder Cuttermesser: Zum Zuschneiden der Flaschen.
* Bohrmaschine oder Nagel und Hammer: Zum Bohren von Löchern für die Aufhängung und die Drainage.
* Kordel, Draht oder stabile Schnur: Zum Aufhängen der Flaschen.
* Blumenerde: Am besten eine hochwertige, nährstoffreiche Erde.
* Kieselsteine oder Tonscherben: Für die Drainage.
* Gießkanne oder Sprühflasche: Zum Bewässern.
* Optional: Sprühfarbe oder Dekomaterial, um die Flaschen zu verschönern.
Die Vorbereitung: Die Flaschen werden zu Pflanzgefäßen
Bevor wir mit dem Bepflanzen loslegen, müssen wir die Plastikflaschen vorbereiten. Das ist eigentlich ganz einfach:
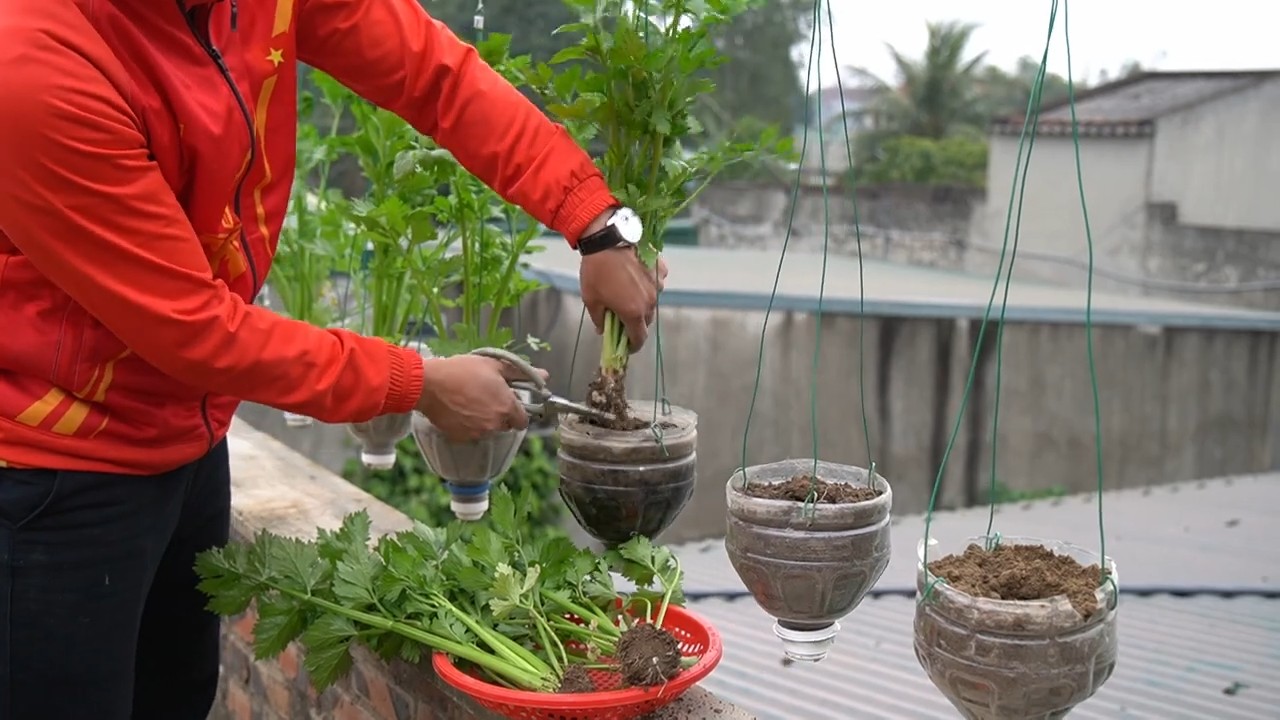
1. Flaschen reinigen: Spüle die Plastikflaschen gründlich mit warmem Wasser und Spülmittel aus, um alle Rückstände zu entfernen. Lass sie gut trocknen.
2. Flaschen zuschneiden:
* Variante 1 (Horizontal): Schneide die Flasche horizontal in der Mitte durch. Du brauchst nur den unteren Teil der Flasche. Der obere Teil kann für andere Projekte wiederverwendet werden.
* Variante 2 (Vertikal): Schneide ein großes Rechteck aus der Seite der Flasche. Lass dabei oben und unten einen Rand stehen, damit die Flasche stabil bleibt. Diese Variante ist gut, wenn du mehrere Selleriepflanzen in einer Flasche unterbringen möchtest.
3. Drainagelöcher bohren: Bohre mit der Bohrmaschine oder einem Nagel und Hammer mehrere kleine Löcher in den Boden der Flasche. Das ist wichtig, damit überschüssiges Wasser ablaufen kann und die Wurzeln nicht faulen.
4. Aufhängungslöcher bohren: Bohre an den oberen Rändern der Flasche (je nach gewählter Variante) Löcher, durch die du später die Kordel oder den Draht zum Aufhängen ziehen kannst. Achte darauf, dass die Löcher stabil genug sind, um das Gewicht der bepflanzten Flasche zu tragen.
5. Optional: Flaschen verschönern: Wenn du möchtest, kannst du die Flaschen jetzt noch mit Sprühfarbe oder anderen Materialien dekorieren. Lass deiner Kreativität freien Lauf! Ich habe meine Flaschen mit Tafelfarbe besprüht und mit Kreide kleine Sellerie-Motive darauf gemalt.
Das Bepflanzen: Sellerie einpflanzen und zum Wachsen bringen
Jetzt kommt der spannende Teil: das Bepflanzen!
1. Drainageschicht einfüllen: Fülle eine Schicht Kieselsteine oder Tonscherben (ca. 2-3 cm hoch) in den Boden der Flasche. Das sorgt für eine gute Drainage und verhindert Staunässe.
2. Erde einfüllen: Fülle die Flasche mit Blumenerde auf. Lass oben noch ein paar Zentimeter Platz, damit du beim Gießen nicht alles überschwemmst.
3. Sellerie einpflanzen:
* Vorsichtig ausgraben (falls du sie aus dem Garten holst): Wenn du deine Selleriepflanzen aus dem Garten holst, grabe sie vorsichtig aus und achte darauf, die Wurzeln nicht zu beschädigen.
* Sellerie einsetzen: Setze die Selleriepflanzen in die Erde. Achte darauf, dass der Wurzelansatz gut mit Erde bedeckt ist. Der grüne Teil der Stiele sollte aber frei bleiben.
* Abstand beachten: Wenn du mehrere Selleriepflanzen in eine Flasche pflanzt, achte auf genügend Abstand zwischen den Pflanzen (ca. 10-15 cm), damit sie genügend Platz zum Wachsen haben.
4. Angießen: Gieße die Selleriepflanzen vorsichtig an. Die Erde sollte gut durchfeuchtet sein, aber nicht zu nass.
Das Aufhängen: Der Garten schwebt!
Fast geschafft! Jetzt müssen wir den hängenden Sellerie-Garten nur noch aufhängen.
1. Kordel oder Draht befestigen: Ziehe die Kordel, den Draht oder die Schnur durch die Aufhängungslöcher an der Flasche. Achte darauf, dass die Befestigung stabil ist und das Gewicht der bepflanzten Flasche tragen kann.
2. Aufhängen: Suche dir einen geeigneten Platz zum Aufhängen. Ideal ist ein sonniger bis halbschattiger Standort, der vor starkem Wind geschützt ist. Du kannst die Flaschen an einem Balkongeländer, einem Baumast oder an einem Haken an der Decke aufhängen.
3. Abstand beachten: Hänge die Flaschen mit genügend Abstand zueinander auf, damit die Pflanzen genügend Licht und Luft bekommen.
Die Pflege: Damit dein Sellerie prächtig gedeiht
Damit dein hängender Sellerie-Garten auch wirklich erfolgreich ist, ist die richtige Pflege wichtig.
1. Gießen: Gieße die Selleriepflanzen regelmäßig. Die Erde sollte immer leicht feucht sein, aber nicht zu nass. An heißen Tagen musst du möglicherweise täglich gießen. Am besten testest du mit dem Finger, ob die Erde noch feucht genug ist.
2. Düngen: Dünge die Selleriepflanzen alle paar Wochen mit einem organischen Flüssigdünger. Das sorgt für eine gute Nährstoffversorgung und kräftiges Wachstum.
3. Schneiden: Schneide regelmäßig die äußeren Stiele des Selleries ab, sobald sie groß genug sind. Das fördert das Wachstum der inneren Stiele.
4. Schädlinge kontrollieren: Kontrolliere die Pflanzen regelmäßig auf Schädlinge wie Blattläuse oder Schnecken. Bei Bedarf kannst du natürliche Schädlingsbekämpfungsmittel einsetzen.
5. Überwintern: Sellerie ist nicht winterhart. Wenn du ihn überwintern möchtest, musst du ihn an einen frostfreien Ort bringen.
Zusätzliche Tipps und Tricks:
* Verschiedene Selleriesorten: Probiere verschiedene Selleriesorten aus, um herauszufinden, welche dir am besten schmeckt und am besten in deinem hängenden Garten gedeiht.
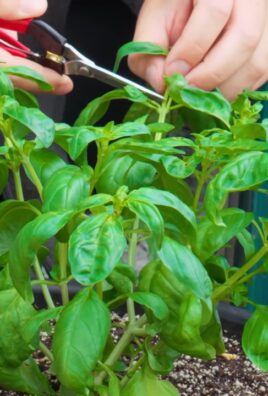
* Begleitpflanzen: Pflanze Begleitpflanzen wie Ringelblumen oder Basilikum in die Flaschen. Sie halten Schädlinge fern und fördern das Wachstum des Selleries.
* Upcycling: Verwende alte T-Shirts oder Stoffreste, um die Flaschen zu umwickeln und ihnen einen individuellen Look zu verleihen.
* Vertikaler Garten: Kombiniere den hängenden Sellerie-Garten mit anderen vertikalen Gärten, um eine grüne Oase auf deinem Balkon oder deiner Terrasse zu schaffen.
Ich hoffe, diese Anleitung hilft dir dabei, deinen eigenen hängenden Staudensellerie-Garten zu gestalten. Es ist ein tolles Projekt, um frische Kräuter und Gemüse anzubauen, Platz zu sparen und gleichzeitig etwas für die Umwelt zu tun. Viel Spaß beim Gärtnern!

Conclusion
So, there you have it! Transforming celery scraps into a thriving, space-saving hanging garden is not just a fun project; it’s a sustainable way to reduce food waste, add a touch of green to your home, and enjoy fresh celery flavor whenever you need it. This DIY hanging celery garden is a must-try for anyone looking to embrace a more eco-conscious lifestyle, regardless of gardening experience.
The beauty of this project lies in its simplicity and adaptability. While we’ve focused on celery, don’t be afraid to experiment! You can try this method with other vegetables like romaine lettuce or bok choy, which also regrow easily from their base. Consider adding companion plants like herbs (parsley, chives) to your hanging planters for a more diverse and fragrant garden. Imagine a cascade of green, filled with the fresh scents of celery and herbs, all grown from what would have otherwise been discarded.
Furthermore, think about the aesthetic possibilities. You can use different types of containers to match your home decor. Woven baskets, repurposed plastic bottles, or even painted tin cans can all be transformed into charming hanging planters. Get creative with the hanging mechanism too! Macrame hangers, sturdy ropes, or even repurposed belts can add a unique touch to your DIY project.
The key to success with your DIY hanging celery garden is patience and observation. Celery, like any plant, needs time to establish itself and thrive. Pay attention to its needs – adequate sunlight, consistent watering, and occasional fertilization – and you’ll be rewarded with a continuous supply of fresh celery. Don’t be discouraged if your first attempt isn’t perfect. Gardening is a learning process, and every mistake is an opportunity to improve.
We wholeheartedly encourage you to give this DIY hanging celery garden a try. It’s a rewarding experience that connects you with nature, reduces waste, and provides you with fresh, homegrown produce. Once you’ve set up your hanging garden, we’d love to hear about your experience! Share your photos, tips, and variations on social media using #HangingCeleryGarden and inspire others to join the movement. Let’s create a community of resourceful gardeners who are passionate about sustainability and fresh, homegrown food. This is more than just a gardening project; it’s a step towards a greener, more sustainable future, one celery stalk at a time. So grab your celery scraps, get creative, and start your own hanging garden today! You’ll be amazed at how easy and rewarding it is to grow your own food, even in a small space.
Frequently Asked Questions (FAQ)
What kind of celery works best for regrowing?
The best celery for regrowing is fresh, organic celery with a healthy-looking base. Look for celery stalks that are firm and crisp, with a vibrant green color. Avoid celery that is wilted, discolored, or has any signs of rot. Organic celery is preferable because it is less likely to have been treated with chemicals that could inhibit regrowth. The key is to have a solid base with the root end intact, as this is where the new growth will emerge.
How much sunlight does my hanging celery garden need?
Celery thrives in bright, indirect sunlight. Aim for at least 6 hours of sunlight per day, but avoid direct, intense sunlight, especially during the hottest part of the day, as this can scorch the leaves. If you’re growing your celery indoors, place it near a sunny window or supplement with a grow light. If you’re growing it outdoors, choose a location that receives morning sun and afternoon shade. Observe your celery plants closely and adjust their location as needed to ensure they are getting the right amount of light.
How often should I water my hanging celery garden?
Celery needs consistent moisture to thrive. Water your hanging celery garden whenever the top inch of soil feels dry to the touch. Avoid overwatering, as this can lead to root rot. Ensure that your hanging planters have adequate drainage to prevent water from pooling at the bottom. The frequency of watering will depend on factors such as the weather, the type of soil you’re using, and the size of your container. In general, you may need to water more frequently during hot, dry weather.
What kind of soil should I use for my hanging celery garden?
Use a well-draining potting mix that is rich in organic matter. A good potting mix will provide the necessary nutrients for your celery plants and allow for proper drainage. You can also amend your potting mix with compost or other organic materials to improve its fertility and water retention. Avoid using garden soil, as it can be too heavy and compact for container gardening.
How long does it take for celery to regrow?
You should start to see new growth within a week or two of placing the celery base in water. Once the roots have developed, you can transplant the celery into a pot with soil. It will take several weeks to months for the celery to fully regrow into a mature plant. Be patient and continue to provide your celery with adequate sunlight, water, and nutrients.
Can I eat the celery that regrows?
Yes, you can eat the celery that regrows from your hanging garden. However, keep in mind that the regrown celery may not be as large or as flavorful as celery grown from seed. The regrown celery will still have a distinct celery flavor and can be used in salads, soups, stews, or as a snack.
How do I fertilize my hanging celery garden?
Fertilize your hanging celery garden every few weeks with a balanced liquid fertilizer. Follow the instructions on the fertilizer label for proper dilution and application. You can also use organic fertilizers such as compost tea or fish emulsion. Avoid over-fertilizing, as this can damage your celery plants.
What if my celery starts to turn yellow or brown?
Yellowing or browning leaves can be a sign of several problems, including overwatering, underwatering, nutrient deficiencies, or pest infestations. Check the soil moisture and adjust your watering schedule accordingly. If the soil is consistently wet, you may be overwatering. If the soil is dry, you may need to water more frequently. If you suspect a nutrient deficiency, fertilize your celery plants with a balanced liquid fertilizer. Inspect your plants for pests and take appropriate action if necessary.
Can I grow celery indoors year-round?
Yes, you can grow celery indoors year-round, provided you can provide it with adequate sunlight and warmth. Place your hanging celery garden near a sunny window or supplement with a grow light. Keep the temperature consistent and avoid exposing your celery plants to drafts.
How do I prevent pests and diseases in my hanging celery garden?
To prevent pests and diseases, start with healthy celery plants and use a well-draining potting mix. Avoid overwatering and ensure that your plants have adequate air circulation. Inspect your plants regularly for signs of pests or diseases and take appropriate action if necessary. You can use organic pest control methods such as insecticidal soap or neem oil to control pests.
What other plants can I grow in a hanging garden?
Many other plants can thrive in a hanging garden, including herbs (parsley, chives, mint), leafy greens (lettuce, spinach), strawberries, tomatoes, and peppers. Choose plants that are well-suited to container gardening and that have similar light and watering requirements.
How do I harvest my regrown celery?
You can harvest your regrown celery by cutting off the outer stalks as needed. Leave the inner stalks intact to continue growing. You can also harvest the entire plant by cutting it off at the base.
Leave a Comment