
Plastic bottle kale growing: sounds a little crazy, right? But trust me, it’s a game-changer! I’m about to show you how to transform those empty plastic bottles cluttering your recycling bin into mini kale-growing machines. Forget expensive raised beds and sprawling gardens; this DIY trick is perfect for anyone with limited space, a tight budget, or just a desire to get a little more creative with their gardening.
Kale, a nutritional powerhouse, has a rich history dating back to ancient Greece and Rome, where it was a staple food. Over the centuries, it’s been cultivated in various forms across the globe. Now, we’re taking this ancient veggie into the 21st century with a modern, eco-friendly twist.
Why should you try plastic bottle kale growing? Well, imagine fresh, organic kale readily available right outside your door, or even on your balcony! No more trips to the grocery store for wilted greens. This method is not only incredibly cost-effective, but it’s also a fantastic way to reduce plastic waste and contribute to a more sustainable lifestyle. Plus, it’s a super fun project that even kids can get involved in. So, let’s dive in and unlock the secrets to growing delicious, healthy kale using nothing but plastic bottles!
DIY: Grünkohl Anbau im Plastikflaschen-Hochbeet – So geht’s!
Hey Leute! Habt ihr auch genug von teurem Grünkohl aus dem Supermarkt? Und wollt ihr gleichzeitig etwas für die Umwelt tun? Dann habe ich hier genau das Richtige für euch: Ein DIY-Projekt, mit dem ihr euren eigenen Grünkohl in recycelten Plastikflaschen anbauen könnt! Das ist nicht nur super nachhaltig, sondern auch platzsparend und kinderleicht. Lasst uns loslegen!
Was ihr braucht:
* Plastikflaschen: Am besten eignen sich 1,5- oder 2-Liter-Flaschen. Je mehr, desto größer euer Grünkohl-Hochbeet. Achtet darauf, dass sie sauber und trocken sind.
* Grünkohl-Samen oder Jungpflanzen: Samen sind günstiger, aber Jungpflanzen sparen Zeit.
* Erde: Am besten Bio-Gemüseerde.
* Schere oder Cuttermesser: Zum Zuschneiden der Flaschen.
* Bohrmaschine oder Nagel und Hammer: Für die Entwässerungslöcher.
* Gießkanne oder Sprühflasche: Zum Bewässern.
* Optional: Dekorative Farbe oder Stifte, um die Flaschen zu bemalen.
* Optional: Draht oder Schnur, um die Flaschen zu verbinden (für eine stabilere Konstruktion).
* Optional: Kies oder Blähton für eine Drainageschicht.
Vorbereitung der Plastikflaschen:
1. Reinigung: Zuerst müsst ihr die Plastikflaschen gründlich reinigen. Entfernt alle Etiketten und spült sie mit warmem Wasser und etwas Spülmittel aus. Lasst sie anschließend gut trocknen. Das ist wichtig, damit keine Schimmelbildung entsteht.
2. Zuschneiden: Jetzt kommt der spaßige Teil! Ihr habt zwei Möglichkeiten, die Flaschen zuzuschneiden:
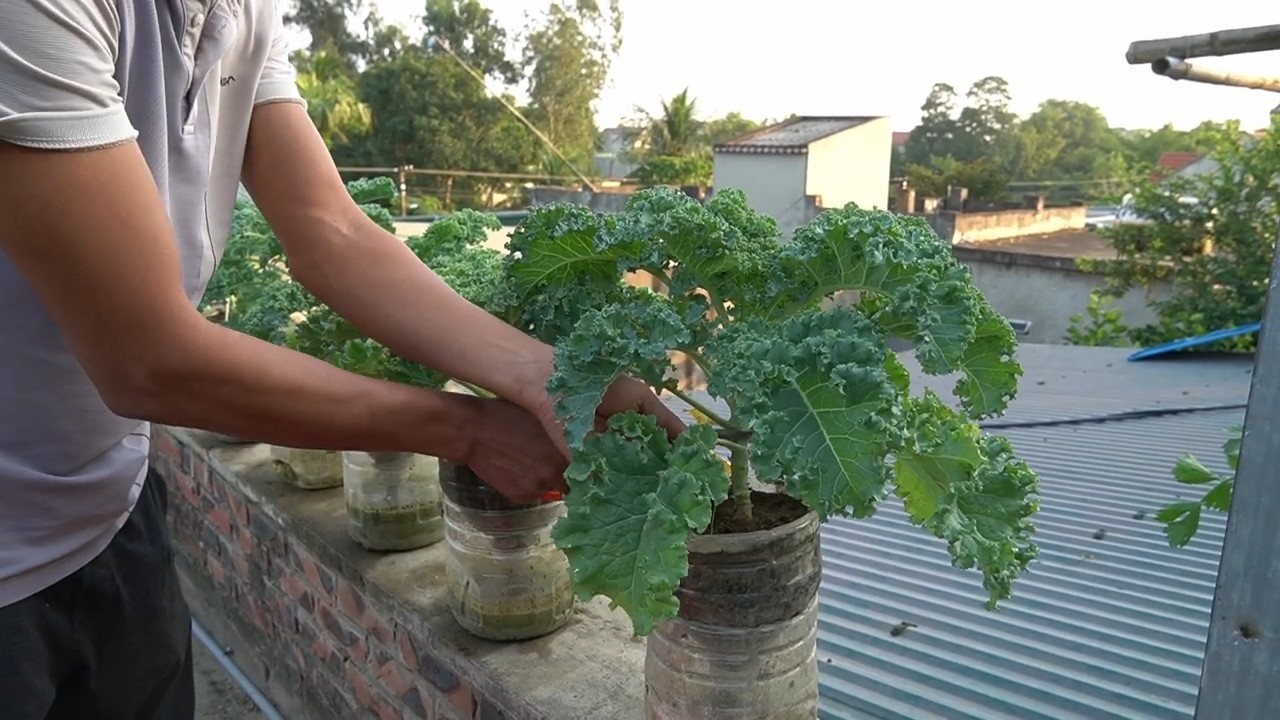
* Variante 1 (Hängende Pflanzgefäße): Schneidet die Flasche etwa im oberen Drittel ab. Der obere Teil wird umgedreht in den unteren Teil gesteckt, sodass der Flaschenhals nach unten zeigt. Das dient als Bewässerungssystem.
* Variante 2 (Gestapelte Pflanzgefäße): Schneidet die Flasche horizontal in der Mitte durch. Ihr erhaltet zwei gleich große Teile, die ihr später bepflanzen könnt.
Ich persönlich finde die hängende Variante super, weil sie platzsparend ist und man die Flaschen schön an einem Geländer oder einer Wand befestigen kann. Aber die gestapelte Variante ist auch toll, wenn ihr mehr Platz habt und ein kleines Beet bauen wollt.
3. Entwässerungslöcher: Egal für welche Variante ihr euch entscheidet, ihr müsst unbedingt Entwässerungslöcher in den Boden der Flaschen bohren oder stechen. Das verhindert Staunässe, die den Grünkohl schädigen könnte. Macht einfach ein paar Löcher mit einer Bohrmaschine oder einem Nagel und Hammer. Seid vorsichtig, dass ihr euch nicht verletzt!
4. Optional: Bemalen: Wenn ihr wollt, könnt ihr die Flaschen jetzt noch bemalen oder mit Stiften verzieren. Das macht das Ganze noch individueller und bunter! Achtet aber darauf, dass ihr ungiftige Farben verwendet, die für den Außenbereich geeignet sind.
Grünkohl säen oder pflanzen:
1. Drainageschicht (Optional): Wenn ihr wollt, könnt ihr eine Drainageschicht aus Kies oder Blähton in den Boden der Flaschen geben. Das verbessert die Entwässerung und verhindert, dass die Erde zu schnell austrocknet.
2. Erde einfüllen: Füllt die Flaschen mit Erde. Lasst oben etwa 2-3 cm Platz, damit ihr beim Gießen nicht alles überschwemmt.
3. Säen oder Pflanzen:
* Säen: Wenn ihr Samen verwendet, legt sie etwa 1 cm tief in die Erde und bedeckt sie leicht mit Erde. Gießt die Erde vorsichtig an.
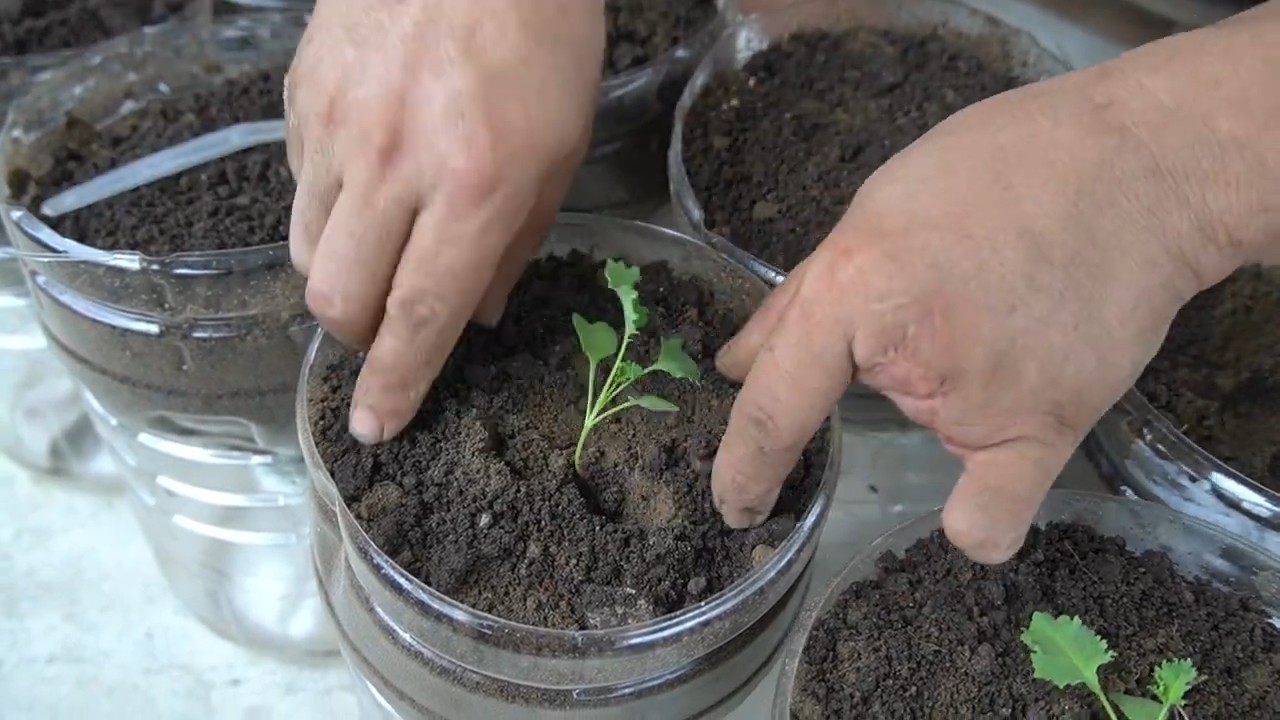
* Pflanzen: Wenn ihr Jungpflanzen verwendet, macht ein kleines Loch in die Erde und setzt die Pflanze hinein. Drückt die Erde leicht an und gießt sie an.
Ich empfehle, die Samen oder Jungpflanzen in einem Abstand von etwa 10-15 cm zu setzen, damit der Grünkohl genug Platz zum Wachsen hat.
4. Gießen: Gießt die Erde regelmäßig, aber vermeidet Staunässe. Die Erde sollte immer leicht feucht sein.
Aufbau des Grünkohl-Hochbeets:
Hier kommt es darauf an, für welche Variante ihr euch entschieden habt:
* Hängende Pflanzgefäße: Bohrt Löcher in den oberen Teil der Flaschen (dort, wo der Flaschenhals ist) und zieht Draht oder Schnur hindurch. So könnt ihr die Flaschen an einem Geländer, einer Wand oder einem Balkon aufhängen. Achtet darauf, dass die Flaschen stabil hängen und nicht herunterfallen können.
* Gestapelte Pflanzgefäße: Ihr könnt die Flaschen einfach nebeneinander aufstellen oder sie mit Draht oder Schnur verbinden, um eine stabilere Konstruktion zu erhalten. Ihr könnt auch mehrere Reihen übereinander stapeln, um ein kleines Hochbeet zu bauen. Achtet darauf, dass die untere Reihe stabil steht und das Gewicht der oberen Reihen tragen kann.
Pflege des Grünkohls:
1. Standort: Grünkohl braucht viel Sonne, also stellt euer Hochbeet an einen sonnigen Standort.
2. Gießen: Gießt den Grünkohl regelmäßig, besonders an heißen Tagen. Die Erde sollte immer leicht feucht sein.
3. Düngen: Düngt den Grünkohl alle paar Wochen mit einem organischen Dünger. Das sorgt für ein gesundes Wachstum und eine reiche Ernte.
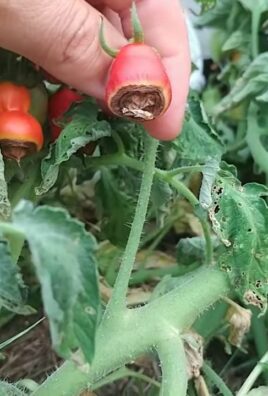
4. Schädlinge: Achtet auf Schädlinge wie Blattläuse oder Raupen. Wenn ihr welche entdeckt, könnt ihr sie mit einem natürlichen Schädlingsbekämpfungsmittel bekämpfen.
5. Ernten: Ihr könnt den Grünkohl ernten, sobald die Blätter groß genug sind. Schneidet die äußeren Blätter ab und lasst die inneren Blätter weiterwachsen. So könnt ihr über einen längeren Zeitraum ernten.
Zusätzliche Tipps:
* Sortenwahl: Es gibt verschiedene Grünkohlsorten. Informiert euch, welche Sorte am besten für euren Standort und eure Bedürfnisse geeignet ist.
* Aussaatzeitpunkt: Grünkohl wird am besten im Frühjahr oder Sommer ausgesät.
* Überwinterung: Grünkohl ist winterhart und kann auch im Winter geerntet werden.
* Kombination mit anderen Pflanzen: Grünkohl verträgt sich gut mit anderen Gemüsesorten wie Tomaten, Gurken oder Paprika.
Häufige Probleme und Lösungen:
* Gelbe Blätter: Gelbe Blätter können ein Zeichen für Nährstoffmangel sein. Düngt den Grünkohl mit einem organischen Dünger.
* Schimmelbildung: Schimmelbildung kann durch Staunässe entstehen. Achtet darauf, dass die Erde gut entwässert ist und gießt nicht zu viel.
* Schädlinge: Schädlinge können den Grünkohl schädigen. Bekämpft sie mit einem natürlichen Schädlingsbekämpfungsmittel.
Fazit:
Mit diesem DIY-Projekt könnt ihr nicht nur euren eigenen Grünkohl anbauen, sondern auch etwas für die Umwelt tun. Es ist einfach, kostengünstig und macht Spaß! Also, worauf wartet ihr noch? Sammelt eure Plastikflaschen und legt los! Ich wünsche euch viel Erfolg beim Grünkohl-Anbau! Und vergesst nicht, eure Ernte mit mir zu teilen! Zeigt mir eure Grünkohl-Hochbeete auf Social Media! Ich bin gespannt!
Conclusion
So, there you have it! Transforming a simple plastic bottle into a thriving kale garden is not just a fun project; it’s a sustainable, space-saving, and incredibly rewarding way to enjoy fresh, homegrown greens. We’ve walked you through the process, highlighting the ease and accessibility of this DIY trick. But why is this method a must-try?
Firstly, it’s about resourcefulness. In a world grappling with waste, repurposing plastic bottles is a small but significant step towards a more eco-conscious lifestyle. Instead of contributing to landfill overflow, you’re giving these bottles a new lease on life, transforming them into miniature ecosystems.
Secondly, it’s about accessibility. Whether you live in a sprawling suburban home or a compact city apartment, space is often a constraint. This vertical gardening solution allows you to cultivate kale even in the most limited environments. Balconies, patios, even sunny windowsills become potential kale-growing havens.
Thirdly, it’s about the sheer joy of gardening. There’s something deeply satisfying about nurturing a plant from seed to harvest. Watching your kale seedlings sprout and flourish within their recycled containers is a testament to your efforts and a connection to the natural world.
But the beauty of this DIY project lies in its adaptability. Feel free to experiment with different types of plastic bottles. Larger bottles can accommodate more kale plants, while smaller bottles are perfect for starting seeds. You can also explore different growing mediums. While we recommended a standard potting mix, you could try incorporating compost, vermicompost, or even a hydroponic solution for a nutrient-rich environment.
Consider adding companion plants to your bottle garden. Herbs like basil or thyme can deter pests and enhance the flavor of your kale. Flowers like marigolds can attract beneficial insects and add a splash of color to your vertical garden.
Don’t be afraid to get creative with the design of your bottle garden. Paint the bottles with vibrant colors, add decorative labels, or create a tiered system for a visually stunning display. The possibilities are endless!
This plastic bottle kale growing method is more than just a gardening hack; it’s a gateway to a more sustainable, fulfilling, and delicious lifestyle.
We wholeheartedly encourage you to give this DIY trick a try. It’s a simple, affordable, and incredibly rewarding project that will bring fresh, homegrown kale to your table. And most importantly, we want to hear about your experience! Share your photos, tips, and variations in the comments below. Let’s build a community of bottle-gardeners and inspire others to embrace this sustainable and delicious way of growing their own food. What worked for you? What challenges did you face? What creative solutions did you come up with? Your insights will help others succeed and further refine this innovative gardening technique. Happy growing!
Frequently Asked Questions (FAQ)
What type of plastic bottle is best for growing kale?
Ideally, you should use food-grade plastic bottles, such as those that previously contained water, juice, or soda. Look for the recycling symbol with a number inside (typically 1 or 2). Avoid using bottles that contained harsh chemicals or cleaning products, as these may leach harmful substances into the soil. Thoroughly wash and rinse the bottles before using them for planting. The size of the bottle will depend on how many kale plants you want to grow in each container. Larger bottles (2-3 liters) are suitable for multiple plants, while smaller bottles (500ml-1 liter) are better for individual seedlings or smaller varieties of kale.
How often should I water my kale plants in plastic bottles?
The watering frequency will depend on several factors, including the size of the bottle, the type of potting mix, the weather conditions, and the size of the kale plants. As a general rule, check the soil moisture level daily. If the top inch of soil feels dry to the touch, it’s time to water. Water thoroughly until excess water drains out of the drainage holes. Avoid overwatering, as this can lead to root rot. During hot and dry weather, you may need to water more frequently. During cooler and wetter weather, you may need to water less frequently. Monitor your plants closely and adjust your watering schedule accordingly.
What kind of soil should I use for growing kale in plastic bottles?
A well-draining potting mix is essential for growing healthy kale in plastic bottles. Avoid using garden soil, as it can be too heavy and compact, leading to poor drainage and root problems. A good potting mix should contain a blend of peat moss, perlite, and vermiculite. You can also add compost or other organic matter to improve the soil’s fertility and water retention. Ensure the potting mix is slightly acidic to neutral (pH 6.0-7.0) for optimal kale growth.
How much sunlight does kale need when grown in plastic bottles?
Kale thrives in full sun, which means at least 6-8 hours of direct sunlight per day. However, it can also tolerate partial shade, especially during the hottest part of the day. If you’re growing kale indoors, place the bottles near a sunny window or use grow lights to supplement natural light. Insufficient sunlight can lead to leggy growth and reduced yields.
How do I fertilize kale growing in plastic bottles?
Kale is a heavy feeder and requires regular fertilization to thrive. You can use a balanced liquid fertilizer (e.g., 10-10-10) diluted to half strength. Apply the fertilizer every 2-3 weeks during the growing season. Alternatively, you can use a slow-release granular fertilizer mixed into the potting mix at planting time. Organic fertilizers, such as compost tea or fish emulsion, are also excellent options. Avoid over-fertilizing, as this can lead to nutrient burn.
How do I prevent pests and diseases from affecting my kale plants in plastic bottles?
Regularly inspect your kale plants for signs of pests or diseases. Common kale pests include aphids, cabbage worms, and flea beetles. You can control these pests by handpicking them off the plants, spraying with insecticidal soap, or using neem oil. To prevent diseases, ensure good air circulation around the plants and avoid overwatering. Remove any infected leaves promptly to prevent the spread of disease. Consider using organic pest control methods to minimize the use of harmful chemicals.
Can I grow different varieties of kale in plastic bottles?
Yes, you can grow various kale varieties in plastic bottles, including curly kale, lacinato kale (dinosaur kale), and Russian kale. Choose varieties that are well-suited to container gardening and your local climate. Consider the size of the mature plant when selecting a variety, as some kale varieties can grow quite large.
How do I harvest kale from plastic bottles?
Harvest kale leaves when they are about 4-6 inches long. Start harvesting from the outer leaves, leaving the inner leaves to continue growing. You can harvest kale leaves continuously throughout the growing season. Avoid harvesting more than one-third of the plant at a time, as this can stress the plant.
What do I do with the plastic bottles after I’m done growing kale?
After you’ve finished growing kale, you can recycle the plastic bottles if they are recyclable in your area. Alternatively, you can reuse them for other gardening projects or repurpose them for other household uses. Consider using them to start seeds, grow herbs, or create other vertical gardens.
Is this plastic bottle kale growing method suitable for other leafy greens?
Absolutely! While we focused on kale, this method is easily adaptable for growing other leafy greens like spinach, lettuce, arugula, and even some herbs. The principles remain the same: proper drainage, adequate sunlight, and nutrient-rich soil. Experiment with different greens to find what thrives best in your environment and enjoy a continuous supply of fresh, homegrown produce.
Leave a Comment