
Growing sweet potatoes in containers might sound like a challenge, but trust me, it’s totally doable and incredibly rewarding! Forget acres of farmland; you can enjoy homegrown sweet potatoes even with a small balcony or patio. For centuries, sweet potatoes have been a staple in diets around the world, from their origins in Central and South America to becoming a beloved comfort food in many cultures. They’re packed with nutrients and offer a delicious, slightly sweet flavor that’s hard to resist.
But why bother with containers? Well, let’s face it, not everyone has the space for a traditional garden. Plus, container gardening offers better control over soil conditions and can protect your precious plants from pests and diseases. Imagine harvesting your own vibrant orange sweet potatoes, knowing exactly where they came from and how they were grown. That’s the magic of DIY gardening! This article is your ultimate guide to successfully growing sweet potatoes in containers, offering simple tricks and hacks that will transform your limited space into a thriving sweet potato patch. Get ready to roll up your sleeves and discover the joy of homegrown goodness!
Süßkartoffeln im Topf anbauen: Dein DIY-Guide für eine reiche Ernte
Hey Gärtnerfreunde! Habt ihr schon mal darüber nachgedacht, Süßkartoffeln im Topf anzubauen? Klingt verrückt, oder? Aber glaubt mir, es ist einfacher als ihr denkt und super lohnenswert! Ich zeige euch, wie ihr mit ein paar einfachen Schritten eure eigenen Süßkartoffeln auf dem Balkon, der Terrasse oder sogar im Garten anbauen könnt. Lasst uns loslegen!
Was du brauchst: Die Vorbereitung
Bevor wir loslegen, brauchen wir natürlich das richtige Equipment. Hier ist eine Liste von Dingen, die ihr bereithalten solltet:
* Süßkartoffeln: Am besten Bio-Süßkartoffeln, da diese nicht mit Wachstumsinhibitoren behandelt wurden.
* Große Töpfe oder Behälter: Mindestens 30 Liter Fassungsvermögen pro Pflanze. Je größer, desto besser!
* Hochwertige Blumenerde: Eine gut durchlässige Mischung ist ideal. Ich verwende gerne eine Mischung aus Blumenerde, Kompost und etwas Sand.
* Wasser: Zum Gießen, natürlich!
* Sonnenlicht: Süßkartoffeln lieben die Sonne!
* Optional: Flüssigdünger für Gemüse, Mulch (z.B. Stroh oder Holzhackschnitzel).
Phase 1: Süßkartoffel-Setzlinge (Slips) ziehen
Die erste Phase ist vielleicht die spannendste: Wir ziehen unsere eigenen Süßkartoffel-Setzlinge, die sogenannten “Slips”. Keine Sorge, es ist einfacher als es klingt!
1. Die Süßkartoffel vorbereiten: Nehmt eure Süßkartoffel und reinigt sie vorsichtig. Ihr könnt sie entweder ganz lassen oder in zwei Hälften schneiden. Ich bevorzuge es, sie ganz zu lassen, da ich das Gefühl habe, dass sie dann mehr Slips produziert.
2. Die Zahnstocher-Methode: Steckt 3-4 Zahnstocher gleichmäßig verteilt in die Mitte der Süßkartoffel. Diese dienen dazu, die Kartoffel im Wasserglas zu stabilisieren.
3. Ins Wasserbad: Füllt ein Glas oder eine Schale mit Wasser. Die Süßkartoffel sollte so im Wasser stehen, dass die untere Hälfte bedeckt ist. Die Zahnstocher verhindern, dass die ganze Kartoffel im Wasser liegt.
4. Der richtige Standort: Stellt das Glas an einen warmen und hellen Ort, aber nicht in die pralle Sonne. Ein Fensterbrett ist ideal.
5. Geduld ist gefragt: Jetzt heißt es warten! Wechselt das Wasser alle paar Tage, um Schimmelbildung zu vermeiden. Nach etwa 2-4 Wochen sollten sich kleine Wurzeln und Triebe (die Slips) bilden.
6. Die Slips ernten: Sobald die Slips etwa 15-20 cm lang sind, könnt ihr sie vorsichtig von der Süßkartoffel abdrehen oder abschneiden. Achtet darauf, dass ihr die Wurzeln nicht beschädigt.
7. Die Slips bewurzeln: Stellt die Slips in ein Glas mit Wasser, sodass die unteren Blätter bedeckt sind. Nach ein paar Tagen sollten sich kleine Wurzeln bilden. Das ist ein wichtiger Schritt, um sicherzustellen, dass die Slips gut anwachsen.
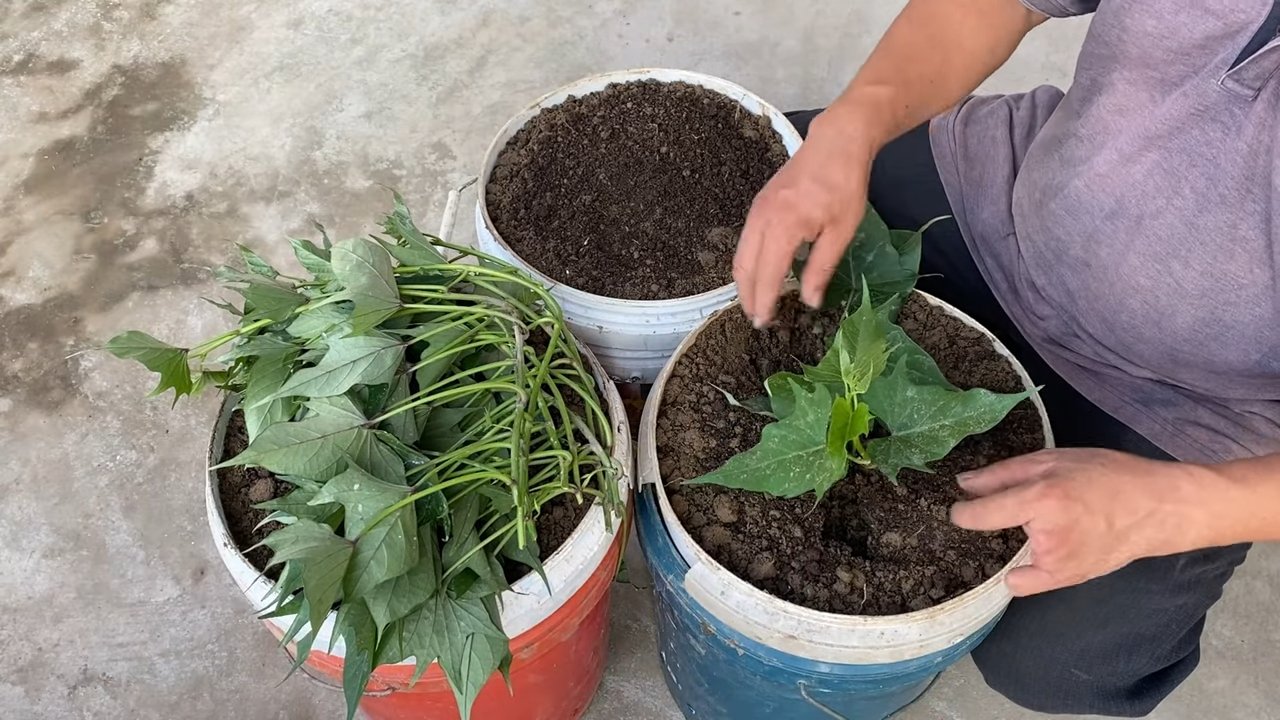
Phase 2: Die Pflanzung
Sobald eure Slips gut bewurzelt sind, können wir sie in die Töpfe pflanzen.
1. Die Töpfe vorbereiten: Füllt eure großen Töpfe mit der vorbereiteten Blumenerde. Lasst etwa 5-10 cm Platz bis zum Rand.
2. Die Slips einpflanzen: Macht kleine Löcher in die Erde, etwa 5-7 cm tief. Setzt die Slips vorsichtig hinein und bedeckt die Wurzeln mit Erde. Drückt die Erde leicht an.
3. Gießen nicht vergessen: Gießt die frisch gepflanzten Slips gründlich an. Die Erde sollte feucht, aber nicht nass sein.
4. Der richtige Standort: Stellt die Töpfe an einen sonnigen Ort. Süßkartoffeln brauchen mindestens 6 Stunden Sonne pro Tag.
Phase 3: Pflege und Wachstum
Jetzt beginnt die eigentliche Arbeit, aber keine Sorge, es ist nicht viel!
1. Regelmäßiges Gießen: Gießt eure Süßkartoffeln regelmäßig, besonders an heißen Tagen. Die Erde sollte immer leicht feucht sein. Vermeidet Staunässe, da dies zu Wurzelfäule führen kann.
2. Düngen: Düngt eure Süßkartoffeln alle 2-3 Wochen mit einem Flüssigdünger für Gemüse. Achtet darauf, die Anweisungen auf der Verpackung zu befolgen.
3. Mulchen: Eine Mulchschicht aus Stroh oder Holzhackschnitzeln hilft, die Feuchtigkeit im Boden zu halten und Unkraut zu unterdrücken.
4. Rankhilfe (optional): Süßkartoffeln bilden lange Ranken. Wenn ihr Platz sparen wollt, könnt ihr eine Rankhilfe anbringen, an der die Ranken hochwachsen können.
5. Schädlinge im Auge behalten: Achtet auf Schädlinge wie Blattläuse oder Kartoffelkäfer. Bei Bedarf könnt ihr natürliche Schädlingsbekämpfungsmittel verwenden.
Phase 4: Die Ernte
Der spannendste Teil! Nach etwa 3-4 Monaten (je nach Sorte und Wetter) sind eure Süßkartoffeln erntereif.
1. Der richtige Zeitpunkt: Die Blätter der Süßkartoffeln beginnen gelb zu werden und abzusterben. Das ist ein Zeichen, dass die Erntezeit gekommen ist.
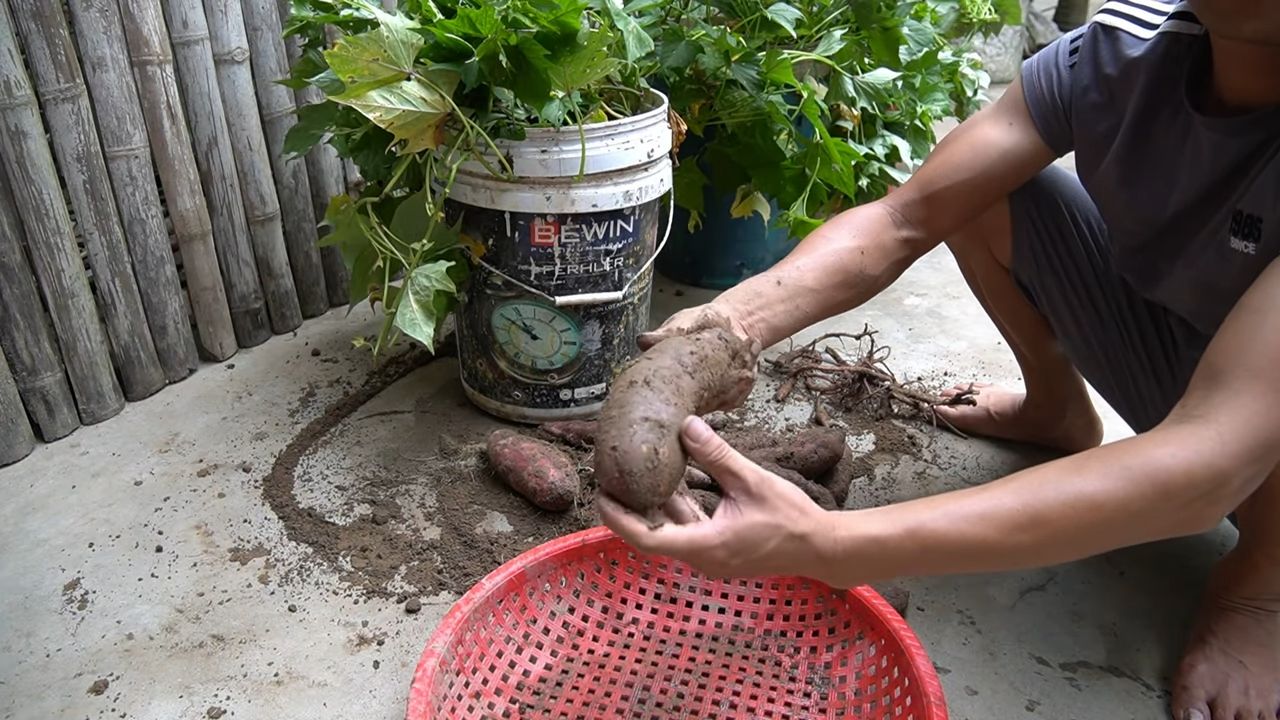
2. Vorsichtig ausgraben: Grabt die Süßkartoffeln vorsichtig aus dem Topf. Achtet darauf, die Knollen nicht zu beschädigen.
3. Reinigen: Entfernt die Erde von den Süßkartoffeln.
4. Trocknen: Lasst die Süßkartoffeln ein paar Tage an einem trockenen und luftigen Ort trocknen. Dadurch wird die Schale gehärtet und die Süßkartoffeln sind länger haltbar.
5. Lagern: Lagert die getrockneten Süßkartoffeln an einem kühlen, dunklen und trockenen Ort. Sie sollten sich mehrere Monate halten.
Zusätzliche Tipps und Tricks
* Sortenwahl: Es gibt viele verschiedene Süßkartoffelsorten. Informiert euch, welche Sorten sich am besten für den Anbau im Topf eignen.
* Bodenverbesserung: Wenn ihr keinen Kompost habt, könnt ihr auch organischen Dünger oder Hornspäne in die Erde mischen.
* Sonnenschutz: An sehr heißen Tagen kann es sinnvoll sein, die Töpfe etwas zu beschatten, um die Pflanzen vor Verbrennungen zu schützen.
* Kreativität: Experimentiert mit verschiedenen Anbaumethoden und Sorten. Gärtnern soll Spaß machen!
Ich hoffe, dieser Guide hilft euch dabei, eure eigenen Süßkartoffeln im Topf anzubauen. Es ist ein tolles Gefühl, seine eigenen Lebensmittel anzubauen und zu ernten. Viel Erfolg und happy gardening!
Conclusion
So, there you have it! Growing sweet potatoes in containers is not only achievable, but it’s also incredibly rewarding. We’ve walked through the simple steps, from choosing the right container and soil to nurturing your plants and harvesting your delicious bounty. But why is this DIY trick a must-try?
First and foremost, it democratizes sweet potato cultivation. You don’t need acres of farmland or even a traditional garden plot to enjoy the unparalleled taste of homegrown sweet potatoes. Whether you have a small balcony, a sunny patio, or just a spare corner on your deck, you can successfully cultivate these nutritional powerhouses. This accessibility makes it a game-changer for urban gardeners and anyone with limited space.
Secondly, container gardening offers unparalleled control. You dictate the soil composition, the watering schedule, and the sun exposure, minimizing the risk of pests and diseases that often plague in-ground gardens. This level of control translates to healthier plants and a more abundant harvest. Plus, the portability of containers allows you to chase the sun, ensuring your sweet potatoes receive the optimal amount of light throughout the growing season.
Thirdly, let’s talk about the sheer satisfaction of nurturing a plant from slip to harvest. There’s something deeply gratifying about watching those vibrant vines unfurl and knowing that you’re responsible for the delicious, nutritious food they produce. It’s a connection to nature that’s often missing in our modern lives, and growing sweet potatoes in containers provides a tangible way to reconnect.
But the fun doesn’t stop there! Feel free to experiment with different varieties of sweet potatoes. Beauregard, with its classic orange flesh, is a reliable choice, but don’t be afraid to try Japanese sweet potatoes with their purple skin and creamy white flesh, or even the Stokes Purple variety, known for its intense purple color and antioxidant-rich properties.
You can also explore different container types. While we recommended larger pots, you can also use grow bags, which are lightweight and breathable. Just be sure to choose a size that’s appropriate for the variety you’re growing.
Consider companion planting to enhance your sweet potato’s growth and deter pests. Marigolds, for example, are known to repel nematodes, while basil can attract beneficial insects.
Finally, don’t forget the power of compost! Incorporating compost into your soil mix will provide your sweet potatoes with a slow-release source of nutrients, promoting healthy growth and a bountiful harvest.
We are confident that you will find growing sweet potatoes in containers to be a fun and rewarding experience. So, grab your containers, gather your supplies, and get ready to embark on a sweet potato adventure! We encourage you to try this DIY trick and share your experiences with us. Post photos of your container gardens, share your tips and tricks, and let us know what varieties you’re growing. Together, we can create a community of container sweet potato enthusiasts! Happy gardening!
Frequently Asked Questions (FAQ)
1. What is the best size container for growing sweet potatoes?
The ideal container size for growing sweet potatoes is at least 10 gallons, but larger is generally better. A 15-20 gallon container will provide ample space for the roots to develop and produce a good yield. The container should also be at least 12 inches deep to accommodate the growing sweet potatoes. Remember, sweet potatoes grow underground, so they need plenty of room to expand. Using a container that is too small will restrict root growth and result in smaller, less abundant sweet potatoes.
2. What type of soil should I use for growing sweet potatoes in containers?
Sweet potatoes thrive in well-draining, loose soil that is rich in organic matter. A good mix would be equal parts of potting soil, compost, and perlite or vermiculite. The potting soil provides a base for the plants, the compost adds nutrients and improves drainage, and the perlite or vermiculite helps to aerate the soil and prevent compaction. Avoid using heavy clay soil, as it can become waterlogged and hinder root development. You can also amend your soil with a slow-release fertilizer specifically formulated for vegetables to provide a steady supply of nutrients throughout the growing season.
3. How often should I water my container sweet potatoes?
Water your container sweet potatoes regularly, especially during hot, dry weather. The soil should be kept consistently moist, but not waterlogged. Check the soil moisture level by sticking your finger about an inch into the soil. If it feels dry, it’s time to water. Water deeply, until water drains out of the bottom of the container. Avoid overhead watering, as this can promote fungal diseases. Instead, water at the base of the plant. During periods of heavy rain, you may need to reduce watering frequency to prevent the soil from becoming waterlogged.
4. How much sunlight do sweet potatoes need?
Sweet potatoes need at least 6-8 hours of direct sunlight per day to thrive. Choose a location for your containers that receives plenty of sunlight throughout the day. If you live in a particularly hot climate, you may need to provide some afternoon shade to prevent the plants from overheating. If you are growing your sweet potatoes indoors, you will need to supplement with grow lights to provide adequate light. Rotate your containers regularly to ensure that all sides of the plant receive equal sunlight.
5. How do I know when my sweet potatoes are ready to harvest?
Sweet potatoes are typically ready to harvest about 90-120 days after planting. The leaves will start to turn yellow and the vines will begin to die back. To check if your sweet potatoes are ready, gently dig around the base of the plant and feel for the tubers. If they are a good size and have a smooth skin, they are ready to harvest. Be careful not to damage the tubers when digging them up. Use a garden fork to gently loosen the soil around the plant and then carefully lift the plant out of the container.
6. Can I grow sweet potatoes from store-bought sweet potatoes?
Yes, you can grow sweet potatoes from store-bought sweet potatoes, but it’s best to use organic sweet potatoes to avoid any potential chemical treatments that may inhibit sprouting. To sprout a sweet potato, suspend it in a jar of water, with the bottom half submerged. Place the jar in a warm, sunny location. After a few weeks, sprouts (slips) will begin to emerge from the sweet potato. Once the slips are about 6-8 inches long, carefully twist them off the sweet potato and plant them in your container.
7. What are some common pests and diseases that affect sweet potatoes?
Common pests that can affect sweet potatoes include aphids, sweet potato weevils, and nematodes. Aphids can be controlled with insecticidal soap or neem oil. Sweet potato weevils are more difficult to control, but you can prevent them by using disease-free slips and practicing crop rotation. Nematodes can be controlled by incorporating organic matter into the soil and using nematode-resistant varieties. Common diseases that can affect sweet potatoes include fungal diseases such as fusarium wilt and black rot. These diseases can be prevented by using disease-free slips, practicing crop rotation, and avoiding overhead watering.
8. Can I overwinter my sweet potato plants?
Sweet potatoes are tropical plants and are not frost-tolerant. In colder climates, you will need to harvest your sweet potatoes before the first frost. You can store your sweet potatoes in a cool, dry place for several months. If you want to overwinter your sweet potato plants, you can dig them up before the first frost and store them in a cool, dark place. In the spring, you can replant them in your containers. However, overwintered plants may not produce as well as new plants grown from slips.
9. How do I cure my sweet potatoes after harvesting?
Curing sweet potatoes is essential for improving their flavor and storage life. After harvesting, gently brush off any excess soil and allow the sweet potatoes to dry in a warm, humid place (80-85°F and 85-90% humidity) for about 7-10 days. This process allows the skins to harden and heal any minor cuts or bruises. After curing, store your sweet potatoes in a cool, dry, and well-ventilated place (55-60°F) for several months. Avoid storing them in the refrigerator, as this can cause them to develop a hard core.
10. What are some creative ways to use my homegrown sweet potatoes?
The possibilities are endless! Of course, you can roast, bake, or mash them as a classic side dish. But don’t stop there! Try making sweet potato fries, sweet potato pie, sweet potato soup, or even sweet potato bread. You can also add them to stews, curries, and salads. Sweet potatoes are incredibly versatile and can be used in both sweet and savory dishes. Get creative and experiment with different recipes to discover your favorite ways to enjoy your homegrown sweet potatoes.
Leave a Comment