
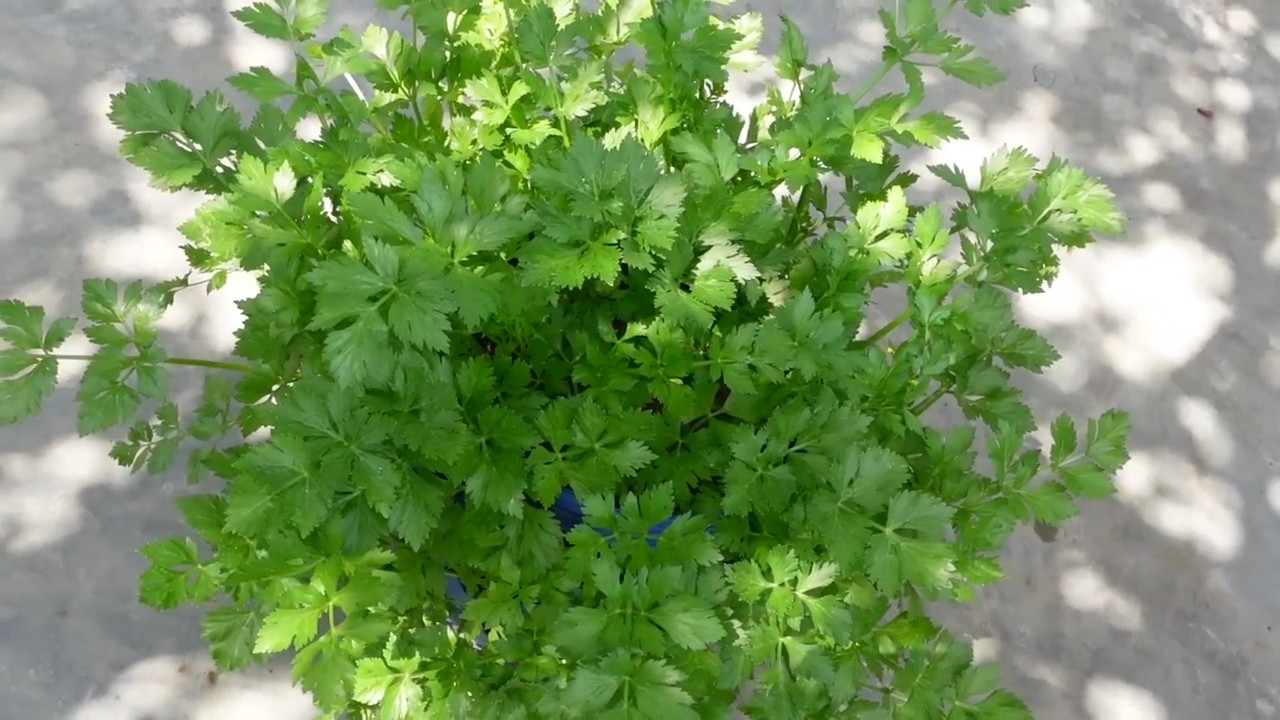
Grow Celery at Home, you say? Absolutely! Imagine stepping into your backyard and snipping fresh, crisp celery stalks whenever you need them. No more limp, store-bought celery that’s been sitting in the fridge for days. This isn’t just a dream; it’s a deliciously achievable reality with a few simple DIY tricks.
Celery, with its satisfying crunch and subtle flavor, has been enjoyed for centuries. Originating in the Mediterranean, it was initially valued for its medicinal properties before becoming a culinary staple. Now, you can bring this historical veggie right to your own table!
Why should you bother learning how to grow celery at home? Well, for starters, it’s incredibly rewarding to nurture your own food. Plus, homegrown celery tastes significantly better than anything you’ll find in the supermarket. But more importantly, knowing how to cultivate your own celery gives you control over what you’re eating. No pesticides, no questionable storage practices – just pure, fresh goodness. I’m going to share some easy-to-follow DIY hacks that will have you harvesting your own celery in no time, even if you don’t have a green thumb!
Zieh dein eigenes Staudensellerie zu Hause: Ein umfassender DIY-Leitfaden
Hey Gartenfreunde! Habt ihr euch jemals gefragt, wie ihr frischen, knackigen Staudensellerie direkt in eurer Küche oder eurem Garten anbauen könnt? Ich zeige euch, wie es geht! Es ist einfacher als ihr denkt und super befriedigend, wenn ihr eure eigenen, selbst gezogenen Selleriestangen ernten könnt. Lasst uns eintauchen!
Was du brauchst: Deine Materialien und Werkzeuge
Bevor wir loslegen, hier eine Liste der Dinge, die du benötigst:
* Ein Staudensellerie-Strunk: Am besten aus dem Supermarkt, mit intaktem Wurzelansatz. Wähle einen, der fest und gesund aussieht.
* Ein Messer: Ein scharfes Messer ist wichtig, um den Strunk sauber abzuschneiden.
* Ein Glas oder eine Schale: Groß genug, um den Strunk aufzunehmen.
* Wasser: Leitungswasser ist völlig ausreichend.
* Blumenerde: Hochwertige Blumenerde für den späteren Umzug in einen Topf.
* Ein Topf: Mit Drainagelöchern, um Staunässe zu vermeiden.
* Ein sonniger Standort: Sellerie liebt Licht!
* Geduld: Das Wichtigste!
Phase 1: Den Strunk vorbereiten und bewurzeln
Dieser erste Schritt ist entscheidend für den Erfolg. Wir wecken den Strunk quasi wieder zum Leben!
1. Den Strunk abschneiden: Nimm dein scharfes Messer und schneide den Staudensellerie-Strunk etwa 5-7 cm vom unteren Ende ab. Du kannst die Selleriestangen, die du abschneidest, natürlich für Suppen, Salate oder zum Knabbern verwenden! Achte darauf, dass der Wurzelansatz intakt bleibt.
2. Den Strunk ins Wasser stellen: Fülle dein Glas oder deine Schale mit etwa 2-3 cm Wasser. Stelle den Strunk mit dem abgeschnittenen Ende nach unten ins Wasser. Achte darauf, dass nur der untere Teil des Strunks im Wasser steht, nicht die gesamte Basis.
3. An einen sonnigen Ort stellen: Stelle das Glas mit dem Strunk an einen hellen, sonnigen Ort. Ein Fensterbrett ist ideal.
4. Wasser wechseln: Wechsle das Wasser alle 1-2 Tage, um es frisch und sauber zu halten. Das verhindert, dass sich Bakterien bilden und der Strunk fault.
5. Beobachten und warten: Nach etwa 5-7 Tagen solltest du sehen, wie kleine Wurzeln aus dem unteren Ende des Strunks wachsen. Auch in der Mitte des Strunks sollten neue, kleine grüne Blätter sprießen. Das ist ein gutes Zeichen!
Phase 2: Den bewurzelten Strunk einpflanzen
Sobald der Strunk Wurzeln gebildet hat, ist es Zeit, ihn in Erde zu pflanzen.
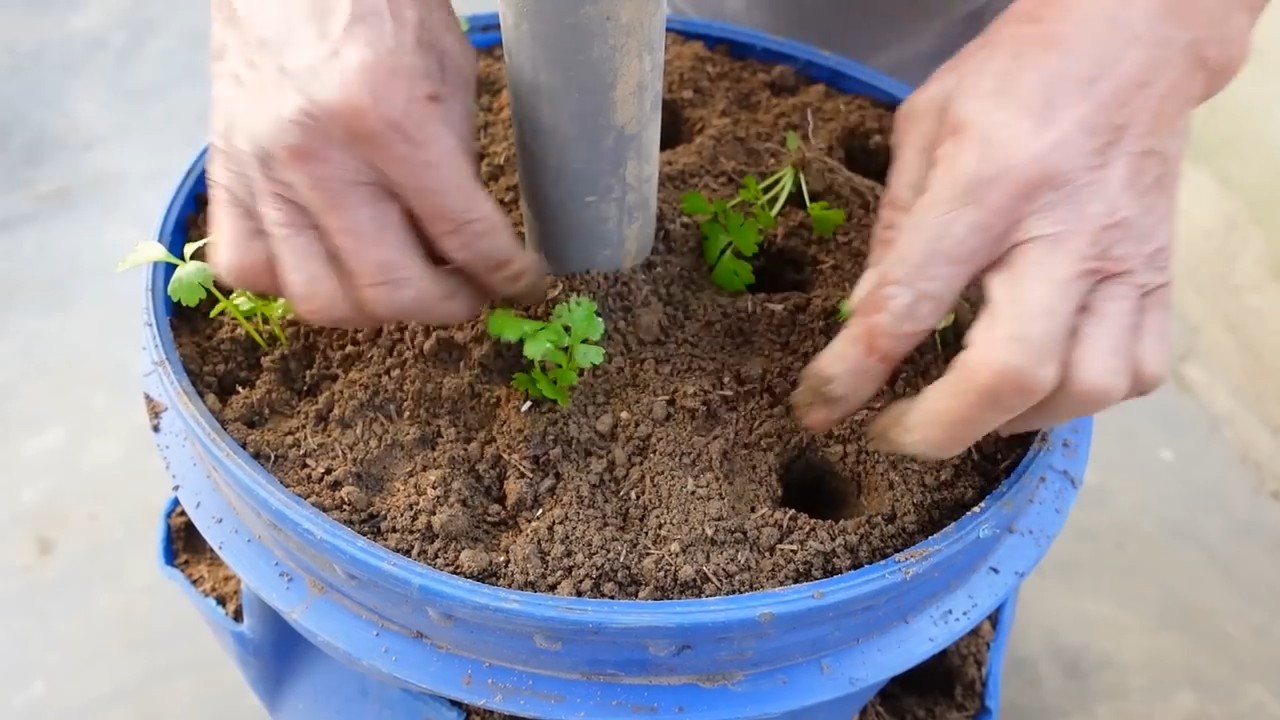
1. Den Topf vorbereiten: Fülle deinen Topf mit hochwertiger Blumenerde. Achte darauf, dass der Topf Drainagelöcher hat, damit überschüssiges Wasser ablaufen kann.
2. Ein Loch graben: Grabe ein kleines Loch in die Mitte der Erde, das groß genug ist, um den Strunk aufzunehmen.
3. Den Strunk einpflanzen: Nimm den Strunk vorsichtig aus dem Wasser und setze ihn in das Loch. Bedecke die Wurzeln mit Erde, aber lasse den oberen Teil des Strunks frei.
4. Angießen: Gieße die Erde vorsichtig an, bis sie feucht, aber nicht durchnässt ist.
5. An einen sonnigen Ort stellen: Stelle den Topf wieder an einen hellen, sonnigen Ort.
Phase 3: Pflege und Wachstum
Jetzt geht es darum, den Sellerie glücklich und gesund zu halten.
1. Regelmäßig gießen: Sellerie braucht viel Wasser. Gieße ihn regelmäßig, so dass die Erde immer feucht ist, aber nicht durchnässt. Überprüfe die Erde täglich und gieße, wenn sich die oberste Schicht trocken anfühlt.
2. Düngen (optional): Du kannst deinen Sellerie alle paar Wochen mit einem verdünnten Flüssigdünger düngen, um das Wachstum zu fördern. Achte darauf, einen Dünger zu verwenden, der für Gemüse geeignet ist.
3. Schädlinge beobachten: Achte auf Schädlinge wie Blattläuse oder Schnecken. Wenn du welche entdeckst, kannst du sie mit natürlichen Methoden bekämpfen, z.B. mit einem Wasserstrahl oder mit Neemöl.
4. Ernten: Nach einigen Wochen solltest du sehen, wie dein Sellerie wächst und neue Stangen bildet. Du kannst die äußeren Stangen ernten, sobald sie groß genug sind. Schneide sie einfach am unteren Ende ab. Der Sellerie wird weiterwachsen und neue Stangen produzieren.
Zusätzliche Tipps und Tricks
* Sellerie liebt Feuchtigkeit: Um die Luftfeuchtigkeit zu erhöhen, kannst du den Sellerie regelmäßig mit Wasser besprühen.
* Drehe den Topf: Drehe den Topf regelmäßig, damit der Sellerie gleichmäßig von allen Seiten Licht bekommt.
* Geduld ist der Schlüssel: Sellerie braucht Zeit zum Wachsen. Sei geduldig und gib ihm die richtige Pflege, dann wirst du mit einer reichen Ernte belohnt.
* Verschiedene Sorten: Es gibt verschiedene Selleriesorten. Probiere verschiedene Sorten aus, um herauszufinden, welche dir am besten schmeckt und am besten in deinem Klima wächst.
* Überwinterung: In kälteren Klimazonen kann Sellerie im Haus überwintert werden. Stelle ihn an einen kühlen, hellen Ort und gieße ihn sparsam.
Häufige Probleme und Lösungen
* Gelbe Blätter: Gelbe Blätter können ein Zeichen für Überwässerung oder Nährstoffmangel sein. Überprüfe die Bewässerung und dünge gegebenenfalls.
* Schlaffe Stangen: Schlaffe Stangen können ein Zeichen für Wassermangel sein. Gieße den Sellerie gründlich.
* Schädlinge: Bekämpfe Schädlinge so früh wie möglich, um Schäden zu vermeiden.
Warum Staudensellerie selbst anbauen?
* Frische und Geschmack: Selbst angebauter Sellerie schmeckt viel frischer und aromatischer als gekaufter.
* Nachhaltigkeit: Du reduzierst deinen ökologischen Fußabdruck, indem du auf lange Transportwege verzichtest.
* Kontrolle: Du hast die Kontrolle über die Anbaumethoden und kannst sicherstellen, dass dein Sellerie ohne schädliche Pestizide angebaut wird.
* Befriedigung: Es ist einfach ein tolles Gefühl, sein eigenes Gemüse anzubauen und zu ernten!
Ich hoffe, dieser Leitfaden hilft dir dabei, deinen eigenen Staudensellerie zu Hause anzubauen. Viel Spaß beim Gärtnern! Und denk daran: Mit ein wenig Geduld und Sorgfalt kannst du frischen, knackigen Sellerie direkt aus deinem eigenen Garten genießen. Lass es mich wissen, wenn du Fragen hast oder deine Erfahrungen teilen möchtest!
Conclusion
So, there you have it! Growing celery at home from scraps is not just a fun experiment; it’s a sustainable way to reduce food waste, enjoy fresh, flavorful celery, and connect with the natural world. It’s a surprisingly simple process that yields impressive results, even for those without a green thumb. Forget those limp, flavorless stalks from the grocery store – imagine the crisp, vibrant celery you can harvest right from your own kitchen or garden!
This DIY trick is a must-try for several compelling reasons. First, it’s incredibly cost-effective. Instead of tossing the celery base into the compost bin, you’re essentially getting a free plant. Second, it’s environmentally friendly. By regrowing celery, you’re reducing your reliance on commercially grown produce, which often involves significant transportation and resource consumption. Third, it’s a rewarding experience. Watching a discarded celery base sprout new growth and eventually mature into a full-fledged plant is incredibly satisfying.
But the benefits don’t stop there. Homegrown celery boasts a superior flavor profile compared to store-bought varieties. The taste is fresher, more intense, and less bitter. Plus, you have complete control over the growing conditions, ensuring that your celery is free from harmful pesticides and chemicals.
Looking for variations? Absolutely! Once your celery is established, you can experiment with different growing techniques. Try transplanting it into a larger container or directly into your garden bed. You can also explore different celery varieties, such as Pascal celery (a classic choice) or Chinese celery (known for its stronger flavor). Consider companion planting with herbs like parsley or cilantro, which can help deter pests and enhance the flavor of your celery. Another fun variation is to try growing celery in different types of soil or hydroponically. Each method will yield slightly different results, allowing you to fine-tune your growing process and discover what works best for you. You can even try blanching your celery by mounding soil around the stalks to create a milder, sweeter flavor.
We wholeheartedly encourage you to give this DIY trick a try. It’s a fantastic project for individuals, families, and classrooms alike. It’s a great way to teach children about plant life cycles, sustainability, and the importance of reducing food waste. Plus, it’s a fun and engaging activity that can be enjoyed year-round.
Don’t be afraid to experiment and adapt the process to suit your own needs and preferences. The beauty of growing celery at home is that it’s a flexible and forgiving process. Even if you encounter a few setbacks along the way, don’t give up! With a little patience and persistence, you’ll be rewarded with a bountiful harvest of fresh, delicious celery.
We’re eager to hear about your experiences! Share your photos, tips, and tricks in the comments section below. Let’s create a community of home celery growers and inspire others to embrace this sustainable and rewarding practice. Let us know what challenges you faced and what successes you celebrated. Your feedback will help us refine this guide and make it even more helpful for future growers. So, grab a celery base, get your hands dirty, and start growing your own celery today! You’ll be amazed at what you can achieve.
Frequently Asked Questions (FAQ)
What part of the celery do I need to regrow it?
You need the base of the celery stalk, the part where all the stalks are connected and where the roots would have been. Cut off the stalks about 2 inches from the base, leaving the base intact. This is the part that will regrow.
How long does it take to regrow celery from a base?
The initial sprouting and root development typically take about 5-7 days in water. After transplanting to soil, it can take several weeks to a few months to grow a full-sized celery plant, depending on growing conditions like sunlight, temperature, and soil quality. Be patient; it’s a process!
What kind of water should I use to regrow celery?
Tap water is generally fine, but it’s best to let it sit out for a few hours to allow chlorine to dissipate. Filtered water or rainwater are also excellent options. Avoid using distilled water, as it lacks the minerals that plants need. Change the water every 1-2 days to keep it fresh and prevent bacterial growth.
How much sunlight does regrowing celery need?
Celery needs at least 6 hours of sunlight per day to thrive. Place your celery base in a sunny windowsill or under a grow light. If you’re growing it outdoors, choose a location that receives full sun. If you live in a very hot climate, some afternoon shade can be beneficial to prevent the leaves from scorching.
What kind of soil is best for growing celery?
Celery prefers rich, well-draining soil that is high in organic matter. A good potting mix amended with compost or aged manure is ideal. The soil should be able to retain moisture but not become waterlogged. You can also add perlite or vermiculite to improve drainage.
How often should I water my regrowing celery?
Keep the soil consistently moist, but not soggy. Water when the top inch of soil feels dry to the touch. Celery needs plenty of water, especially during hot weather. Avoid letting the soil dry out completely, as this can stress the plant and hinder its growth.
Can I grow celery indoors year-round?
Yes, you can grow celery indoors year-round, provided you have adequate sunlight or a grow light. Maintain a consistent temperature and humidity level. Indoor celery may not grow as large as outdoor celery, but you can still harvest fresh stalks regularly.
What are some common problems when regrowing celery, and how can I fix them?
Some common problems include:
* **Yellowing leaves:** This can be caused by overwatering, underwatering, or nutrient deficiencies. Adjust your watering schedule and consider fertilizing with a balanced liquid fertilizer.
* **Slow growth:** This can be due to insufficient sunlight, poor soil quality, or cool temperatures. Ensure your celery is getting enough light and warmth, and amend the soil with compost or other organic matter.
* **Pests:** Aphids and other pests can sometimes attack celery. Inspect your plants regularly and treat any infestations with insecticidal soap or neem oil.
* **Bolting (premature flowering):** This can occur if the celery is stressed by heat or drought. Ensure your celery is getting enough water and shade during hot weather.
When is the best time to harvest my regrown celery?
You can start harvesting celery stalks when they are about 6-8 inches long. Simply cut off the outer stalks as needed, leaving the inner stalks to continue growing. This allows you to enjoy a continuous harvest over several weeks.
Can I eat the leaves of regrown celery?
Yes, the leaves of regrown celery are perfectly edible and have a similar flavor to the stalks, though sometimes more intense. They can be used in salads, soups, stews, or as a garnish. Don’t discard them! They are a flavorful addition to many dishes.
Will the regrown celery be as big as store-bought celery?
The size of your regrown celery will depend on several factors, including the variety of celery, growing conditions, and the size of the original base. It may not grow as large as store-bought celery, but it will still produce plenty of fresh, flavorful stalks for your enjoyment.
Can I grow celery from seed instead of a base?
Yes, you can grow celery from seed. However, it’s a more time-consuming process, and celery seeds can be slow to germinate. Regrowing from a base is a faster and easier way to get started.
How can I make my regrown celery taste sweeter?
Blanching can help to make celery taste sweeter. To blanch, mound soil around the stalks as they grow, blocking out sunlight. This will reduce the production of chlorophyll, resulting in a milder, sweeter flavor.
Is regrowing celery worth the effort?
Absolutely! Regrowing celery is a rewarding and sustainable way to enjoy fresh, flavorful celery while reducing food waste. It’s a fun and educational project that can be enjoyed by people of all ages and skill levels. Give it a try, and you’ll be amazed at what you can achieve!
Leave a Comment