
Growing Cilantro at Home can feel like a culinary quest, especially when you’re craving that fresh, zesty flavor in your tacos or guacamole. But what if I told you that achieving cilantro abundance is easier than you think, right in your own backyard (or even on your windowsill)? Forget those sad, wilted bunches from the grocery store! This DIY guide is your secret weapon to unlocking a constant supply of this vibrant herb.
Cilantro, also known as coriander (the seeds!), has a rich history, dating back to ancient Egypt. It was even found in Tutankhamun’s tomb! Throughout history, different cultures have prized cilantro for its medicinal properties and culinary versatility. From adding a burst of freshness to Asian cuisine to being a staple in Latin American dishes, cilantro’s global appeal is undeniable.
So, why do you need these DIY tricks for growing cilantro at home? Because let’s face it, cilantro can be a bit finicky. It’s notorious for bolting (going to seed) quickly, especially in hot weather. This article will equip you with simple, effective strategies to extend your cilantro harvest, prevent bolting, and ensure you always have fresh, flavorful leaves at your fingertips. I’m going to share my favorite tips and tricks that have transformed my cilantro-growing game, and I’m confident they’ll work for you too! Get ready to enjoy a continuous supply of this amazing herb, straight from your garden to your plate.
Growing Cilantro at Home: Your Comprehensive DIY Guide
Hello, fellow garden lovers! Cilantro, also known as coriander, is an incredibly versatile herb used in countless dishes. But instead of always buying it at the supermarket, why not just grow it yourself? It’s easier than you think, and I’ll show you how! This guide will take you step-by-step through the entire process, from sowing to harvesting. Let’s get started!
What you need: The Preparation
Before we get started, make sure you have everything on hand. Here is a list of the things you’ll need:
- Cilantro seeds: You can find them online, at a garden center, or even in some supermarkets. Make sure they are fresh!
- Pots or containers: Choose pots with good drainage. The size depends on how much cilantro you want to grow. I recommend pots with at least a 15 cm (6-inch) diameter.
- High-quality potting soil: Well-draining potting soil is crucial. You can also mix in some compost to improve the nutrient supply.
- Watering can or spray bottle: For watering the seeds and plants.
- A sunny spot: Cilantro needs a lot of light, but direct midday sun can be harmful. A location with morning or afternoon sun is ideal.
- Optional: Plant labels to keep track.
The Sowing: The Foundation for Your Cilantro
Sowing is the first and most important step. Here are the steps you should follow:
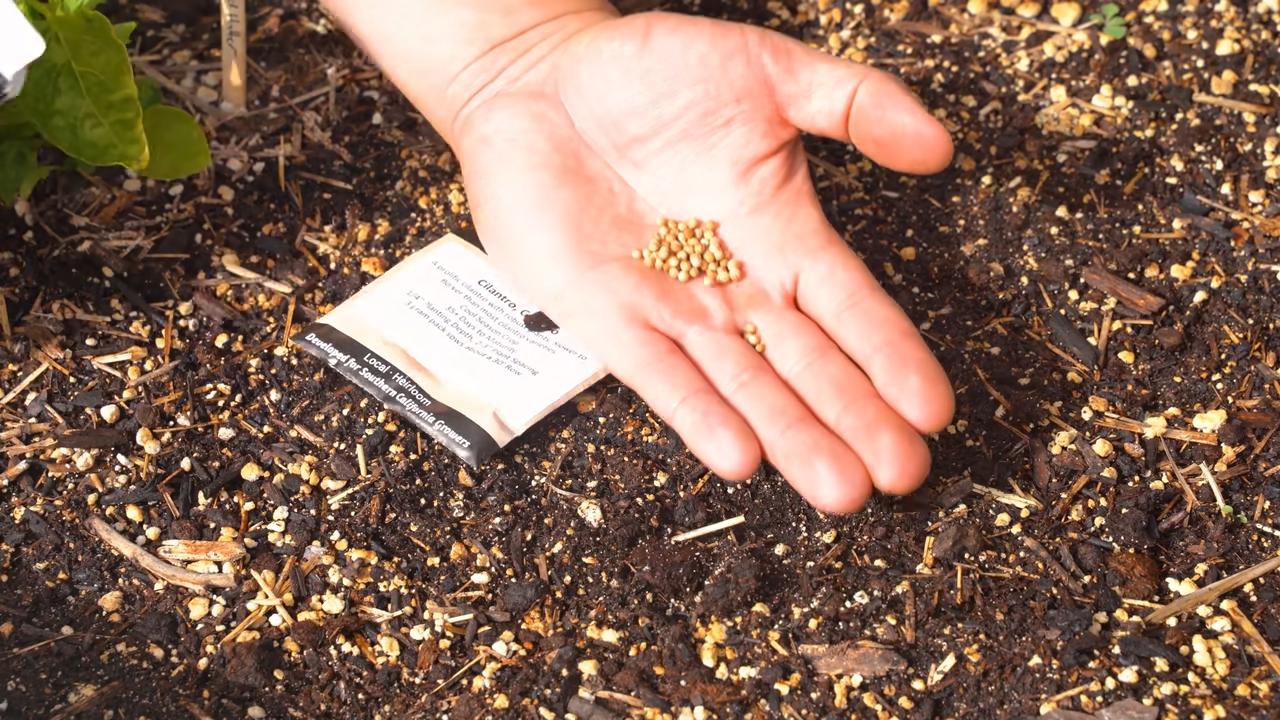
- Prepare the seeds: Coriander seeds are actually small fruits, each containing two seeds. To speed up germination, you can gently crush or split the seeds. This helps the seeds to germinate faster. I always do this, and it works great!
- Fill the pots: Fill your pots with potting soil, but leave about 2-3 cm (about an inch) of space at the top. Press the soil down lightly.
- Sow the seeds: Sprinkle the seeds evenly over the soil. I usually sow 5-6 seeds per pot. Then cover the seeds with a thin layer of soil (about 0.5 cm or 0.2 inches).
- Water: Gently moisten the soil with a watering can or spray bottle. The soil should be damp, but not soaked.
- Location: Place the pots in a sunny spot. Cilantro needs at least 6 hours of sunlight per day.
- Be patient: Germination can take 1-3 weeks. Keep the soil moist during this time.
The Care: So Your Cilantro Thrives
Once the seeds have germinated, the real work begins. Here are some tips on how you can care for your cilantro:
- Watering: Cilantro needs regular watering, especially in warm weather. The soil should always be slightly moist, but avoid waterlogging. I usually water my plants every 2-3 days, depending on the weather.
- Thinning: If too many plants are growing in one pot, you should thin them out. Remove the weakest plants so the stronger ones have enough space to grow.
- Fertilizing: Cilantro is not very demanding, but occasional fertilizing can promote growth. Use an organic liquid fertilizer and follow the instructions on the package. I fertilize my plants about every 2-3 weeks.
- Pests and diseases: Cilantro is relatively resistant to pests and diseases. Occasionally, aphids may appear. You can simply rinse them off with a jet of water or use a biological insecticide.
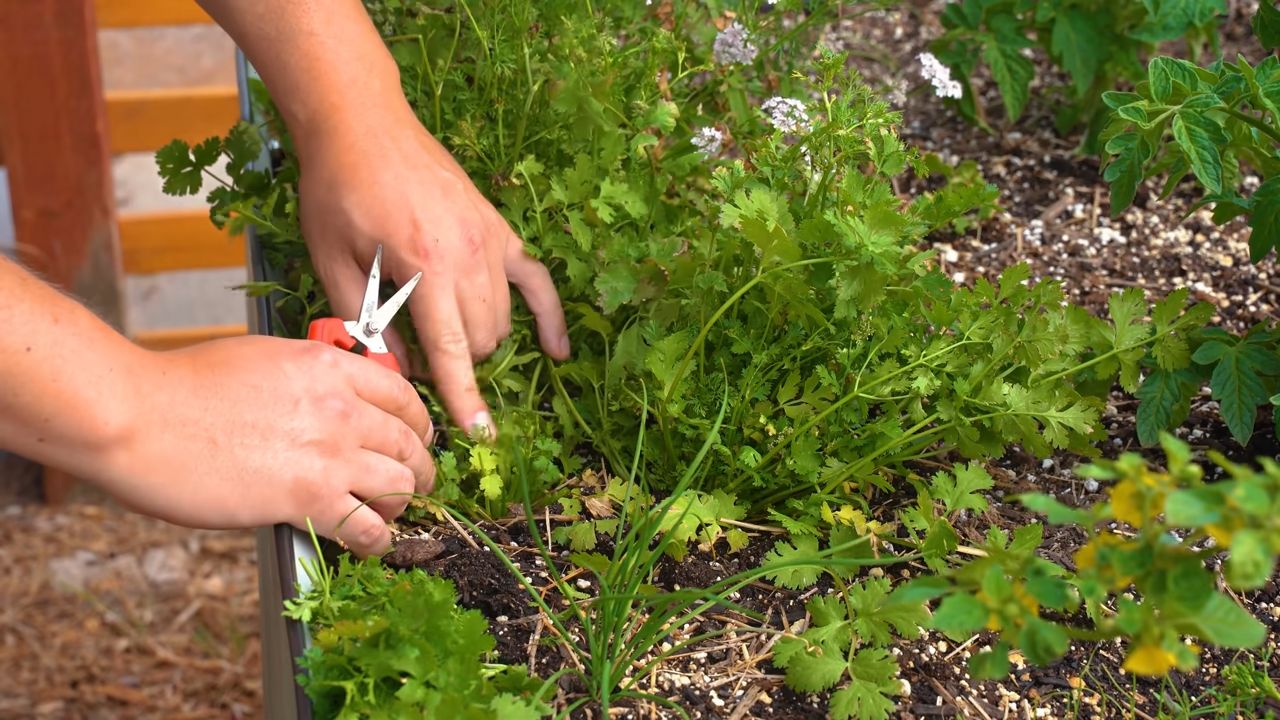
- Preventing bolting: Cilantro tends to bolt (flower) quickly, especially in warm weather. Once it flowers, it loses its flavor. To delay bolting, you can prune the plants regularly. Simply snip off the shoot tips.
The Harvest: The Reward for Your Effort
The harvest is the most exciting part! Here are the steps you should follow:
- The right time: You can harvest cilantro as soon as the plants are about 15 cm (6 inches) tall.
- The harvesting technique: Cut the leaves with scissors or a knife. Cut the outer leaves first so the inner leaves can continue to grow.
- Regular harvesting: Harvest the cilantro regularly to delay bolting and encourage the growth of new leaves.
- Storage: Fresh cilantro keeps in the refrigerator for about a week. You can also freeze or dry it. To freeze, I chop the cilantro and freeze it in ice cube trays with water. To dry, I hang the sprigs in a dry, dark place.
Additional Tips and Tricks: For the Perfect Cilantro
Here are a few more tips that can help you optimize your cilantro cultivation:
- Seasonal sowing: Cilantro grows best in cooler weather. Sow it in the spring or fall. In the summer, it can bolt quickly.
- Shade: If you live in a region with hot summers, place the plants in the shade during the hottest hours of the day.
- Different varieties: There are different cilantro varieties. Some are more resistant to bolting than others. Do some research on the different varieties before buying.
- Saving cilantro seeds: If your cilantro flowers, you can harvest the seeds and save them for the next sowing. Simply let the flowers dry and collect the seeds.
- Cilantro in companion planting: Cilantro gets along well with other plants like carrots, tomatoes, and lettuce.
Common Problems and Solutions: What to Do When Something Goes Wrong?
Even when growing cilantro, problems can occur. Here are some common problems and how you can solve them:
Rapid bolting: If the cilantro bolts quickly, it may be due to high temperatures. Move the plants to a cooler location or prune them regularly.
No germination: If the seeds don’t germinate, it can have several causes. The seeds could be too old, the soil could be too dry or too wet, or the temperature could be too low. Make sure the seeds are fresh, the soil is moist, and the temperature is between 15 and 25 degrees Celsius (59-77°F).
Yellow leaves: Yellow leaves can be a sign of a nutrient deficiency. Fertilize the plants with an organic liquid fertilizer.
Aphids: Aphids can infest the leaves. Rinse them off with a jet of water or use a biological insecticide.
Koriander ist ein unglaublich vielseitiges Kraut, das in vielen verschiedenen Gerichten verwendet werden kann. Hier sind einige Ideen:
* Guacamole: Koriander ist ein Muss in Guacamole.
* Salsas: Koriander verleiht Salsas eine frische Note.
* Currys: Koriander ist ein wichtiger Bestandteil vieler Currys.
* Suppen: Koriander kann Suppen verfeinern.
* Salate: Koriander kann Salaten eine frische Note verleihen.
* Tacos und Burritos: Koriander ist ein beliebtes Topping für Tacos und Burritos.
Ich hoffe, dieser Leitfaden hat dir geholfen, deinen eigenen Koriander anzubauen. Es ist ein lohnendes Projekt, das dir frische Kräuter direkt vor deiner Haustür liefert. Viel
Conclusion
So, there you have it! Growing cilantro at home is not only achievable, but it’s also a game-changer for anyone who loves fresh, vibrant flavors in their cooking. Forget those sad, wilted bunches from the grocery store that cost a fortune and seem to disappear within days. With a little effort and the right approach, you can have a constant supply of this fragrant herb right at your fingertips.
Why is this DIY trick a must-try? Because it empowers you to control the quality and freshness of your cilantro. You’ll be amazed at the difference in taste between homegrown cilantro and the store-bought variety. The flavor is brighter, more intense, and utterly delicious. Plus, you’ll save money in the long run, reduce food waste, and experience the satisfaction of nurturing something from seed to table.
But the benefits don’t stop there. Growing your own cilantro allows for experimentation and customization. Want to try a different variety? Go for it! There are several types of cilantro, each with its own unique flavor profile. Some are more heat-tolerant, while others are known for their slow-bolting tendencies. Explore the options and find the perfect cilantro for your climate and taste preferences.
Consider these variations to elevate your cilantro-growing experience:
* Succession Planting: Plant new seeds every few weeks to ensure a continuous harvest throughout the growing season. This is especially important in warmer climates where cilantro tends to bolt quickly.
* Container Gardening: If you’re short on space, cilantro thrives in containers. Choose a pot that’s at least 6 inches deep and wide to allow for adequate root growth.
* Hydroponics: For a more advanced approach, try growing cilantro hydroponically. This method allows for faster growth and greater control over nutrient levels.
* Companion Planting: Plant cilantro alongside other herbs and vegetables that benefit from its presence. Carrots, tomatoes, and basil are all excellent companions for cilantro.
Don’t be intimidated if you’ve never grown herbs before. Growing cilantro at home is a surprisingly simple and rewarding experience. With a little patience and attention, you’ll be harvesting your own fresh cilantro in no time.
We wholeheartedly encourage you to give this DIY trick a try. Start small, learn as you go, and don’t be afraid to experiment. The rewards are well worth the effort.
And most importantly, we want to hear about your experience! Share your tips, tricks, and triumphs in the comments below. Let us know what worked for you, what challenges you faced, and what delicious dishes you created with your homegrown cilantro. Together, we can build a community of cilantro enthusiasts and inspire others to embrace the joy of growing their own food. So, grab some seeds, get your hands dirty, and start growing your own cilantro today!
Frequently Asked Questions (FAQ)
Why does my cilantro keep bolting (going to seed)?
Bolting is a common issue with cilantro, especially in warm weather. Cilantro is a cool-season herb, and when temperatures rise, it tends to bolt in an effort to reproduce. Several factors can contribute to bolting, including:
* High Temperatures: Cilantro thrives in temperatures between 60°F and 70°F (15°C and 21°C). When temperatures consistently exceed 75°F (24°C), bolting is more likely.
* Lack of Water: Insufficient watering can stress the plant and trigger bolting. Keep the soil consistently moist, but not waterlogged.
* Poor Soil: Cilantro prefers well-draining soil that is rich in organic matter. Poor soil can lead to nutrient deficiencies and stress, increasing the likelihood of bolting.
* Crowding: Overcrowding can also stress the plants and cause them to bolt. Thin out seedlings to ensure adequate spacing.
To prevent bolting, try these strategies:
* Plant at the Right Time: Sow cilantro seeds in early spring or late summer, when temperatures are cooler.
* Provide Shade: In hot climates, provide afternoon shade to protect the plants from intense sunlight.
* Water Regularly: Keep the soil consistently moist, especially during hot weather.
* Choose Slow-Bolting Varieties: Some cilantro varieties are bred to be more resistant to bolting. Look for varieties like ‘Slow Bolt’ or ‘Santo’.
* Harvest Frequently: Regular harvesting encourages the plant to produce more leaves and delays bolting.
How often should I water my cilantro?
The frequency of watering depends on several factors, including the climate, soil type, and container size. As a general rule, water cilantro when the top inch of soil feels dry to the touch. During hot weather, you may need to water daily. In cooler weather, you can water less frequently.
Avoid overwatering, as this can lead to root rot. Make sure the pot has drainage holes to allow excess water to escape.
What kind of soil is best for growing cilantro?
Cilantro prefers well-draining soil that is rich in organic matter. A good potting mix for cilantro should contain a blend of peat moss, perlite, and vermiculite. You can also amend the soil with compost or other organic matter to improve drainage and fertility.
Avoid using heavy clay soil, as this can retain too much moisture and lead to root rot.
How much sunlight does cilantro need?
Cilantro needs at least 6 hours of sunlight per day to thrive. However, in hot climates, it can benefit from some afternoon shade. If you’re growing cilantro indoors, place it near a sunny window or use a grow light.
Can I grow cilantro indoors?
Yes, cilantro can be grown indoors, provided it receives enough sunlight or artificial light. Choose a pot that is at least 6 inches deep and wide, and use a well-draining potting mix. Place the pot near a sunny window or under a grow light. Water regularly and fertilize every few weeks.
How do I harvest cilantro?
Harvest cilantro leaves when they are young and tender. Snip off the leaves with scissors or pinch them off with your fingers. Avoid harvesting more than one-third of the plant at a time, as this can stress the plant.
Regular harvesting encourages the plant to produce more leaves and delays bolting.
What can I do with cilantro seeds (coriander)?
When your cilantro plant bolts, it will produce seeds, which are known as coriander. You can harvest the seeds and use them as a spice in cooking. Coriander seeds have a warm, citrusy flavor that is different from the flavor of cilantro leaves.
To harvest coriander seeds, allow the seed heads to dry completely on the plant. Then, cut off the seed heads and place them in a paper bag. Shake the bag to release the seeds. Store the seeds in an airtight container in a cool, dry place.
My cilantro seedlings are leggy and weak. What am I doing wrong?
Leggy and weak seedlings are often a sign of insufficient light. Cilantro seedlings need plenty of light to grow strong and healthy. If you’re growing cilantro indoors, make sure it’s getting enough light from a sunny window or a grow light. If you’re growing cilantro outdoors, make sure it’s planted in a location that receives at least 6 hours of sunlight per day.
You can also try thinning out the seedlings to provide more space for each plant to grow.
Can I freeze cilantro?
Yes, you can freeze cilantro to preserve it for later use. Wash and dry the cilantro leaves thoroughly. Then, chop the leaves and place them in an ice cube tray. Fill the tray with water or olive oil and freeze. Once the cubes are frozen, transfer them to a freezer bag or container.
You can also freeze cilantro by blanching it first. Blanching helps to preserve the color and flavor of the cilantro. To blanch cilantro, boil it for 1-2 minutes, then immediately transfer it to an ice bath. Drain the cilantro and squeeze out any excess water. Then, chop the cilantro and freeze it in a freezer bag or container.
Is growing cilantro at home worth the effort?
Absolutely! While it requires some attention, the reward of having fresh, flavorful cilantro readily available is well worth the effort. The taste difference between homegrown and store-bought cilantro is significant, and you’ll also save money and reduce food waste. Plus, it’s a fun and rewarding gardening project that anyone can enjoy.
Leave a Comment