
Grow Mini Carrots at Home? Absolutely! Imagine plucking the sweetest, most adorable little carrots straight from your own garden – it’s easier than you think, and I’m here to show you how. Forget those bland, store-bought carrots; we’re talking about vibrant, flavorful mini carrots bursting with freshness, ready to add a pop of color and nutrition to your salads, snacks, or even your kids’ lunchboxes.
For centuries, cultivating our own food has been a cornerstone of self-sufficiency and a connection to the earth. While large-scale agriculture has become the norm, the joy of nurturing a plant from seed to harvest remains deeply satisfying. Plus, growing your own produce, especially something as delightful as mini carrots, allows you to control exactly what goes into your food – no pesticides, no hidden additives, just pure, natural goodness.
But why grow mini carrots at home specifically? Well, space is often a constraint for many of us. These little guys are perfect for small gardens, balconies, or even containers on your patio. They mature quickly, offering a faster reward for your efforts, and their tender sweetness is simply irresistible. In this article, I’ll share my favorite DIY tricks and hacks to ensure you have a bountiful harvest of these miniature delights, even if you’re a complete beginner. Get ready to get your hands dirty and experience the joy of homegrown goodness!
Grow Your Own Tiny Treats: A Guide to Growing Mini Carrots at Home
Okay, so you want to grow mini carrots? Awesome! They’re super cute, delicious, and surprisingly easy to cultivate, even if you don’t have a huge garden. I’m going to walk you through everything you need to know to get those adorable little root veggies sprouting.
Choosing the Right Carrot Variety
First things first, not all carrots are created equal when it comes to mini-ness. You’ll want to select a variety specifically bred for smaller sizes. Here are a few of my favorites:
* **’Parisian’**: These are round, almost like little radishes, and mature very quickly. Perfect for impatient gardeners (like me!).
* **’Thumbelina’**: Another round variety, similar to Parisian, but often a bit sweeter.
* **’Little Finger’**: These are more traditionally carrot-shaped, but only grow to about 3-4 inches long.
* **’Short n Sweet’**: As the name suggests, these are short and sweet, reaching about 4 inches in length.
Choosing the right variety is crucial for success! Don’t just grab any carrot seeds and expect mini miracles.
Preparing Your Growing Environment
Carrots need loose, well-draining soil to thrive. Rocky or compacted soil will result in stunted or misshapen carrots. Trust me, I’ve learned this the hard way!
* **Soil Type**: Carrots prefer sandy loam soil. If your soil is heavy clay, you’ll need to amend it.
* **Sunlight**: Carrots need at least 6 hours of sunlight per day.
* **pH Level**: The ideal soil pH for carrots is between 6.0 and 6.8.
Step-by-Step Planting Guide
Alright, let’s get our hands dirty! Here’s how to plant your mini carrot seeds:
1. **Prepare the Soil**: This is the most important step! If you’re using garden soil, till it to a depth of at least 6-8 inches. Remove any rocks, clumps, or debris. Amend the soil with compost or well-rotted manure to improve drainage and fertility. If you’re using containers, choose a pot that’s at least 6-8 inches deep and fill it with a high-quality potting mix. I personally love using raised beds because they offer great drainage and are easier to manage.
2. **Sow the Seeds**: Carrot seeds are tiny, so it’s easy to sow them too thickly. To avoid overcrowding, mix the seeds with sand or coffee grounds before sowing. This will help you spread them more evenly. Create shallow furrows (about ¼ inch deep) in the soil, spaced about 2-3 inches apart. Sprinkle the seed mixture into the furrows.
3. **Cover the Seeds**: Gently cover the seeds with a thin layer of soil or vermiculite. Vermiculite helps retain moisture and prevents the soil from crusting over, which can hinder germination.
4. **Water Gently**: Water the soil gently using a watering can or a hose with a gentle spray nozzle. Avoid blasting the seeds with water, as this can wash them away. The soil should be consistently moist, but not waterlogged.
5. **Mark the Rows**: Label your rows with the carrot variety and the date you planted them. This will help you keep track of your progress and avoid accidentally weeding out your precious seedlings.
6. **Thin the Seedlings**: This is crucial! Once the seedlings emerge (usually in 7-14 days), you’ll need to thin them to prevent overcrowding. When the seedlings are about 1-2 inches tall, thin them to about 1-2 inches apart. You can use small scissors to snip off the unwanted seedlings at the soil line, or gently pull them out. Be careful not to disturb the roots of the remaining seedlings. I know it feels brutal to kill off little plants, but it’s essential for getting good-sized carrots.
7. **Mulch (Optional)**: Applying a thin layer of mulch around the seedlings can help retain moisture, suppress weeds, and regulate soil temperature. Straw, shredded leaves, or grass clippings are all good options.
Caring for Your Mini Carrots
Now that your carrots are planted, it’s time to nurture them!
* **Watering**: Carrots need consistent moisture to thrive. Water deeply whenever the top inch of soil feels dry to the touch. Avoid overwatering, as this can lead to root rot.
* **Weeding**: Keep the area around your carrots free of weeds. Weeds compete with carrots for nutrients and water, and can also harbor pests and diseases. Hand-weeding is the best option, as it minimizes the risk of damaging the carrot roots.
* **Fertilizing**: Carrots are not heavy feeders, but they will benefit from a light feeding of fertilizer. Use a balanced fertilizer (e.g., 10-10-10) or a fertilizer specifically formulated for root vegetables. Apply the fertilizer according to the package directions. I prefer using organic fertilizers like compost tea or fish emulsion.
* **Pest Control**: Carrots are susceptible to a few pests, including carrot rust flies, aphids, and nematodes. Inspect your plants regularly for signs of infestation. If you find pests, you can try spraying them with insecticidal soap or neem oil. You can also use row covers to protect your plants from pests.
* **Sunlight**: Ensure your carrots are getting at least 6 hours of sunlight per day. If you’re growing them in containers, you may need to move them around to ensure they get enough sun.
Harvesting Your Mini Carrots
The best part! Mini carrots are typically ready to harvest in 50-70 days, depending on the variety.
1. **Check for Size**: Gently brush away the soil around the base of a few carrots to check their size. They should be about 1-2 inches in diameter for round varieties, and 3-4 inches long for finger-shaped varieties.
2. **Loosen the Soil**: Before pulling the carrots, loosen the soil around them with a garden fork or trowel. This will make it easier to pull them out without breaking them.
3. **Pull Gently**: Grasp the carrot tops firmly and gently pull the carrots out of the soil. If they’re difficult to pull, try wiggling them back and forth.
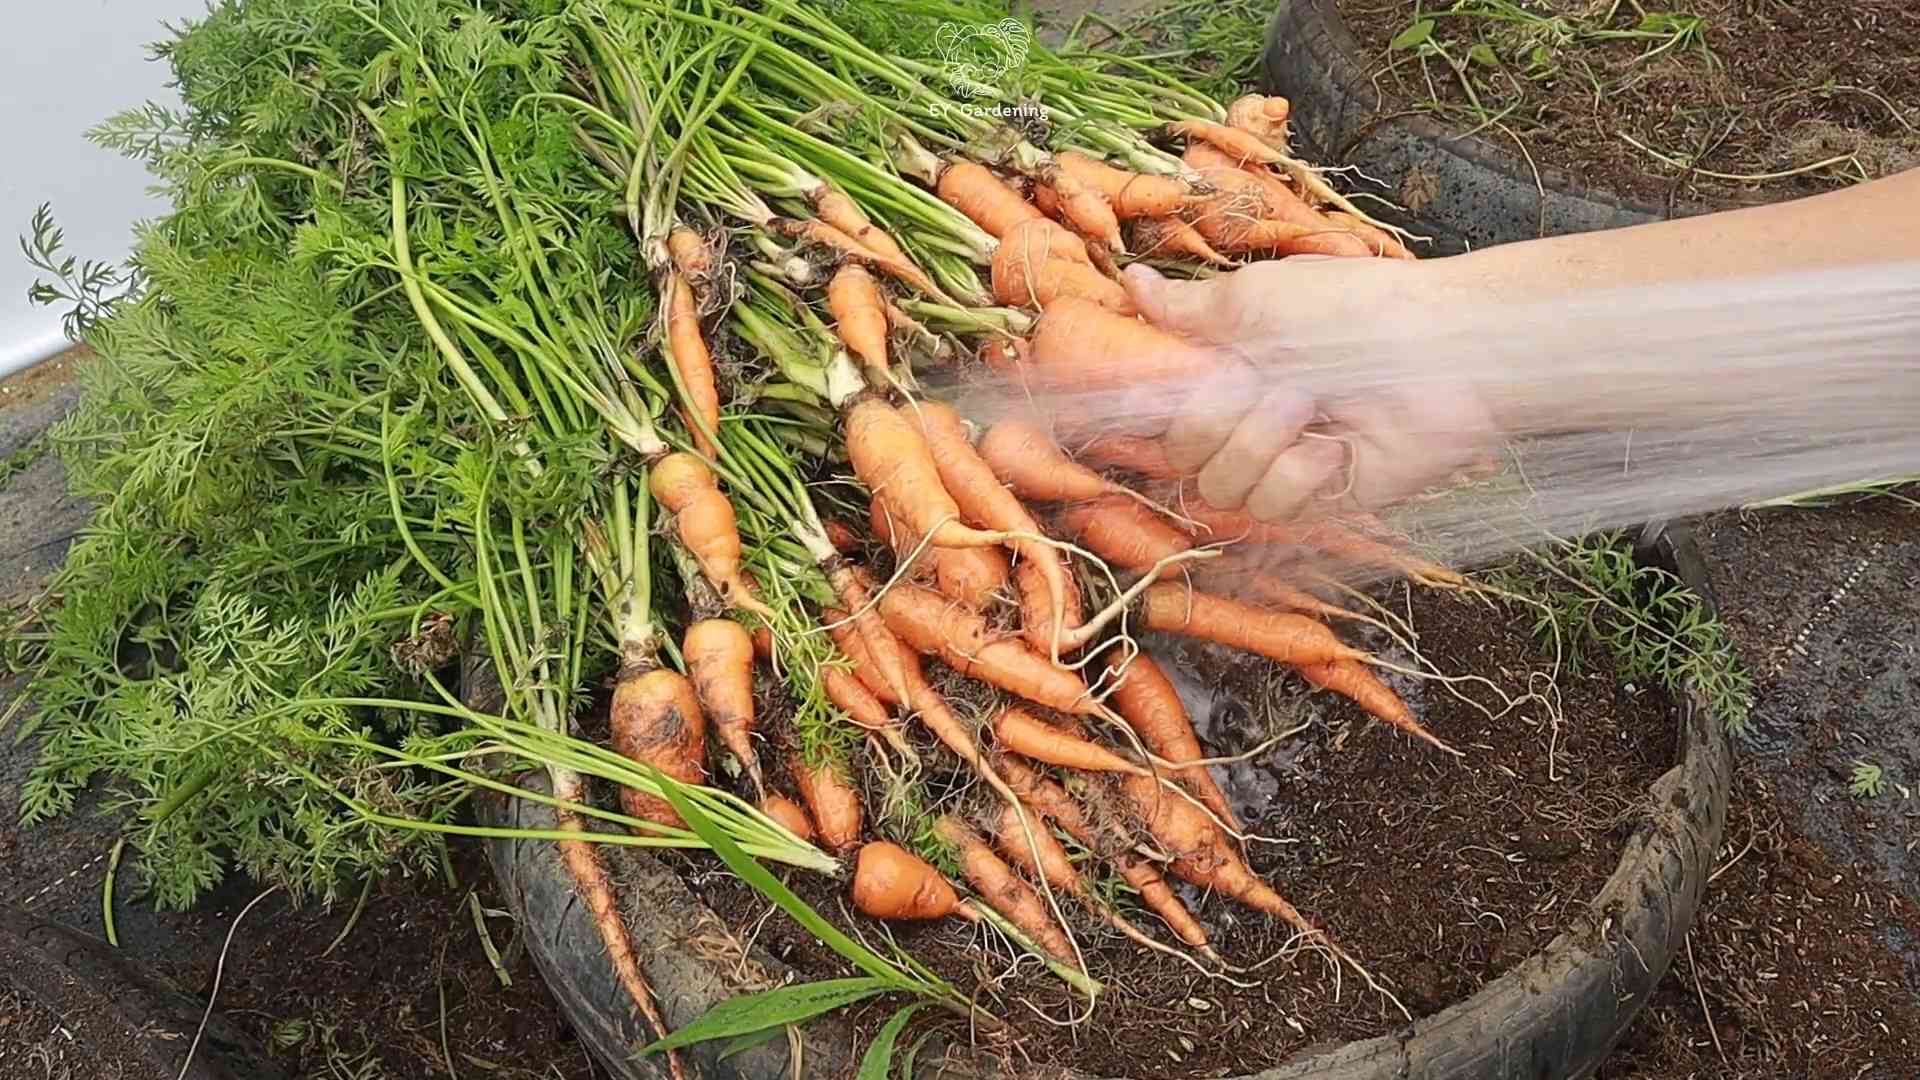
4. **Wash and Enjoy**: Wash the carrots thoroughly to remove any dirt. You can eat them raw, roasted, steamed, or added to salads and other dishes. They’re also great for snacking!
Troubleshooting Common Problems
Even with the best care, you might encounter a few problems along the way. Here are some common issues and how to address them:
* **Poor Germination**: If your seeds don’t germinate, it could be due to several factors, including old seeds, dry soil, or cold temperatures. Make sure you’re using fresh seeds, keep the soil consistently moist, and wait for warmer weather.
* **Forked or Stunted Roots**: This is usually caused by compacted or rocky soil. Amend your soil with compost or well-rotted manure to improve drainage and fertility. Remove any rocks or debris from the soil.
* **Pest Infestations**: As mentioned earlier, carrots are susceptible to a few pests. Inspect your plants regularly and take action promptly if you find any pests.
* **Diseases**: Carrots can be affected by diseases such as leaf blight and root rot. To prevent diseases, provide good air circulation, avoid overwatering, and use disease-resistant varieties.
Tips for Success
Here are a few extra tips to help you grow the best mini carrots ever:
* **Succession Planting**: Sow a new batch of seeds every 2-3 weeks to ensure a continuous harvest throughout the growing season.
* **Companion Planting**: Plant carrots alongside other vegetables like onions, garlic, and rosemary. These plants can help deter pests and improve the flavor of your carrots.
* **Soil Testing**: If you’re unsure about the nutrient content of your soil, consider getting a soil test. This will help you determine what amendments are needed to optimize your soil for carrot growth.
* **Don’t Give Up!**: Gardening can be challenging, but it’s also incredibly rewarding. Don’t be discouraged if you encounter setbacks. Just keep learning and experimenting, and you’ll eventually get the hang of it.
Growing mini carrots is a fun and rewarding experience. With a little bit of effort and patience, you can enjoy a bountiful harvest of these adorable and delicious vegetables. Happy gardening!

Conclusion
So, there you have it! Growing mini carrots at home is not only achievable but also incredibly rewarding. Forget those bland, store-bought baby carrots that lack the vibrant flavor and satisfying crunch of the real deal. With a little patience and these simple steps, you can cultivate your own supply of sweet, tender, and perfectly petite carrots right in your backyard or even on your balcony.
Why is this DIY trick a must-try? Because it puts you in control. You choose the variety, ensuring you get the flavor profile you crave. You control the growing environment, guaranteeing organic, pesticide-free produce. And you experience the sheer joy of nurturing something from seed to table. Plus, let’s be honest, there’s something undeniably charming about pulling up a handful of these miniature delights.
But the fun doesn’t stop there! Feel free to experiment with different carrot varieties. Nantes carrots are known for their sweetness, while Chantenay carrots are more robust and earthy. Consider adding companion plants like marigolds or rosemary to deter pests and enhance the flavor of your carrots. You can also try succession planting, sowing seeds every few weeks, to ensure a continuous harvest throughout the growing season.
For those with limited space, container gardening is your best friend. Choose a pot that’s at least 12 inches deep to accommodate the root growth. Use a well-draining potting mix and be diligent about watering. Even a sunny windowsill can provide enough light for a small container of mini carrots.
And if you’re feeling adventurous, why not try growing rainbow carrots? These colorful varieties add a visual pop to your garden and your plate. Imagine serving a vibrant salad featuring orange, yellow, purple, and white mini carrots – a true feast for the eyes and the taste buds!
Ultimately, the success of your mini carrot growing endeavor hinges on providing the right conditions: loose, well-drained soil, consistent moisture, and plenty of sunlight. Don’t be afraid to get your hands dirty and experiment. Gardening is a learning process, and even experienced gardeners encounter challenges. The key is to observe your plants, learn from your mistakes, and adapt your approach as needed.
We are confident that you will find this DIY project to be both enjoyable and fruitful. The satisfaction of harvesting your own homegrown mini carrots is unparalleled. So, grab your seeds, prepare your soil, and get ready to embark on a gardening adventure.
We encourage you to try this DIY trick and share your experience with us! Post photos of your mini carrot harvest on social media using #HomegrownMiniCarrots and tag us [Your Social Media Handle]. We can’t wait to see your success! Let’s spread the joy of growing our own food and inspire others to embrace the rewarding world of home gardening. Growing your own food, especially something as adorable and delicious as mini carrots, is a truly fulfilling experience.
Frequently Asked Questions (FAQ)
What is the best time of year to plant mini carrots?
The best time to plant mini carrots depends on your climate. In general, carrots are a cool-season crop, so they thrive in spring and fall. For spring planting, sow seeds 2-3 weeks before the last expected frost. For fall planting, sow seeds 2-3 months before the first expected frost. In warmer climates, you can even grow carrots throughout the winter. The ideal soil temperature for germination is between 55°F and 75°F (13°C and 24°C). If you live in a region with hot summers, provide some afternoon shade to prevent the soil from overheating.
How deep should I plant the carrot seeds?
Carrot seeds are very small, so they should be planted shallowly. Sow the seeds about ¼ inch deep and gently cover them with soil. Be careful not to bury them too deep, as this can prevent them from germinating. After sowing, lightly water the soil to keep it moist. You can also cover the planting area with a piece of burlap or cardboard to help retain moisture and prevent the soil from crusting over. Remove the cover once the seedlings start to emerge.
How often should I water my mini carrots?
Carrots need consistent moisture to grow properly. Water deeply and regularly, especially during dry periods. Aim to keep the soil consistently moist but not waterlogged. Overwatering can lead to root rot, while underwatering can cause the carrots to become stunted and tough. A good rule of thumb is to water when the top inch of soil feels dry to the touch. Use a watering can or a hose with a gentle spray nozzle to avoid disturbing the delicate seedlings.
What kind of soil is best for growing mini carrots?
Carrots prefer loose, well-drained soil that is rich in organic matter. Heavy, compacted soil can hinder root development and result in misshapen carrots. Before planting, amend the soil with compost or well-rotted manure to improve drainage and fertility. Avoid using fresh manure, as it can burn the roots. If your soil is particularly heavy, consider adding sand or perlite to improve drainage. The ideal soil pH for carrots is between 6.0 and 6.8.
How long does it take for mini carrots to grow?
Mini carrots typically take 50-70 days to mature, depending on the variety and growing conditions. Check the seed packet for specific information on the maturity time for your chosen variety. You can start harvesting mini carrots when they reach about 3-4 inches in length. To harvest, gently loosen the soil around the carrot and pull it straight up. If the soil is dry, water it beforehand to make harvesting easier.
Do mini carrots need fertilizer?
Carrots benefit from regular fertilization, especially during the early stages of growth. Use a balanced fertilizer that is specifically formulated for root vegetables. Avoid using fertilizers that are high in nitrogen, as this can promote leafy growth at the expense of root development. Apply the fertilizer according to the package instructions. You can also side-dress your carrots with compost tea or fish emulsion every few weeks to provide them with a boost of nutrients.
How do I prevent pests and diseases from affecting my mini carrots?
Carrots are susceptible to a variety of pests and diseases, including carrot rust flies, aphids, and fungal diseases. To prevent these problems, practice good garden hygiene. Remove any weeds or debris that can harbor pests and diseases. Rotate your crops each year to prevent soilborne diseases from building up. You can also use row covers to protect your carrots from pests. If you notice any signs of pests or diseases, treat them promptly with an appropriate organic pesticide or fungicide. Companion planting with herbs like rosemary and sage can also help deter pests.
Can I grow mini carrots in containers?
Yes, mini carrots are well-suited for container gardening. Choose a pot that is at least 12 inches deep and has drainage holes. Use a well-draining potting mix and water regularly. Place the container in a sunny location that receives at least 6 hours of sunlight per day. You can also grow mini carrots in raised beds or window boxes.
What are some good companion plants for mini carrots?
Companion planting can help improve the growth and flavor of your mini carrots. Some good companion plants for carrots include onions, garlic, rosemary, sage, and marigolds. Onions and garlic deter carrot rust flies, while rosemary and sage repel other pests. Marigolds attract beneficial insects that prey on pests. Avoid planting carrots near dill or fennel, as these plants can attract aphids.
How do I store my harvested mini carrots?
To store your harvested mini carrots, remove the tops and gently wash them. Pat them dry and store them in a plastic bag or container in the refrigerator. They should last for several weeks. You can also freeze mini carrots for longer storage. To freeze them, blanch them in boiling water for 2-3 minutes, then transfer them to an ice bath to stop the cooking process. Drain them well and store them in freezer bags or containers.


Leave a Comment