
Kale Growing Plastic Bottles: Who knew turning trash into treasure could be so delicious and nutritious? I’m so excited to share this incredibly simple and effective DIY trick that will have you harvesting fresh kale, even if you’re short on space or dealing with less-than-ideal soil conditions.
For centuries, resourceful gardeners have sought innovative ways to cultivate food, often born out of necessity. From ancient terraced farming to modern-day hydroponics, the spirit of ingenuity has always been at the heart of growing our own. This method of kale growing plastic bottles taps into that same spirit, offering a sustainable and budget-friendly solution for anyone wanting to enjoy the benefits of homegrown greens.
Let’s face it, buying fresh kale from the store can be expensive, and sometimes the quality just isn’t there. Plus, there’s nothing quite like the satisfaction of harvesting your own food! This DIY project is perfect for apartment dwellers, balcony gardeners, or anyone looking to reduce waste and add a touch of green to their lives. I’ll walk you through each step, making it easy to transform those discarded plastic bottles into thriving kale planters. Get ready to unlock a world of fresh, homegrown goodness with this simple yet effective technique!
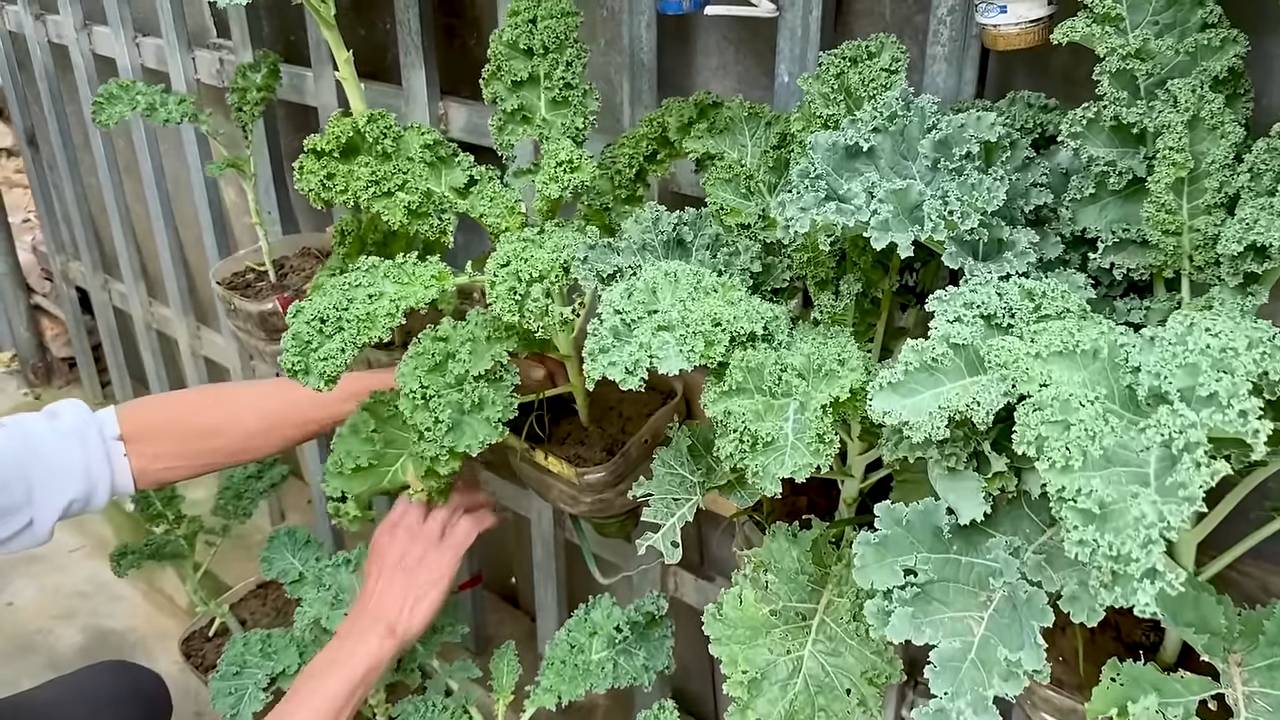
DIY Vertical Kale Garden from Plastic Bottles
Hey there, fellow gardening enthusiasts! I’m so excited to share this super cool and eco-friendly project with you: building a vertical kale garden using recycled plastic bottles. Not only is this a fantastic way to grow your own delicious and nutritious kale, but it’s also a great way to reduce plastic waste and add a touch of green to even the smallest spaces. Trust me, it’s easier than you think, and the results are totally worth it!
What You’ll Need
Before we dive in, let’s gather our supplies. Here’s a list of everything you’ll need to create your own vertical kale garden:
* Plastic Bottles: The star of the show! You’ll need several plastic bottles (2-liter soda bottles or similar work great). The number of bottles depends on how tall you want your garden to be. I recommend starting with at least 6-8 bottles. Make sure they’re clean and dry.
* Scissors or Utility Knife: For cutting the bottles. Be careful!
* Drill or Nail and Hammer: To create drainage holes.
* Rope or Strong Twine: To hang the bottles. I prefer natural twine for a rustic look.
* Potting Soil: Choose a good quality potting mix that drains well. Kale loves rich soil!
* Kale Seedlings or Seeds: You can start from seeds or buy seedlings from your local garden center. Seedlings are faster, but seeds are more economical.
* Watering Can or Hose: To keep your kale happy and hydrated.
* Measuring Tape or Ruler: To ensure even spacing.
* Gloves: To protect your hands.
* Optional: Spray Paint: If you want to give your bottles a more uniform or decorative look.
Preparing the Bottles
Okay, let’s get our hands dirty! This is where we transform those plastic bottles into mini kale planters.
1. Clean and Dry the Bottles: Make sure your bottles are thoroughly cleaned and dried. Remove any labels and sticky residue. A little soap and water will do the trick.
2. Cut the Bottles: This is a crucial step, so pay attention! You’ll be cutting a large rectangular opening in the side of each bottle to create a planting space.
* Using your scissors or utility knife, carefully cut along three sides of a rectangle on the side of the bottle. Leave the top side of the rectangle attached to the bottle – this will act as a hinge. Think of it like creating a little door. The size of the rectangle depends on the size of your bottle, but aim for something around 4 inches wide and 6 inches long.
* Repeat this process for all the bottles you plan to use.
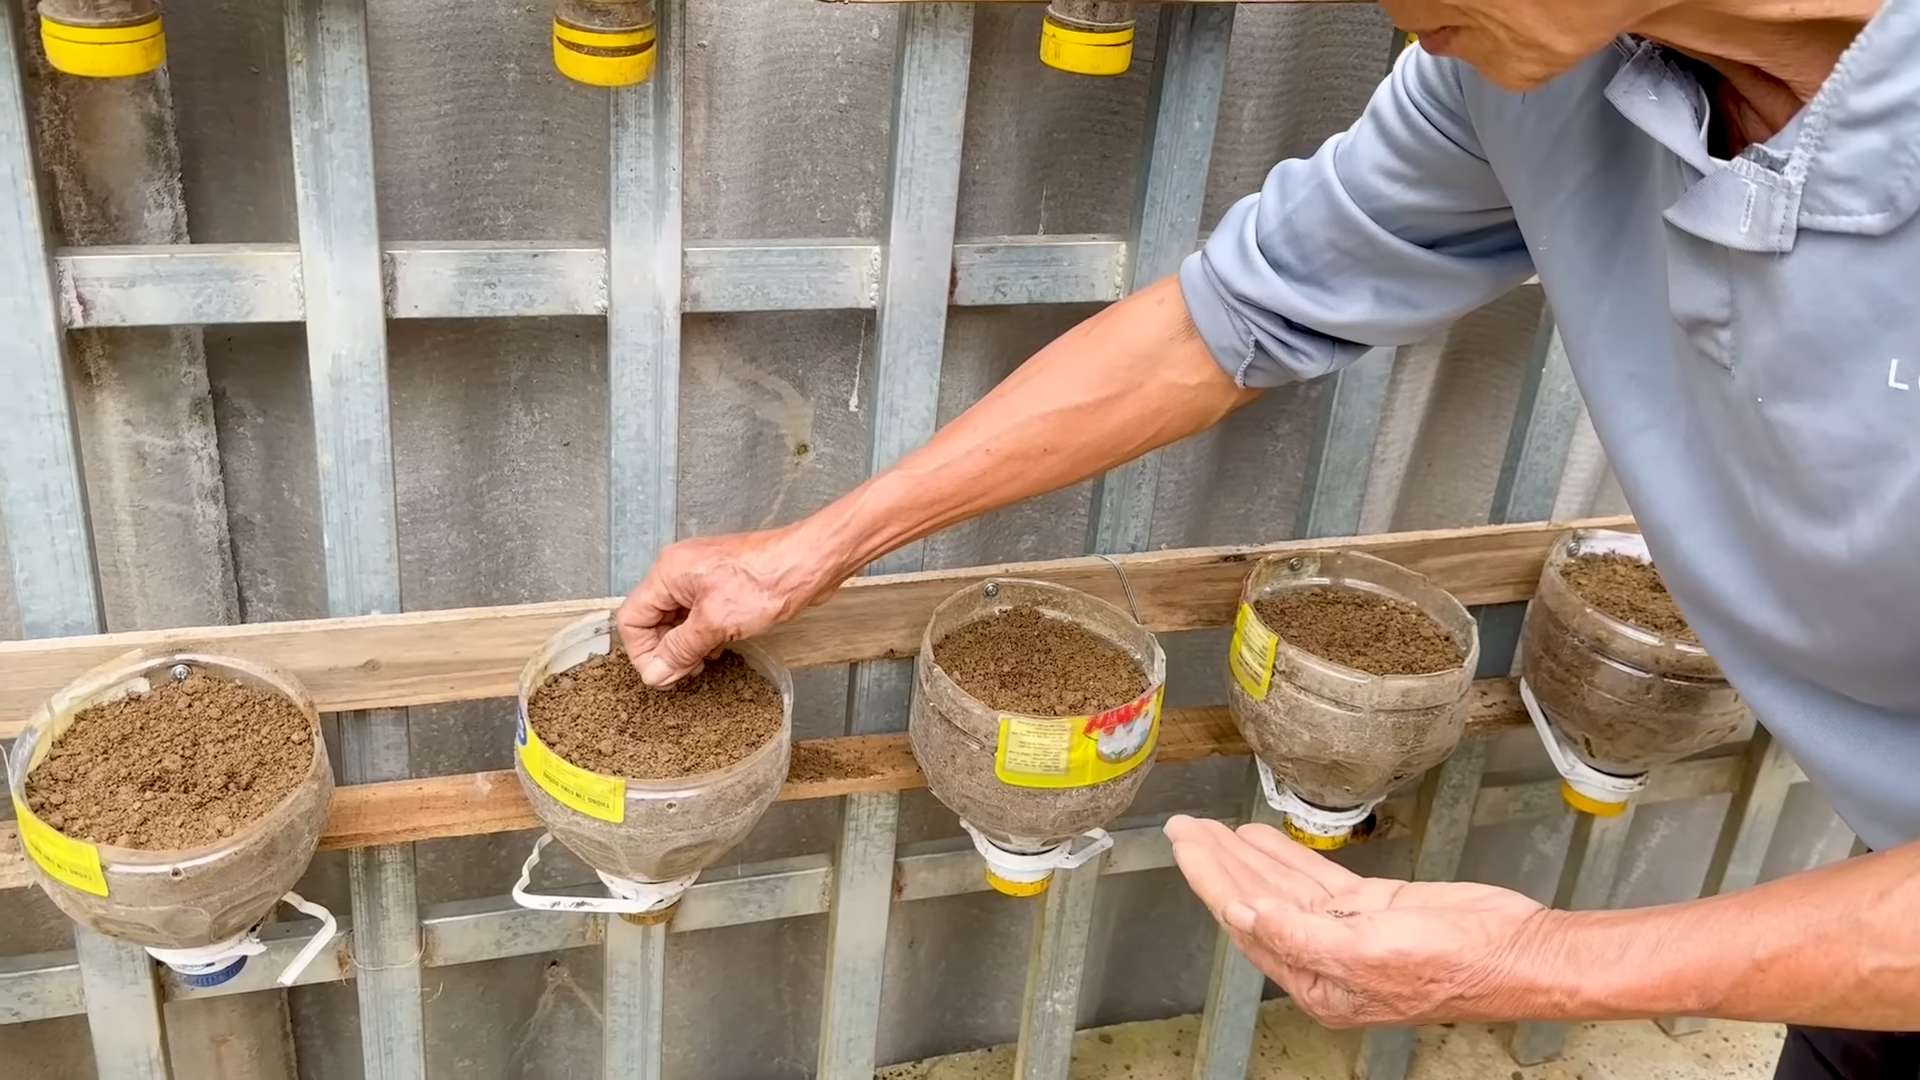
3. Create Drainage Holes: Kale needs good drainage, so don’t skip this step!
* Using your drill or nail and hammer, create several small drainage holes in the bottom of each bottle. I usually make about 4-5 holes.
* If you’re using a nail and hammer, be careful not to crack the plastic. Gently tap the nail until it pierces through.
4. (Optional) Paint the Bottles: If you want to add a pop of color or create a more uniform look, now’s the time to paint your bottles.
* Choose a spray paint that’s suitable for plastic.
* Apply several thin coats, allowing each coat to dry completely before applying the next.
* Let the paint dry completely before moving on to the next step.
Assembling the Vertical Garden
Now comes the fun part: putting everything together! This is where your individual bottle planters transform into a beautiful vertical kale garden.
1. Attach the Rope or Twine: We’ll be using the rope or twine to hang the bottles vertically.
* Cut a long piece of rope or twine. The length will depend on how tall you want your garden to be and how much space you want between each bottle. I usually add about 12-18 inches extra at the top for hanging.
* Thread the rope through the neck of the first bottle. Make a secure knot to hold the bottle in place.
* Measure the desired distance between the first and second bottle (I recommend about 8-10 inches).
* Thread the rope through the neck of the second bottle, making another secure knot.
* Repeat this process for all the remaining bottles, ensuring that each bottle is securely attached to the rope and evenly spaced.
2. Add the Soil: Now it’s time to fill your bottle planters with soil.
* Open the “door” you created earlier on each bottle.
* Carefully fill each bottle with potting soil, leaving about an inch of space at the top.
* Gently pat down the soil to remove any air pockets.
3. Plant the Kale: The moment we’ve been waiting for!
* If you’re using seedlings, gently remove them from their containers and plant them in the soil-filled bottles. Make sure the roots are covered with soil.
* If you’re using seeds, follow the instructions on the seed packet for planting depth and spacing. I usually plant a few seeds in each bottle and then thin them out later if needed.
* Water the soil gently after planting.
Hanging and Maintaining Your Garden
Almost there! Now it’s time to find the perfect spot for your vertical kale garden and learn how to keep it thriving.
1. Choose a Location: Kale needs plenty of sunlight, so choose a location that gets at least 6 hours of direct sunlight per day. A sunny balcony, patio, or even a well-lit window will work.
2. Hang Your Garden: Find a sturdy hook, railing, or other support to hang your vertical garden. Make sure the support can handle the weight of the bottles, soil, and plants.
3. Water Regularly: Kale needs consistent moisture, so water your plants regularly, especially during hot weather. Check the soil moisture by sticking your finger into the soil. If it feels dry, it’s time to water.
4. Fertilize Occasionally: To keep your kale growing strong, fertilize it every few weeks with a balanced liquid fertilizer. Follow the instructions on the fertilizer label.
5. Harvest Your Kale: You can start harvesting kale leaves once they’re large enough to eat. Simply cut off the outer leaves, leaving the inner leaves to continue growing. This will encourage continuous production.
Troubleshooting Tips
Even with the best planning, sometimes things don’t go exactly as expected. Here are a few troubleshooting tips to help you overcome common problems:
* Yellowing Leaves: This could be a sign of overwatering or underwatering. Check the soil moisture and adjust your watering schedule accordingly. Yellowing leaves can also indicate a nutrient deficiency. Try fertilizing your plants with a balanced fertilizer.
* Pests: Kale can be susceptible to pests like aphids and cabbage worms. Inspect your plants regularly and take action if you see any signs of infestation. You can try spraying your plants with insecticidal soap or neem oil.
* Slow Growth: If your kale isn’t growing as quickly as you’d like, it could be due to lack of sunlight or nutrients. Make sure your plants are getting enough sunlight and fertilize them regularly.
* Bottles Falling: Ensure the knots holding the bottles are secure. If the bottles are too heavy, consider using smaller bottles or adding less soil.
Enjoy Your Fresh Kale!
And that’s it! You’ve successfully created your own vertical kale garden from recycled plastic bottles. Now you can enjoy fresh, homegrown kale right at your fingertips. Use it in salads, smoothies, soups, or any other dish you like. Happy gardening! I hope you found this guide helpful and inspiring. Let me know if you have any questions or share your own experiences in the comments below!
Conclusion
So, there you have it! Growing kale in plastic bottles is not just a quirky gardening hack; it’s a game-changer for anyone looking to maximize space, minimize waste, and enjoy a constant supply of fresh, nutritious greens. We’ve walked you through the simple steps, highlighting how accessible and rewarding this method can be.
But why is this DIY trick a must-try? First and foremost, it’s incredibly space-efficient. Whether you have a sprawling garden or a tiny balcony, vertical gardening with plastic bottles allows you to cultivate a surprising amount of kale in a small footprint. This is particularly beneficial for urban dwellers or those with limited outdoor space.
Secondly, it’s an eco-conscious choice. By repurposing plastic bottles, you’re actively reducing plastic waste and giving these materials a new lease on life. It’s a small act with a significant impact on the environment. Plus, it’s a fantastic way to teach children about sustainability and the importance of recycling.
Thirdly, it’s cost-effective. Starting with readily available materials like plastic bottles and basic potting soil, you can grow your own kale without breaking the bank. This is a great way to save money on groceries and enjoy fresh, organic produce at home.
But the benefits don’t stop there. Growing kale in plastic bottles also offers better control over the growing environment. You can easily move the bottles to optimize sunlight exposure, protect them from harsh weather conditions, and monitor soil moisture levels. This level of control can lead to healthier, more productive plants.
Now, let’s talk about variations. While we’ve focused on kale, this method can be adapted for other leafy greens like spinach, lettuce, and even herbs. Experiment with different types of plastic bottles to find what works best for your space and aesthetic preferences. You can also add decorative elements to your bottle planters to create a visually appealing vertical garden. Consider painting the bottles, adding labels, or even incorporating them into a larger vertical structure.
For those looking to take their kale growing to the next level, consider adding a simple irrigation system. You can create a drip irrigation system using small tubes and a water reservoir, ensuring consistent moisture levels for your plants. This is particularly useful during hot, dry weather.
Another variation is to experiment with different soil mixes. While basic potting soil works well, you can also add compost, perlite, or vermiculite to improve drainage and nutrient availability. Tailor your soil mix to the specific needs of your kale plants for optimal growth.
We encourage you to embrace this DIY project and experience the joy of growing your own kale. It’s a rewarding and sustainable way to enjoy fresh, healthy greens. Don’t be afraid to experiment, adapt the method to your specific needs, and most importantly, have fun!
Once you’ve tried growing kale in plastic bottles, we’d love to hear about your experience. Share your photos, tips, and challenges in the comments below. Let’s create a community of DIY gardeners and inspire others to embrace sustainable practices. Your insights could help someone else discover the joys of growing their own food. So, get started today and let us know how it goes! We are confident that you will find that growing kale in plastic bottles is a simple and effective way to have fresh greens at your fingertips.
Frequently Asked Questions (FAQ)
What type of plastic bottles are best for growing kale?
The best type of plastic bottles for growing kale are those that are sturdy and opaque or semi-opaque. Avoid using thin, flimsy bottles that might collapse under the weight of the soil and plants. Bottles that previously held water, juice, or soda are all good options. Make sure to thoroughly clean the bottles before using them to remove any residue that could harm your plants. Clear bottles can be used, but they may allow too much sunlight to reach the roots, potentially causing overheating. If you use clear bottles, consider painting them or wrapping them in a light-colored material to protect the roots.
How often should I water my kale plants grown in plastic bottles?
The frequency of watering depends on several factors, including the weather, the size of the bottles, and the type of soil you’re using. As a general rule, check the soil moisture level daily. If the top inch of soil feels dry to the touch, it’s time to water. Water thoroughly until water drains out of the drainage holes at the bottom of the bottle. Avoid overwatering, as this can lead to root rot. During hot, dry weather, you may need to water more frequently, possibly even twice a day. During cooler, wetter weather, you may only need to water every few days.
What kind of soil should I use for growing kale in plastic bottles?
A well-draining potting mix is essential for growing kale in plastic bottles. Avoid using garden soil, as it can be too heavy and compact, leading to poor drainage and root problems. A good potting mix will typically contain a blend of peat moss, perlite, and vermiculite. You can also add compost to the mix to provide additional nutrients. Consider adding a slow-release fertilizer to the soil mix to provide a steady supply of nutrients to your kale plants.
How much sunlight do kale plants need when grown in plastic bottles?
Kale plants need at least 6 hours of sunlight per day to thrive. Place your plastic bottle planters in a location that receives full sun, especially during the morning hours. If you live in a hot climate, you may need to provide some afternoon shade to prevent the plants from overheating. If you don’t have access to a sunny location, you can supplement with artificial grow lights.
How do I protect my kale plants from pests and diseases when growing in plastic bottles?
Regularly inspect your kale plants for signs of pests and diseases. Common pests that affect kale include aphids, cabbage worms, and flea beetles. You can control these pests by handpicking them off the plants, spraying them with insecticidal soap, or using a biological insecticide like Bacillus thuringiensis (Bt). To prevent diseases, ensure good air circulation around the plants and avoid overwatering. If you notice any signs of disease, such as yellowing leaves or spots, remove the affected leaves immediately.
Can I grow kale indoors in plastic bottles?
Yes, you can grow kale indoors in plastic bottles, but you’ll need to provide adequate light. Place the bottles near a sunny window that receives at least 6 hours of direct sunlight per day. If you don’t have enough natural light, you’ll need to supplement with artificial grow lights. Use full-spectrum LED grow lights and position them close to the plants. You’ll also need to ensure good air circulation and maintain a consistent temperature.
How long does it take for kale to grow in plastic bottles?
Kale typically takes about 55 to 75 days to mature from seed to harvest. However, you can start harvesting leaves as soon as they are large enough to eat, usually about 4 to 6 weeks after planting. Harvest the outer leaves first, leaving the inner leaves to continue growing. This will encourage the plant to produce more leaves.
How do I harvest kale from plastic bottles?
To harvest kale, simply cut off the outer leaves with a sharp knife or scissors. Leave the inner leaves to continue growing. Avoid harvesting more than one-third of the plant at a time, as this can stress the plant and reduce its productivity. Harvest kale in the morning, when the leaves are crisp and fresh.
What are some other plants I can grow in plastic bottles using this method?
Besides kale, you can grow a variety of other plants in plastic bottles using this method. Some popular options include spinach, lettuce, herbs (such as basil, mint, and parsley), strawberries, and even small vegetables like peppers and tomatoes. Choose plants that have shallow root systems and don’t require a lot of space.
How do I deal with drainage issues when growing kale in plastic bottles?
Proper drainage is crucial for growing healthy kale in plastic bottles. Make sure to create adequate drainage holes at the bottom of the bottles before planting. You can also add a layer of gravel or pebbles to the bottom of the bottles to improve drainage. Avoid overwatering, as this can lead to waterlogged soil and root rot. If you notice that the soil is staying too wet, try adding more perlite or vermiculite to the potting mix to improve drainage.
Leave a Comment