
Growing Potatoes at Home can seem daunting, but trust me, it’s one of the most rewarding experiences a home gardener can have! Imagine pulling fresh, earthy potatoes straight from your own backyard – the taste is simply unmatched. For centuries, potatoes have been a staple food in cultures around the world, from the Andes Mountains where they originated, to the humble gardens of today. Their versatility and nutritional value have made them a beloved crop, and now, you can easily cultivate them yourself.
But why should you bother with the effort? Well, store-bought potatoes often lack the vibrant flavor of homegrown varieties, and let’s be honest, knowing exactly where your food comes from is incredibly satisfying. Plus, growing potatoes at home is a fantastic way to connect with nature, reduce your carbon footprint, and save money on groceries. In this article, I’m going to share some simple, DIY tricks and hacks that will help you achieve a bountiful potato harvest, even if you have limited space or gardening experience. Get ready to get your hands dirty and enjoy the delicious fruits (or rather, tubers!) of your labor!
Growing Potatoes in Buckets: A Beginner’s Guide to Bountiful Harvests
Hey there, fellow gardening enthusiasts! I’m so excited to share my experience with growing potatoes in buckets. It’s a fantastic way to enjoy fresh, homegrown potatoes, even if you don’t have a sprawling garden. Trust me, it’s easier than you think, and the reward of digging up your own spuds is incredibly satisfying. So, grab your buckets, some seed potatoes, and let’s get started!
What You’ll Need: The Essential Supplies
Before we dive into the nitty-gritty, let’s gather our supplies. Here’s a checklist to make sure you’re all set:
* Seed Potatoes: These aren’t just any potatoes from the grocery store! Seed potatoes are specifically grown for planting and are certified disease-free. You can find them at your local garden center or online. Choose varieties that suit your taste and climate. I personally love Yukon Gold for their creamy texture and all-purpose use.
* Large Buckets: 5-gallon buckets are a good starting point, but larger ones (10-gallon or more) will give your potatoes more room to grow and potentially yield a bigger harvest. Make sure they’re clean and have drainage holes.
* Potting Mix: A well-draining potting mix is crucial. Avoid using garden soil, as it can become compacted in containers and hinder drainage. I recommend a mix of compost, peat moss (or coconut coir), and perlite.
* Fertilizer: A slow-release fertilizer formulated for vegetables will provide your potatoes with the nutrients they need throughout the growing season. Look for a balanced formula like 10-10-10 or something specifically designed for root vegetables.
* Watering Can or Hose: Essential for keeping your potatoes hydrated.
* Optional:
* Grow Bags: A great alternative to buckets, especially if you want something more breathable.
* Chitting Tray: For pre-sprouting your seed potatoes (more on that later).
* Gloves: To keep your hands clean.
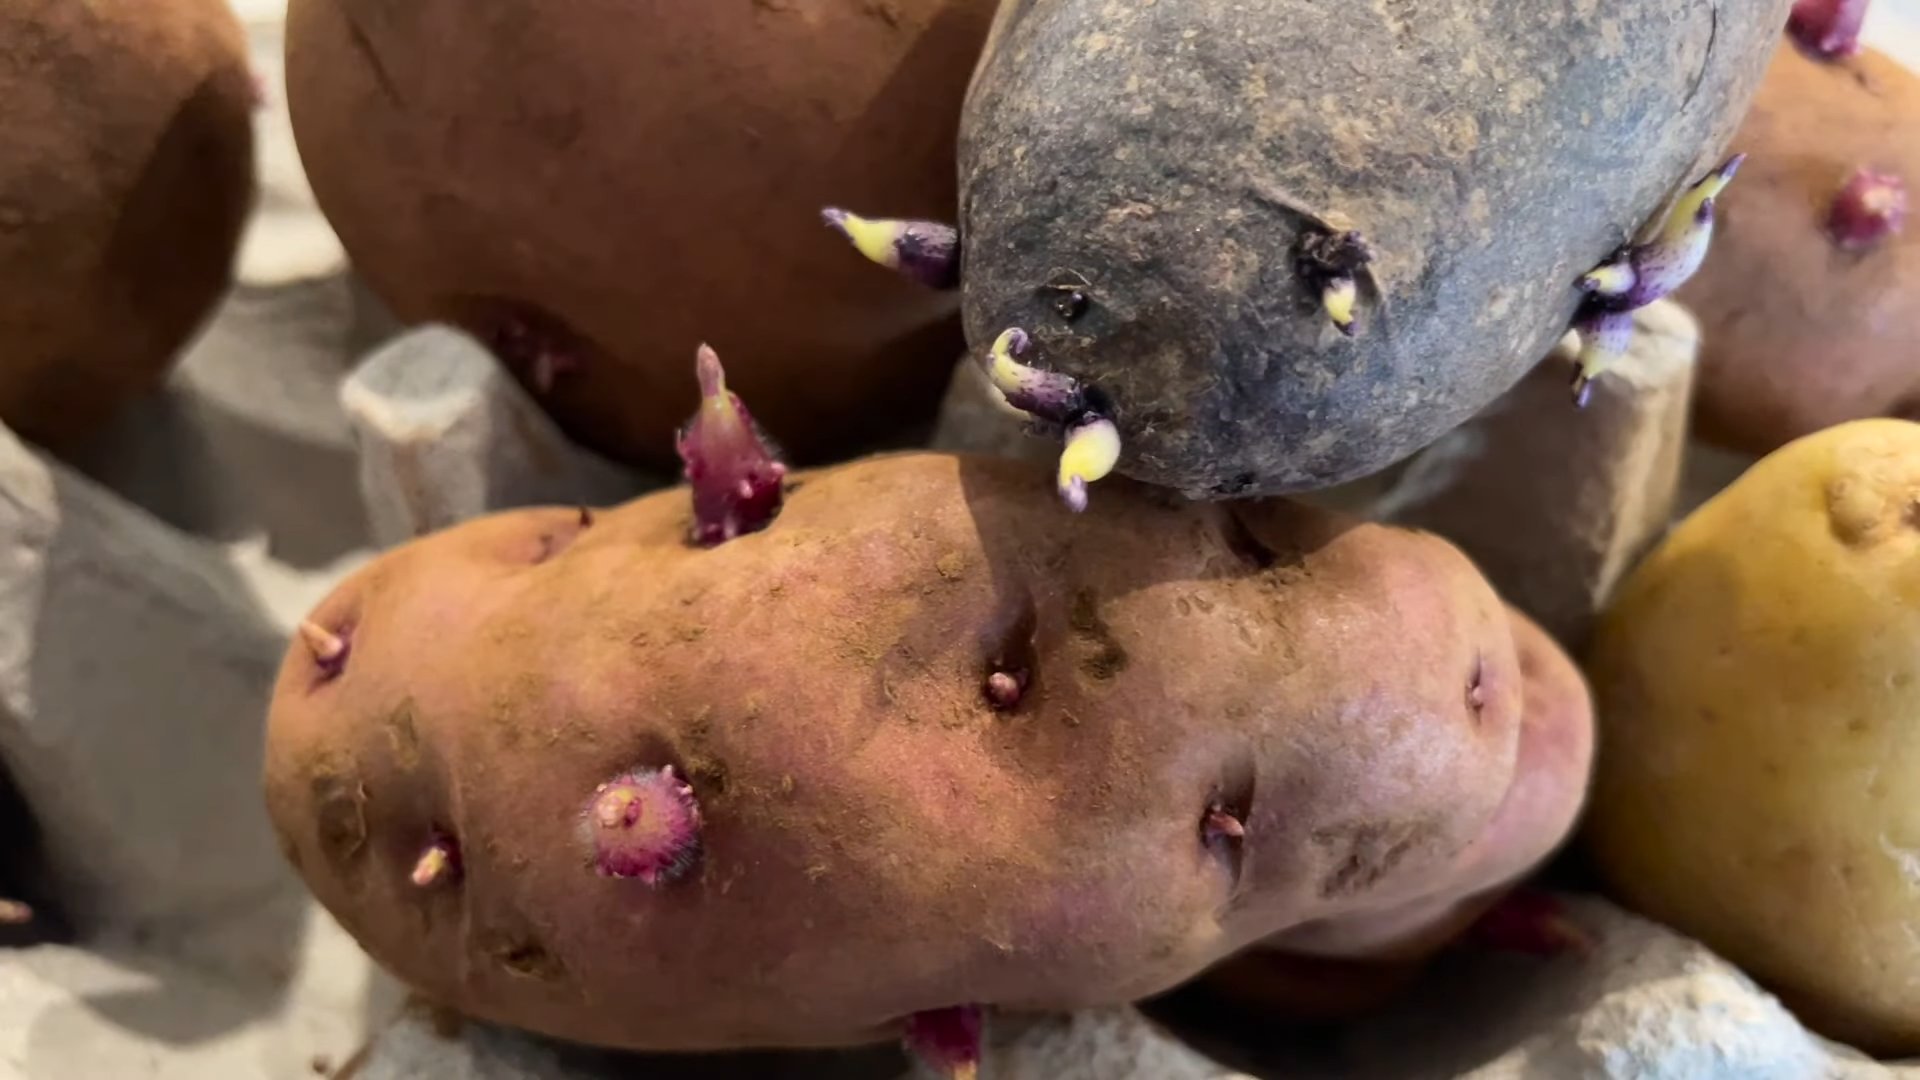
Preparing Your Seed Potatoes: The Chitting Process (Optional but Recommended)
Chitting, or pre-sprouting, your seed potatoes can give them a head start and result in an earlier harvest. It’s not absolutely necessary, but I highly recommend it.
1. Choose Your Seed Potatoes: Select healthy-looking seed potatoes with “eyes” (small buds) on them.
2. Place in a Bright, Cool Location: Arrange the seed potatoes in a single layer in a chitting tray, egg carton, or any container that allows air circulation. Place them in a cool, bright location (around 60-70°F) with indirect sunlight. Avoid direct sunlight, as it can dry them out.
3. Wait for Sprouts: Over the next few weeks, the eyes will start to sprout. You’re aiming for short, green sprouts (about 1/2 to 1 inch long).
4. Handle with Care: Be careful not to break off the sprouts when handling the seed potatoes.
Planting Your Potatoes: Getting Started
Now for the fun part – planting!
1. Prepare Your Buckets: Ensure your buckets have adequate drainage holes. If not, drill a few into the bottom.
2. Add Potting Mix: Fill the bucket with about 4-6 inches of potting mix.
3. Plant the Seed Potatoes: Place the seed potatoes on top of the potting mix, with the sprouts facing upwards. If your seed potato is large, you can cut it into pieces, ensuring each piece has at least one or two eyes. Let the cut pieces callous over for a day or two before planting to prevent rotting.
4. Cover with Potting Mix: Cover the seed potatoes with another 4-6 inches of potting mix.
5. Water Thoroughly: Water the soil gently until it’s moist but not soggy.
The “Hilling” Process: Encouraging More Potatoes
This is where the magic happens! “Hilling” is the process of adding more soil to the bucket as the potato plants grow. This encourages the plant to produce more potatoes along the buried stem.
1. Wait for Growth: Once the potato plants emerge from the soil and reach about 6-8 inches tall, it’s time to hill.
2. Add More Potting Mix: Add more potting mix to the bucket, covering the stems of the plants, leaving only the top few leaves exposed.
3. Repeat the Process: Continue hilling every few weeks as the plants grow, until the bucket is almost full.
4. Water Regularly: Keep the soil consistently moist, especially during hot weather.
Caring for Your Potato Plants: Watering, Fertilizing, and Pest Control
Proper care is essential for a successful potato harvest.
1. Watering: Water your potato plants regularly, especially during dry spells. The soil should be consistently moist but not waterlogged. Check the soil moisture by sticking your finger into the soil – if it feels dry an inch or two down, it’s time to water.
2. Fertilizing: Fertilize your potato plants every few weeks with a balanced fertilizer. Follow the instructions on the fertilizer package. You can also use organic fertilizers like compost tea or fish emulsion.
3. Sunlight: Potato plants need at least 6-8 hours of sunlight per day. Place your buckets in a sunny location.
4. Pest Control: Keep an eye out for pests like aphids, potato beetles, and flea beetles. You can control these pests with organic insecticides like neem oil or insecticidal soap. Handpicking the pests off the plants is also an effective method.
5. Disease Prevention: To prevent diseases, ensure good air circulation around the plants and avoid overwatering. If you notice any signs of disease, such as yellowing or browning leaves, remove the affected leaves immediately.
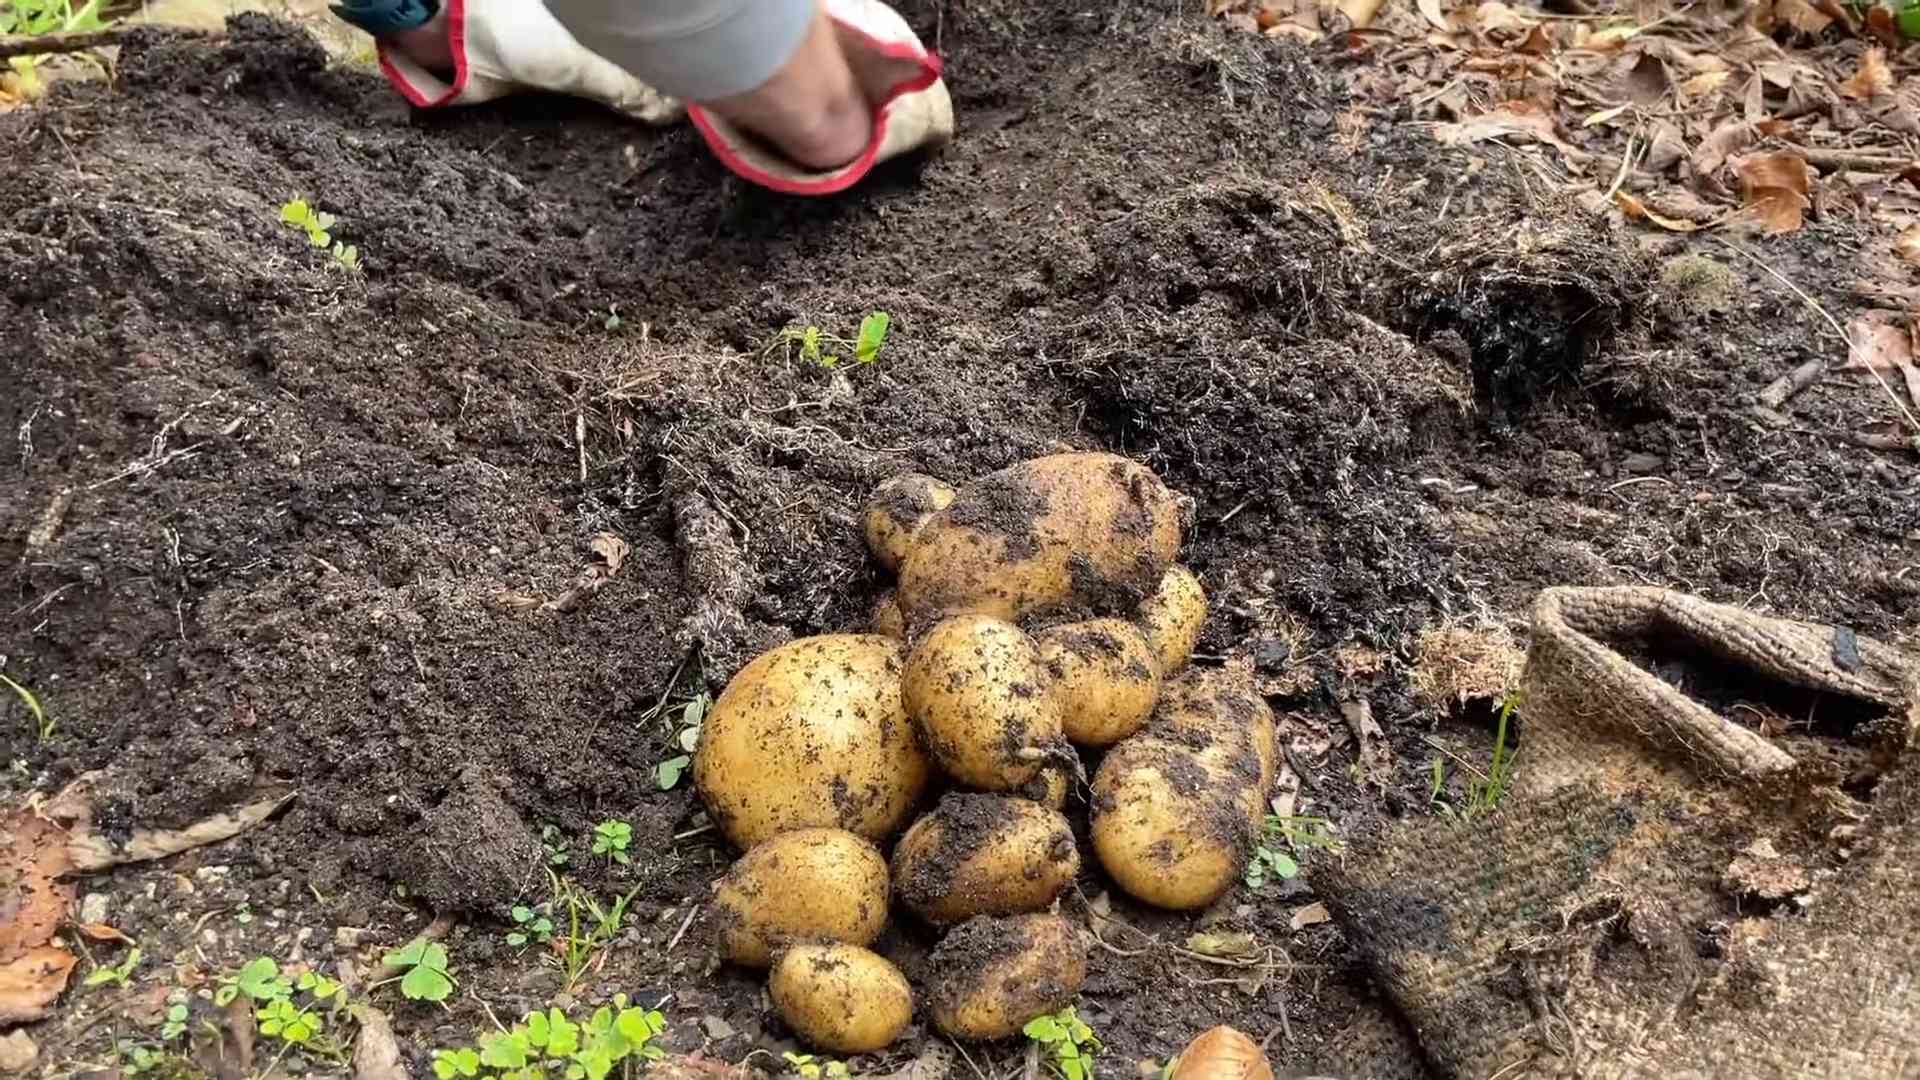
Harvesting Your Potatoes: The Moment of Truth
The moment you’ve been waiting for!
1. Timing is Key: Potatoes are typically ready to harvest about 70-100 days after planting, depending on the variety. You can harvest “new potatoes” (small, tender potatoes) earlier, about 60-70 days after planting.
2. Look for Signs: The potato plants will start to flower, and the foliage will begin to yellow and die back. This is a sign that the potatoes are ready to harvest.
3. Stop Watering: Stop watering the plants a week or two before harvesting to allow the potatoes to dry out slightly.
4. Harvesting: Carefully tip the bucket over and gently remove the potatoes from the soil. You can also use a garden fork to loosen the soil and dig up the potatoes. Be careful not to damage the potatoes.
5. Curing (Optional): To improve their storage life, cure the potatoes by spreading them out in a cool, dark, and well-ventilated place for a week or two. This allows the skins to harden and any minor cuts or bruises to heal.
6. Storage: Store your potatoes in a cool, dark, and dry place. Avoid storing them near onions or apples, as these can cause them to sprout prematurely.
Troubleshooting: Common Issues and Solutions
Even with the best care, you might encounter some challenges. Here are a few common issues and how to address them:
* Potato Scab: This is a common disease that causes rough, scabby patches on the potato skins. It’s more common in alkaline soils. To prevent potato scab, maintain a slightly acidic soil pH (around 6.0-6.5) and avoid overwatering.
* Early Blight: This fungal disease causes dark, circular spots on the leaves. To prevent early blight, ensure good air circulation around the plants and avoid overhead watering. Treat with a fungicide if necessary.
* Potato Beetles: These pests can quickly defoliate potato plants. Handpick the beetles and larvae off the plants or use an insecticide.
* Lack of Potatoes: If your plants are growing well but not producing many potatoes, it could be due to a lack of nutrients, insufficient sunlight, or improper hilling. Make sure you’re fertilizing regularly, providing adequate sunlight, and hilling the plants as they grow.
Choosing the Right Potato Variety
Selecting the right potato variety is crucial for success. Consider your climate, growing season length, and personal preferences. Here are a few popular varieties:
* Yukon Gold: A versatile, all-purpose potato with a creamy texture and buttery flavor.
* Red Pontiac: A red-skinned potato with a waxy texture, great for boiling and salads.
* Russet Burbank: A classic baking potato with a fluffy texture.
* Fingerling Potatoes: These small, elongated potatoes have a unique flavor and texture.
Beyond the Basics: Advanced Techniques
Conclusion
So, there you have it! Growing potatoes at home, while it might seem daunting at first, is an incredibly rewarding and surprisingly simple process. We’ve walked you through the steps, from selecting the right seed potatoes to harvesting your own homegrown bounty. But why should you bother?
The answer is multifaceted. Firstly, the taste of freshly dug, homegrown potatoes is simply unparalleled. The flavor is richer, earthier, and far superior to anything you’ll find in the supermarket. Secondly, you have complete control over the growing process. You can choose organic methods, avoiding harmful pesticides and herbicides, ensuring you’re feeding your family the healthiest possible food. Thirdly, it’s a fantastic way to connect with nature, learn about the food you eat, and even get some exercise in the process. And finally, let’s be honest, there’s a certain satisfaction that comes from nurturing a plant from seed (or in this case, a seed potato) to harvest.
This DIY potato growing trick isn’t just about saving money (although that’s a definite bonus!). It’s about reclaiming control over your food supply, experiencing the joy of gardening, and enjoying the unparalleled flavor of truly fresh potatoes.
Consider these variations to personalize your potato growing experience:
* Container Gardening: If you’re short on space, don’t despair! Potatoes thrive in large containers or grow bags. Just ensure they have adequate drainage and plenty of room for the tubers to develop. Experiment with different potato varieties suited for container growing, such as fingerling potatoes.
* Vertical Gardening: For a truly space-saving solution, try growing potatoes in a potato tower. This involves layering soil and straw in a tall structure, allowing the potato plants to grow upwards and produce a larger yield in a smaller footprint.
* Different Varieties: Don’t limit yourself to just one type of potato! Explore the vast world of potato varieties, from the classic Russet Burbank to the colorful Yukon Gold and the petite fingerling potatoes. Each variety offers a unique flavor and texture, adding variety to your meals.
* Companion Planting: Enhance your potato patch by incorporating companion plants. Marigolds deter pests, while beans and peas fix nitrogen in the soil, benefiting the potato plants.
We’ve shared our tips and tricks, but the real magic happens when you get your hands dirty and start experimenting. Don’t be afraid to try different methods, adapt to your local climate, and learn from your experiences.
So, grab some seed potatoes, prepare your soil, and embark on your own potato-growing adventure. We’re confident that you’ll be amazed by the results. And most importantly, we want to hear about your journey! Share your successes, your challenges, and your delicious potato recipes with us. Let’s build a community of home gardeners who are passionate about growing their own food. Happy growing!
Frequently Asked Questions (FAQ)
What are seed potatoes and where can I get them?
Seed potatoes are potatoes specifically grown to be planted and produce new potato plants. They are certified disease-free and are available at most garden centers, nurseries, and online retailers. Avoid using potatoes from the grocery store, as they may have been treated to prevent sprouting or may carry diseases.
How do I prepare seed potatoes for planting?
Chitting, or pre-sprouting, your seed potatoes can give them a head start. Place the seed potatoes in a cool, bright location for a few weeks before planting, allowing them to develop short, green sprouts. This will encourage faster growth once planted. You can also cut larger seed potatoes into smaller pieces, ensuring each piece has at least one or two “eyes” (sprouts). Allow the cut pieces to callous over for a day or two before planting to prevent rotting.
What kind of soil is best for growing potatoes?
Potatoes prefer well-drained, loose soil that is rich in organic matter. Amend heavy clay soil with compost, aged manure, or other organic materials to improve drainage and aeration. The ideal soil pH for potatoes is between 6.0 and 6.8.
How much sunlight do potatoes need?
Potatoes need at least six hours of direct sunlight per day to thrive. Choose a planting location that receives plenty of sunlight throughout the growing season.
How often should I water my potato plants?
Water your potato plants regularly, especially during dry periods. Keep the soil consistently moist, but avoid overwatering, which can lead to rot. A good rule of thumb is to water deeply once or twice a week, depending on the weather conditions.
What is “hilling” and why is it important?
Hilling is the process of mounding soil around the base of the potato plants as they grow. This encourages the development of more tubers along the stems and protects the developing potatoes from sunlight, which can cause them to turn green and produce solanine, a toxic compound. Hill your potato plants every few weeks as they grow, adding several inches of soil each time.
How do I know when my potatoes are ready to harvest?
The timing of harvest depends on the potato variety and your desired use. “New potatoes,” which are small and tender, can be harvested a few weeks after the plants flower. For mature potatoes, wait until the foliage begins to yellow and die back. This indicates that the tubers have reached their full size and are ready to be harvested.
How do I harvest potatoes?
Carefully dig around the base of the plant with a garden fork or shovel, being careful not to damage the tubers. Gently lift the plant and loosen the soil to reveal the potatoes. Brush off any excess soil and allow the potatoes to dry in a cool, dark place for a few days before storing.
How should I store my harvested potatoes?
Store potatoes in a cool, dark, and well-ventilated place, such as a root cellar or basement. The ideal storage temperature is between 40 and 50 degrees Fahrenheit. Avoid storing potatoes near apples or onions, as they release gases that can cause potatoes to spoil.
What are some common potato pests and diseases?
Common potato pests include potato beetles, aphids, and wireworms. Common diseases include blight, scab, and early blight. Practice crop rotation, use disease-resistant varieties, and monitor your plants regularly for signs of pests or diseases. Organic pest control methods, such as insecticidal soap or neem oil, can be used to control pests.
Can I grow potatoes in containers?
Yes, potatoes can be successfully grown in containers. Choose a large container with good drainage and fill it with a well-draining potting mix. Plant seed potatoes as described above and hill the plants as they grow. Water regularly and fertilize with a balanced fertilizer.
What are some good companion plants for potatoes?
Good companion plants for potatoes include beans, peas, marigolds, and basil. Beans and peas fix nitrogen in the soil, benefiting the potato plants. Marigolds deter pests, and basil repels potato beetles.
What if my potato plants don’t flower?
Not all potato varieties flower, and flowering is not essential for tuber development. As long as the plants are healthy and receiving adequate sunlight, water, and nutrients, they should still produce potatoes.
Can I grow potatoes from store-bought potatoes?
While it’s possible to grow potatoes from store-bought potatoes, it’s not recommended. Store-bought potatoes may have been treated to prevent sprouting or may carry diseases. Seed potatoes are certified disease-free and are more likely to produce healthy plants and a good yield.
Is growing potatoes at home worth the effort?
Absolutely! The taste of homegrown potatoes is far superior to store-bought potatoes, and you have complete control over the growing process. It’s a rewarding and educational experience that can provide you with fresh, healthy food for your family. Plus, the satisfaction of harvesting your own potatoes is unmatched.
Leave a Comment