
Grow Broccoli Indoors? Absolutely! Imagine harvesting fresh, vibrant broccoli right from your kitchen, even when the snow is falling outside. Forget those bland, expensive grocery store heads – with a few simple tricks, you can enjoy the crisp, delicious flavor of homegrown broccoli year-round.
For centuries, humans have cultivated crops indoors, from the ancient Romans using rudimentary greenhouses to the modern marvels of vertical farming. This tradition speaks to our innate desire to connect with nature and provide for ourselves, regardless of the season. But you don’t need a fancy greenhouse to grow broccoli indoors.
In today’s world, where access to fresh, healthy produce can be limited or costly, learning how to cultivate your own food is more important than ever. Plus, let’s be honest, there’s something incredibly satisfying about nurturing a plant from seed to harvest. This DIY guide will provide you with easy-to-follow steps and insider tips to successfully grow broccoli indoors, saving you money, reducing your carbon footprint, and adding a touch of green to your living space. I’m excited to share these secrets with you!
Growing Broccoli Indoors: Your Comprehensive DIY Guide
Hey garden friends! Do you also feel like harvesting fresh broccoli, whether it’s snowing outside or the sun is shining? Then you’ve come to the right place! I’ll show you how to successfully grow broccoli in your own four walls. It’s easier than you think, I promise!
What You Need: The Right Equipment
Before we get started, here is a list of everything you’ll need for your indoor broccoli adventure:
- Broccoli seeds: It’s best to choose varieties that are suitable for growing in pots. Dwarf or mini broccoli varieties are ideal.
- Seedling pots or trays: Small pots or trays to start the seeds.
- Seed starting mix: Special soil for starting seeds that is loose and low in nutrients.
- Larger pots: Pots with a diameter of at least 20-25 cm for the mature plants.
- Potting soil: High-quality potting soil that is well-draining and rich in nutrients.
- Plant lamp: Broccoli needs a lot of light! A plant lamp is essential, especially in the darker months.
- Spray bottle: For moistening the soil.
- Watering can: For watering the plants.
- Liquid fertilizer: A balanced liquid fertilizer for vegetables.
- Optional: A small greenhouse or plastic wrap to increase humidity during germination.
Phase 1: Sowing – The Start of Your Broccoli Project
- Prepare the seedling pots: Fill the seedling pots or trays with seed starting mix. Press the soil down lightly.
- Sow the seeds: Place 2-3 seeds per pot or tray. Cover the seeds with a thin layer of seed starting mix (approx. 0.5 cm).
- Water: Moisten the soil carefully with a spray bottle. The soil should be damp, but not wet.
- Create optimal conditions: Place the seedling pots in a warm place (approx. 20-25°C). A mini-greenhouse or plastic wrap over the pots helps to increase humidity.
- Patience is required: The seeds usually germinate within 5-10 days. Keep the soil moist during this time.
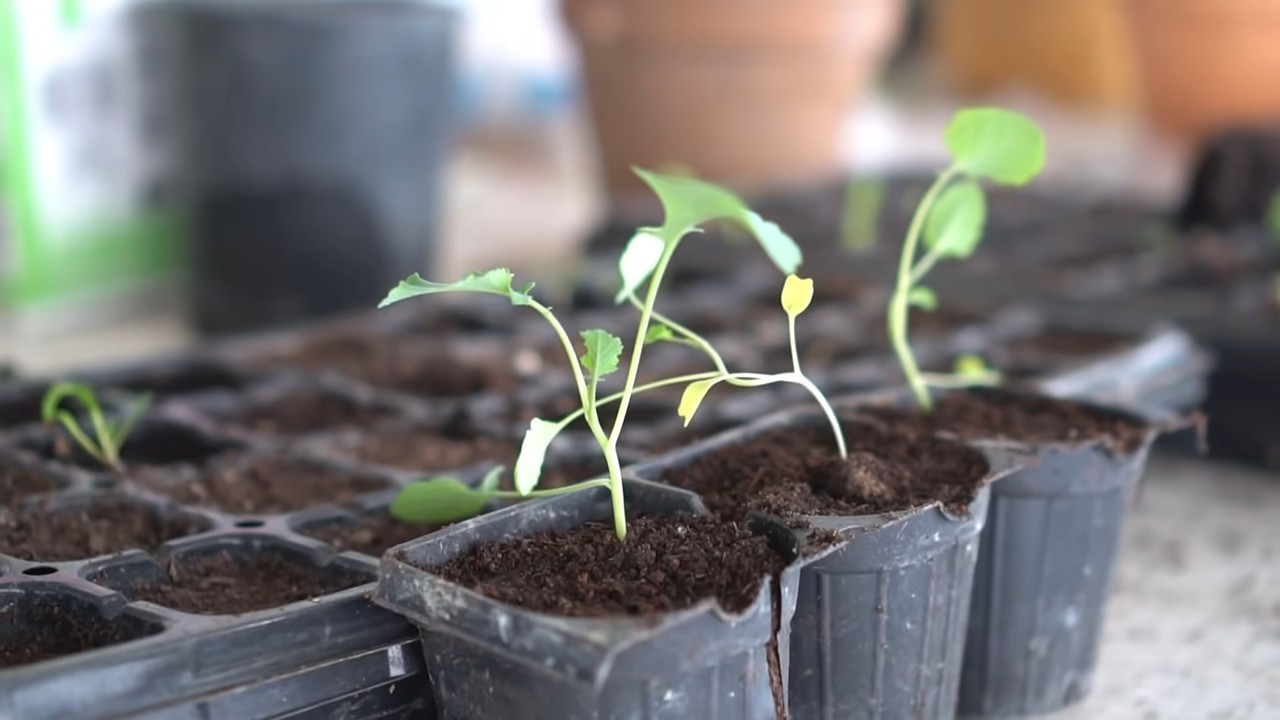
Phase 2: Pricking Out – Giving the Little Seedlings More Space
Once the seedlings have developed their first true leaves (besides the seed leaves), it’s time to prick them out. This means you transplant the small seedlings into larger pots so they have more space to grow.
- Prepare the larger pots: Fill the larger pots with potting soil.
- Carefully lift out: Carefully lift the seedlings out of the seedling pots. Be careful not to damage the roots. If you sowed several seeds in one pot, choose the strongest seedling.
- Planting: Place each seedling in a separate pot. The top of the root ball should be level with the soil surface.
- Watering: Water the plants carefully.
- Location: Place the pots in a bright spot.
Phase 3: Light, Water, Love – Caring for Your Broccoli Plants
Now the real work begins! Broccoli needs the right care to thrive.
- Light: Broccoli needs at least 6 hours of direct sunlight per day. If you don’t have enough natural light, use a plant lamp. Place the lamp at a distance of about 30-40 cm above the plants.
- Watering: Water the plants regularly, but avoid waterlogging. The soil should always be slightly moist. Check the soil’s moisture by sticking your finger about 2-3 cm deep into the soil.
- Fertilizing: Fertilize the plants every 2-3 weeks with a balanced liquid fertilizer for vegetables. Follow the instructions on the fertilizer package.
- Temperature: Broccoli prefers cool temperatures between 15-20°C. Avoid extreme temperature fluctuations.
- Humidity: Broccoli likes moderate humidity. You can increase the humidity by spraying the plants regularly with water or setting up a humidifier.
- Pests and Diseases: Watch for signs of pests or diseases. Aphids, cabbage white butterflies, and fungal diseases can affect broccoli. If necessary, you can use organic pesticides or fungicides.
- Rotating the pots: Rotate the pots regularly so the plants receive light evenly from all sides.
Phase 4: The Harvest – Finally, Homegrown Broccoli!
After about 60-80 days (depending on the variety), the time has finally come: you can harvest your own broccoli!
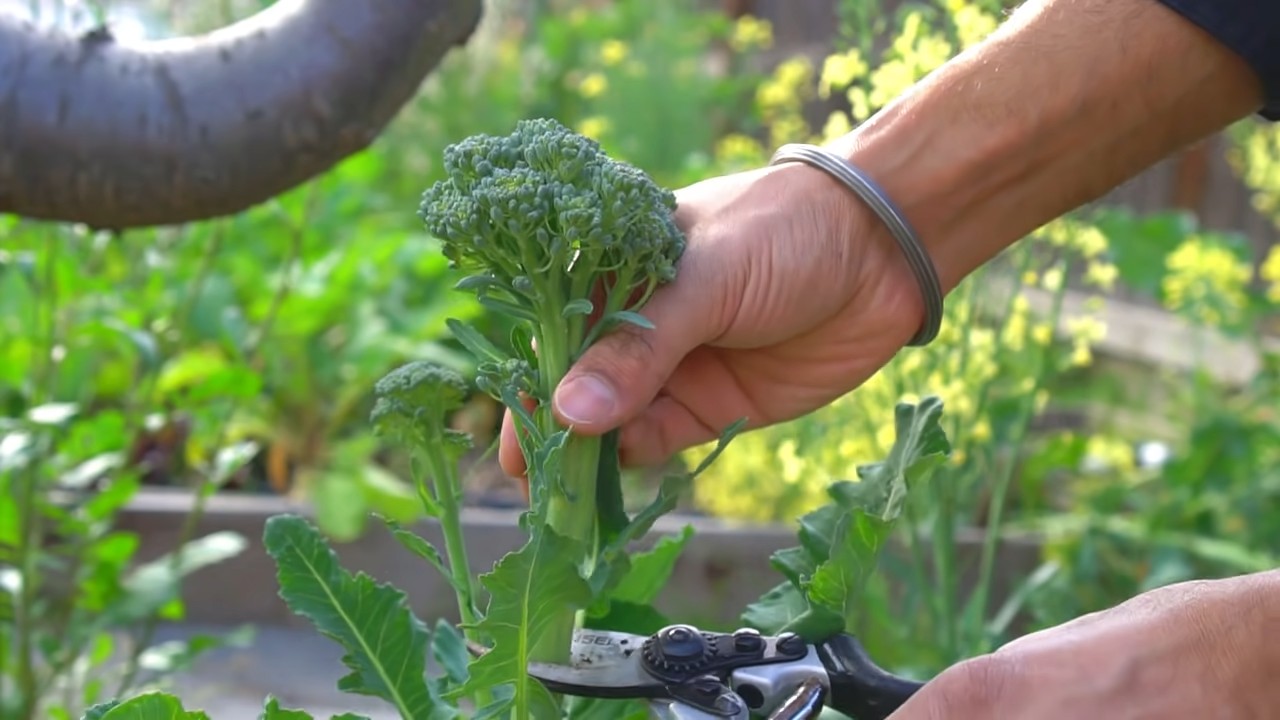
- Harvesting time: Harvest the broccoli when the florets are firm and closed. If the florets turn yellow or open up, it’s too late.
- Harvesting method: Cut the broccoli head with a sharp knife. Leave about 10-15 cm of the stem.
- After the harvest: Often, smaller florets will form on the side shoots of the broccoli, which you can also harvest.
- Storage: Broccoli keeps in the refrigerator for about 1 week.
Additional Tips for Successful Indoor Cultivation
- Choose the right variety: As mentioned, dwarf or mini broccoli varieties are ideal for growing in pots.
- Use high-quality soil: Good potting soil is crucial for the growth of your plants.
- Ensure good drainage: Waterlogging can lead to root rot. Make sure the pots have drainage holes.
- Be patient: Growing broccoli takes time and patience. Don’t be discouraged if it doesn’t work out right away.
- Observe your plants: Pay attention to changes in the appearance of your plants. This allows you to identify and fix problems early.
- Recycle your soil: After the harvest, you can compost the soil or use it for other plants.
Common Problems and Solutions
- Yellow leaves: Can be a sign of overwatering, nutrient deficiency, or pest infestation. Check your watering, fertilize the plants, and look for pests.
- Limp leaves: Can be a sign of underwatering or too little light. Water the plants and move them to a brighter spot.
- Small broccoli heads: Can be a sign of nutrient deficiency or too little light. Fertilize the plants and move them to a brighter spot.
- Pests: Aphids, cabbage white butterflies, and other pests can affect broccoli. Use organic pesticides or fungicides.
With these tips and tricks, nothing stands in the way of your own indoor broccoli garden! Happy gardening and enjoy your meal! I hope this guide helps you harvest your own fresh broccoli, no matter the season. Let me know how it goes
Conclusion
So, there you have it! Growing broccoli indoors might seem like a daunting task at first, but with a little patience, the right setup, and these simple steps, you can enjoy fresh, homegrown broccoli even when the weather outside isn’t cooperating. This DIY trick isn’t just about saving money; it’s about connecting with your food, understanding the growing process, and experiencing the satisfaction of nurturing something from seed to table.
Why is this a must-try? Because it puts you in control. You dictate the growing conditions, ensuring your broccoli is free from unwanted pesticides and herbicides. You harvest at peak freshness, maximizing flavor and nutritional value. And let’s be honest, there’s a certain magic to watching those tiny seedlings transform into vibrant, edible plants right in your own home.
But don’t stop there! Experiment with different varieties of broccoli. Try sprouting broccoli for a quicker harvest and a milder flavor. Consider using different types of grow lights to see how they affect growth rate and yield. You could even explore companion planting indoors, pairing your broccoli with herbs like dill or chamomile to deter pests and enhance flavor.
Ready to take the plunge and grow broccoli indoors? We encourage you to give it a try! Start small, with just a few plants, and gradually scale up as you gain confidence. Don’t be afraid to make mistakes – that’s how we learn. And most importantly, share your experience with us! We’d love to hear about your successes, your challenges, and any tips or tricks you discover along the way. Post photos of your indoor broccoli garden, share your favorite recipes using your homegrown harvest, and let’s build a community of indoor gardening enthusiasts. This DIY trick is more than just a method; it’s a journey, and we’re excited to embark on it with you. So, get your seeds ready, set up your grow lights, and prepare to enjoy the delicious rewards of growing broccoli indoors!
Frequently Asked Questions (FAQs)
Q: What is the best variety of broccoli to grow indoors?
A: While you can technically grow any broccoli variety indoors, some are better suited than others. Look for varieties that are known for their compact size and shorter growing season. ‘Waltham 29’ and ‘De Cicco’ are popular choices for indoor growing. These varieties tend to mature more quickly and don’t require as much space as some of the larger, more sprawling types. Experimenting with different varieties is also a great way to find what works best for your specific indoor environment. Consider starting with a few different types to see which thrives under your grow lights and in your chosen containers.
Q: How much light does indoor broccoli need?
A: Broccoli requires a significant amount of light to thrive, typically 6-8 hours of direct sunlight per day. Since natural sunlight can be limited indoors, especially during winter months, you’ll need to supplement with grow lights. LED grow lights are an excellent option because they are energy-efficient and provide the full spectrum of light that broccoli needs for healthy growth. Position your grow lights close enough to the plants (usually 6-12 inches) to provide adequate illumination, but not so close that they burn the leaves. Monitor your plants closely and adjust the height of the lights as needed. Signs of insufficient light include leggy growth (long, thin stems) and pale leaves.
Q: What kind of soil should I use for growing broccoli indoors?
A: Broccoli needs well-draining, nutrient-rich soil. A good quality potting mix specifically formulated for vegetables is ideal. Avoid using garden soil, as it can be too heavy and may contain pests or diseases. You can also amend your potting mix with compost or other organic matter to improve drainage and fertility. Ensure the soil pH is slightly acidic to neutral, around 6.0 to 7.0. You can test the pH of your soil using a soil testing kit available at most garden centers.
Q: How often should I water my indoor broccoli plants?
A: Broccoli needs consistent moisture, but it’s important to avoid overwatering, which can lead to root rot. Water your plants when the top inch of soil feels dry to the touch. Water deeply, ensuring that the water drains out of the bottom of the container. Avoid getting water on the leaves, as this can promote fungal diseases. During warmer months or when the plants are actively growing, you may need to water more frequently. Check the soil moisture regularly and adjust your watering schedule accordingly.
Q: How do I fertilize my indoor broccoli plants?
A: Broccoli is a heavy feeder, meaning it requires a good amount of nutrients to grow and produce heads. Start fertilizing your plants a few weeks after they emerge, using a balanced liquid fertilizer diluted to half strength. Fertilize every 2-3 weeks, following the instructions on the fertilizer label. You can also use a slow-release fertilizer incorporated into the soil at planting time. As the plants begin to form heads, you can switch to a fertilizer that is higher in phosphorus and potassium to promote head development.
Q: How do I deal with pests and diseases on my indoor broccoli plants?
A: While indoor growing can reduce the risk of pests and diseases, it’s still important to be vigilant. Common pests that may affect indoor broccoli include aphids, spider mites, and whiteflies. Inspect your plants regularly for signs of infestation, such as small insects on the leaves or webbing. You can control these pests by spraying the plants with insecticidal soap or neem oil. For fungal diseases, such as powdery mildew, ensure good air circulation around the plants and avoid getting water on the leaves. You can also treat fungal diseases with a fungicide specifically formulated for vegetables.
Q: When is the right time to harvest my indoor broccoli?
A: The timing of harvest depends on the variety of broccoli you are growing. Generally, broccoli is ready to harvest when the heads are firm and the florets are tightly closed. If the florets start to open and turn yellow, it’s a sign that the broccoli is past its prime. Cut the main head of broccoli with a sharp knife, leaving a few inches of stem. Side shoots may develop after the main head is harvested, providing you with additional smaller heads.
Q: Can I grow broccoli indoors year-round?
A: Yes, with the right setup, you can grow broccoli indoors year-round. The key is to provide consistent light, temperature, and humidity levels. You may need to adjust your growing conditions depending on the season. For example, during winter months, you may need to increase the amount of supplemental light and maintain a warmer temperature.
Q: What size container should I use for growing broccoli indoors?
A: Broccoli needs a container that is at least 12 inches deep and 12 inches wide to allow for adequate root development. A 5-gallon container is a good starting point. Make sure the container has drainage holes to prevent waterlogging. You can also use grow bags, which are a good option for indoor growing because they are lightweight and allow for good air circulation.

Leave a Comment