
Grow Parsley Indoors Sunlight: Ever dream of snipping fresh, vibrant parsley right from your kitchen windowsill, even when the weather outside is frightful? I know I have! For centuries, parsley has been more than just a garnish; it’s been a symbol of spring, a medicinal herb, and a culinary staple in cultures around the globe. From ancient Greece, where it adorned victors and decorated tombs, to modern kitchens where it brightens countless dishes, parsley’s versatility is undeniable.
But let’s face it, not everyone has a sprawling garden bathed in sunshine. That’s where this DIY guide comes in! I’m going to show you simple, effective tricks to grow parsley indoors sunlight, regardless of your living situation. Whether you’re a seasoned gardener or a complete beginner, these hacks will help you cultivate a thriving parsley patch right inside your home. Imagine the satisfaction of adding freshly grown parsley to your meals, knowing you nurtured it from seed to plate. Ready to ditch the wilted grocery store bunches and embrace the joy of homegrown flavor? Let’s get started!
Growing Parsley Indoors: A Beginner’s Guide to Fresh Herbs Year-Round
Hey there, fellow herb enthusiasts! Are you tired of buying wilted, overpriced parsley from the grocery store? Do you dream of having fresh, vibrant parsley readily available for all your culinary creations? Well, you’ve come to the right place! I’m going to walk you through the simple steps of growing parsley indoors, so you can enjoy this flavorful herb all year long. Trust me, it’s easier than you think!
What You’ll Need
Before we dive in, let’s gather our supplies. Here’s a list of everything you’ll need to successfully grow parsley indoors:
* **Parsley Seeds or Seedlings:** You can start from seeds, which is more economical, or buy established seedlings for a quicker start. I personally prefer starting from seeds, as it gives me a greater sense of accomplishment!
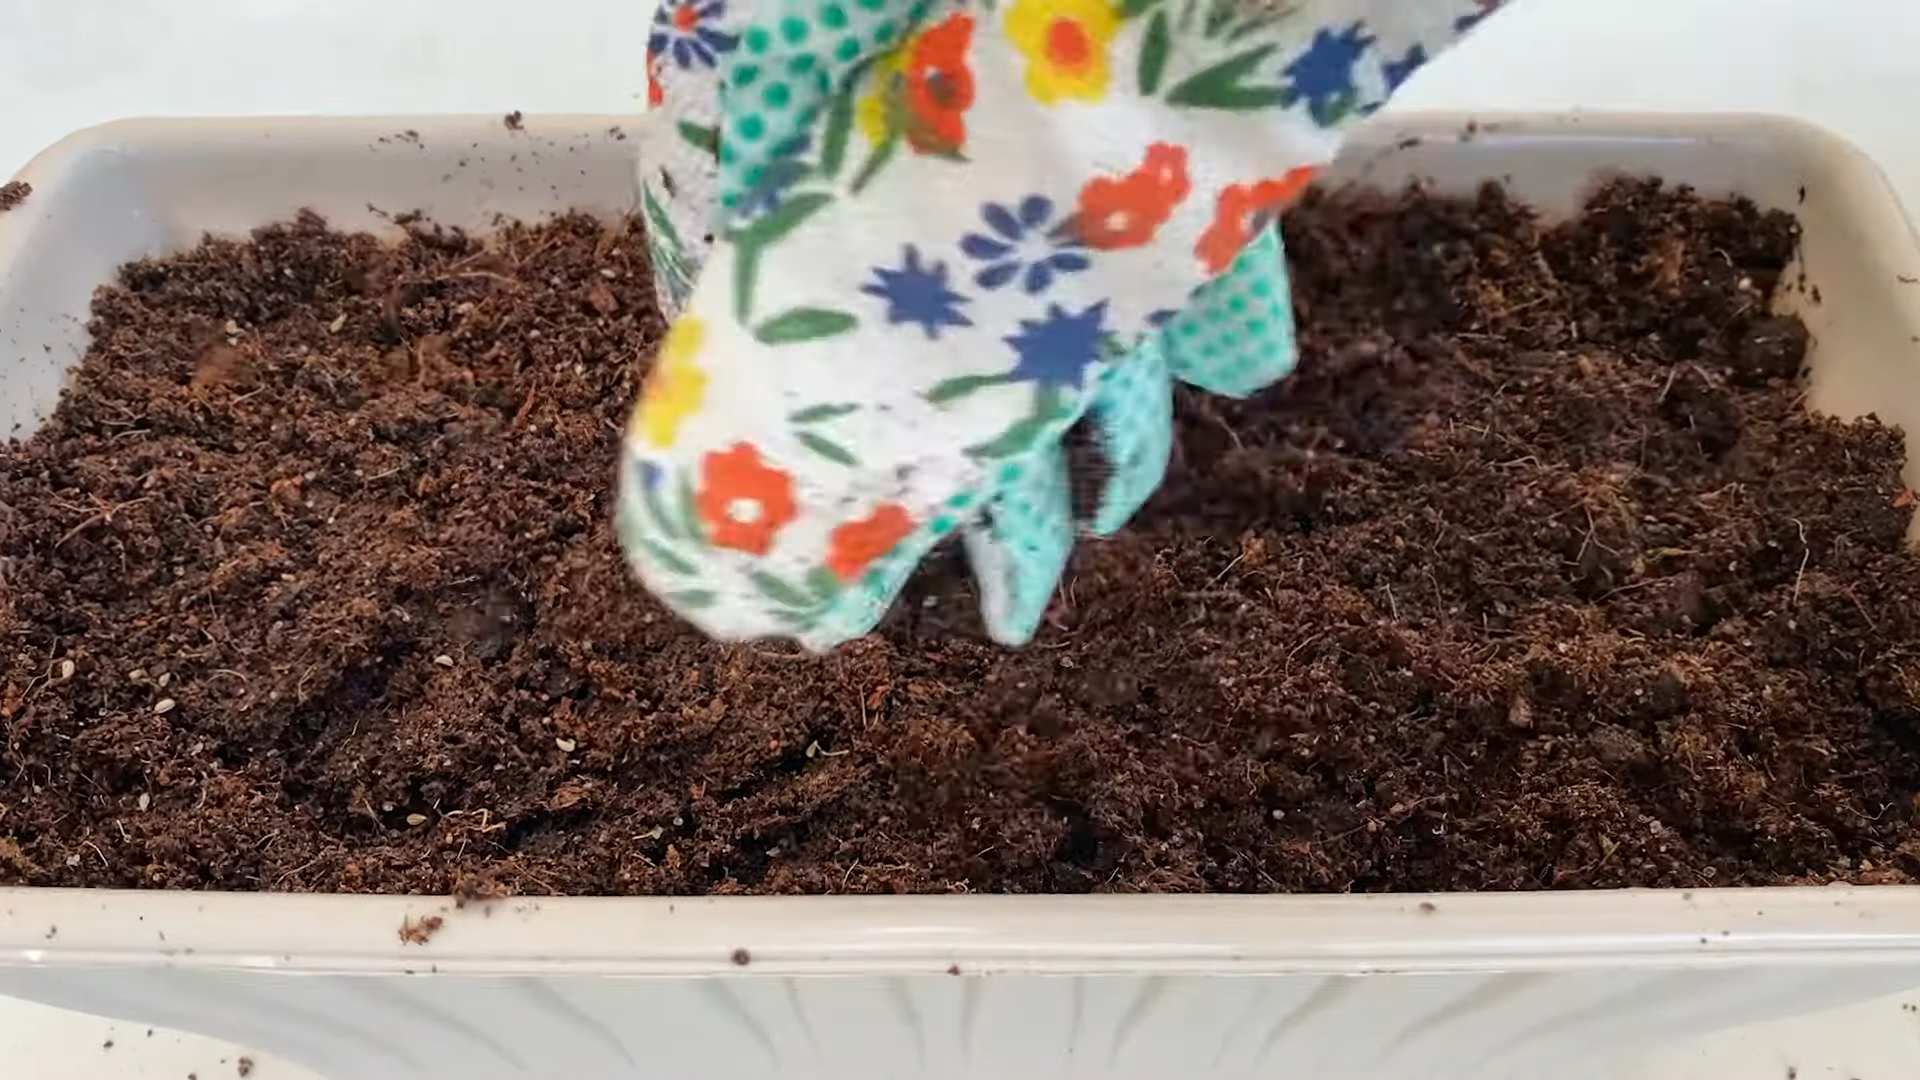
* **Potting Mix:** Use a high-quality, well-draining potting mix. Avoid using garden soil, as it can compact and hinder drainage.
* **Pots:** Choose pots that are at least 6 inches in diameter and have drainage holes. Parsley needs room for its roots to grow.
* **Grow Lights (Optional but Recommended):** While parsley needs sunlight, indoor sunlight can be inconsistent. Grow lights will ensure your parsley gets the light it needs to thrive, especially during the winter months.
* **Watering Can or Spray Bottle:** For gentle watering.
* **Small Shovel or Trowel:** For planting.
* **Seed Starting Tray (If starting from seeds):** This is optional, but it makes the germination process easier.
* **Spray Bottle with Water:** For misting seedlings.
* **Fertilizer (Optional):** A balanced liquid fertilizer can help boost growth, but it’s not essential.
Choosing the Right Parsley Variety
There are two main types of parsley: curly and flat-leaf (Italian). Both are easy to grow indoors, so choose the one you prefer based on taste and appearance. I personally love the robust flavor of flat-leaf parsley, but curly parsley adds a nice decorative touch to dishes.
Starting from Seeds vs. Seedlings
As I mentioned earlier, you can start parsley from seeds or buy seedlings. Here’s a quick comparison:
* **Seeds:** More economical, wider variety of choices, but takes longer to establish.
* **Seedlings:** Faster start, less work initially, but can be more expensive and have limited variety.
I’ll cover both methods in the instructions below.
Starting Parsley from Seeds
This is my preferred method, as it allows me to control the entire growing process.
1. **Prepare the Seed Starting Tray (Optional):** Fill the seed starting tray with potting mix. Moisten the soil gently with a spray bottle.
2. **Sow the Seeds:** Sprinkle a few parsley seeds into each cell of the seed starting tray or directly into your pot. Cover the seeds with a thin layer of potting mix (about 1/4 inch).
3. **Water Gently:** Water the seeds gently with a spray bottle to avoid disturbing them.
4. **Cover and Wait:** Cover the seed starting tray or pot with a plastic dome or plastic wrap to create a humid environment. This will help the seeds germinate.
5. **Provide Warmth:** Place the seed starting tray or pot in a warm location (around 70-75°F). A heat mat can be helpful if your home is cool.
6. **Monitor Moisture:** Keep the soil consistently moist, but not soggy. Check daily and mist with water as needed.
7. **Germination:** Parsley seeds can take up to 2-3 weeks to germinate, so be patient! Once the seedlings emerge, remove the plastic dome or plastic wrap.
8. **Provide Light:** Place the seedlings under grow lights or in a sunny window. If using a window, rotate the pot regularly to ensure even growth.
9. **Thin the Seedlings (If Necessary):** If multiple seedlings emerge in the same cell or pot, thin them out, leaving only the strongest seedling.
10. **Transplant (If Starting in a Tray):** Once the seedlings have a few sets of true leaves (not just the initial seed leaves), transplant them into their final pots.
Planting Parsley Seedlings
If you’re starting with seedlings, the process is even simpler.
1. **Prepare the Pot:** Fill the pot with potting mix, leaving about an inch of space at the top.
2. **Remove the Seedling:** Gently remove the seedling from its container. If the roots are tightly bound, gently loosen them with your fingers.
3. **Plant the Seedling:** Dig a hole in the potting mix large enough to accommodate the seedling’s root ball. Place the seedling in the hole and backfill with potting mix.
4. **Water Thoroughly:** Water the seedling thoroughly after planting.
5. **Provide Light:** Place the pot under grow lights or in a sunny window.
Caring for Your Indoor Parsley
Now that your parsley is planted, it’s time to provide the care it needs to thrive.
1. **Light:** Parsley needs at least 6-8 hours of sunlight per day. If you’re not using grow lights, place your parsley in the sunniest window you have. Rotate the pot regularly to ensure even growth. If you are using grow lights, position them a few inches above the plants and keep them on for 12-14 hours per day.
2. **Watering:** Water your parsley when the top inch of soil feels dry to the touch. Avoid overwatering, as this can lead to root rot. Make sure the pot has good drainage. I usually water mine every 2-3 days, but this will vary depending on the humidity and temperature in your home.
3. **Temperature:** Parsley prefers temperatures between 60-75°F. Avoid placing it near drafts or heat sources.
4. **Fertilizing (Optional):** If you want to give your parsley a boost, you can fertilize it every 2-4 weeks with a balanced liquid fertilizer. Follow the instructions on the fertilizer label. I usually dilute the fertilizer to half strength to avoid burning the roots.
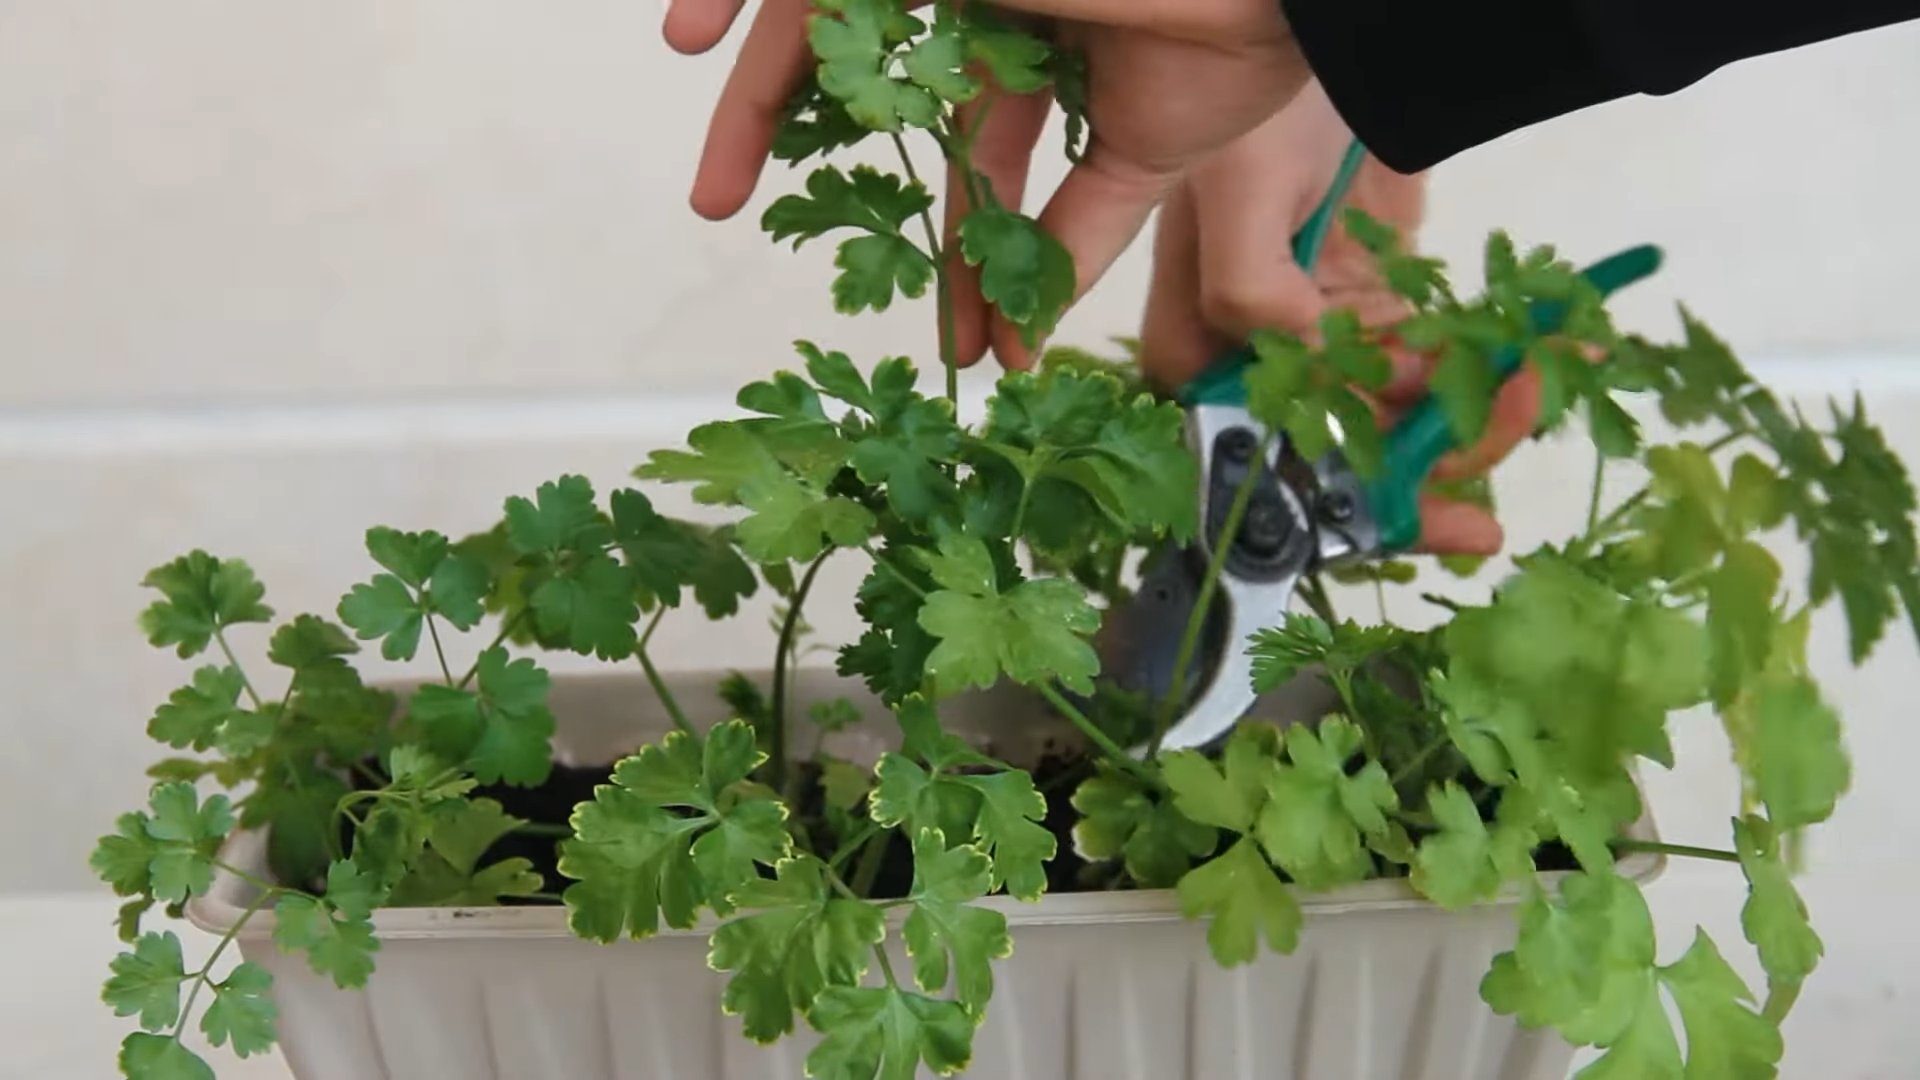
5. **Pruning:** Regular pruning is essential for keeping your parsley healthy and productive. Pinch off the top leaves regularly to encourage bushier growth. Remove any yellow or brown leaves.
6. **Pest Control:** Indoor parsley is generally less susceptible to pests than outdoor parsley, but it’s still important to be vigilant. Check your plants regularly for signs of pests, such as aphids or spider mites. If you find any pests, you can try washing them off with a strong stream of water or using an insecticidal soap.
Harvesting Your Parsley
The best part of growing your own parsley is, of course, harvesting it!
1. **When to Harvest:** You can start harvesting parsley once the plants are about 6 inches tall.
2. **How to Harvest:** Use scissors or pruning shears to cut off the outer stems of the parsley plant, leaving the inner stems to continue growing. Avoid cutting off more than one-third of the plant at a time.
3. **Using Your Parsley:** Freshly harvested parsley is best used immediately. You can also store it in the refrigerator for a few days. To store parsley, wrap it in a damp paper towel and place it in a plastic bag.
Troubleshooting
Even with the best care, you may encounter some problems while growing parsley indoors. Here are some common issues and how to address them:
* **Yellowing Leaves:** This can be caused by overwatering, underwatering, or nutrient deficiencies. Check the soil moisture and adjust your watering accordingly. If you suspect a nutrient deficiency, try fertilizing with a balanced liquid fertilizer.
* **Leggy Growth:** This is usually caused by insufficient light. Make sure your parsley is getting enough sunlight or grow light.
* **Pests:** As mentioned earlier, check your plants regularly for pests and take action if you find any.
* **Slow Growth:** This can be caused by a variety of factors, including insufficient light, poor soil, or low temperatures. Make sure your parsley is getting enough light, use a high-quality potting mix, and keep the temperature between 60-75°F.
Enjoy Your Fresh Parsley!
Congratulations! You’re now well on your way to enjoying fresh, homegrown parsley all year round. Use it in your favorite recipes, as a garnish, or even just to add a pop of green to your kitchen. I love adding fresh parsley to soups, salads, pasta dishes, and omelets. The possibilities are endless!
Growing parsley indoors is a rewarding experience that will not only save you money but also provide you with a constant supply of fresh, flavorful herbs. So, get started today and enjoy the taste of homegrown goodness! Happy gardening!
Conclusion
So, there you have it! Mastering the art of growing parsley indoors, even without a sun-drenched windowsill, is entirely achievable. We’ve debunked the myth that ample sunlight is the only path to a thriving herb garden. By understanding the specific needs of parsley and employing a few clever techniques, you can enjoy fresh, flavorful parsley year-round, regardless of your home’s natural light conditions.
This DIY trick is a must-try for several compelling reasons. Firstly, it grants you access to fresh, homegrown parsley whenever you need it, elevating your culinary creations with its vibrant flavor and aroma. Imagine adding a sprinkle of freshly chopped parsley to your pasta dishes, soups, salads, or even as a garnish for your favorite grilled meats. The difference between store-bought dried parsley and the real deal is truly remarkable.
Secondly, growing your own parsley indoors is a sustainable and cost-effective alternative to constantly purchasing it from the grocery store. You’ll reduce your carbon footprint by minimizing transportation and packaging waste, and you’ll save money in the long run. Plus, there’s something incredibly satisfying about nurturing a plant from seed to harvest, knowing that you’re contributing to a greener lifestyle.
Thirdly, this method opens up the possibility of growing parsley for those who live in apartments, condos, or homes with limited outdoor space. No longer are you restricted by the availability of a garden plot or a sunny balcony. With a little ingenuity and the right tools, you can create a thriving indoor herb garden that brings a touch of nature into your living space.
Now, let’s talk about variations and suggestions. While we’ve focused on using grow lights as a primary source of light, you can experiment with different types of grow lights to find what works best for your parsley. LED grow lights are energy-efficient and produce minimal heat, making them a popular choice. Fluorescent grow lights are another option, although they may require more frequent replacement.
You can also explore different varieties of parsley. Flat-leaf parsley (Italian parsley) is known for its robust flavor, while curly parsley is often used as a garnish. Experiment with both to discover your preference. Consider companion planting your parsley with other herbs like basil, chives, or oregano to create a diverse and fragrant indoor herb garden.
Don’t be afraid to get creative with your containers. While standard pots work perfectly well, you can also use repurposed containers like mason jars, tin cans, or even old teacups. Just make sure that your containers have adequate drainage to prevent waterlogging.
Finally, remember that patience is key. Parsley can be a bit slow to germinate, so don’t be discouraged if you don’t see sprouts immediately. Keep the soil consistently moist, provide adequate light, and be patient. Your efforts will be rewarded with a bountiful harvest of fresh, flavorful parsley.
We wholeheartedly encourage you to try this DIY trick for growing parsley indoors. It’s a rewarding and sustainable way to enhance your culinary experience and bring a touch of nature into your home. Once you’ve given it a try, we’d love to hear about your experience! Share your tips, tricks, and photos in the comments section below. Let’s create a community of indoor parsley growers and inspire others to embrace the joy of homegrown herbs. Let us know if you found success growing parsley indoors without relying solely on natural sunlight.
Frequently Asked Questions (FAQ)
Q: How much light does parsley actually need when grown indoors?
A: While parsley thrives in full sunlight outdoors (6-8 hours per day), achieving that intensity indoors can be challenging. When growing parsley indoors, aim for at least 12-16 hours of artificial light per day using grow lights. The closer you can mimic the full-spectrum light of the sun, the better. If you have a window that provides some natural light, even a few hours, supplement it with grow lights to reach the optimal duration. Remember, insufficient light will result in leggy, weak growth and a less flavorful herb.
Q: What type of grow light is best for growing parsley indoors?
A: Several types of grow lights are suitable for growing parsley indoors. LED grow lights are a popular choice due to their energy efficiency, long lifespan, and minimal heat output. Full-spectrum LED grow lights are particularly effective as they provide a balanced spectrum of light that mimics natural sunlight. Fluorescent grow lights, both compact fluorescent lamps (CFLs) and T5 fluorescent tubes, are also viable options, although they may require more frequent replacement than LEDs. Incandescent bulbs are not recommended as they produce excessive heat and provide an inadequate light spectrum for plant growth. Consider the size of your growing area and the number of plants you’re growing when choosing the wattage of your grow light.
Q: What kind of soil should I use for growing parsley indoors?
A: Parsley prefers well-draining soil that is rich in organic matter. A good potting mix specifically formulated for herbs or vegetables is ideal. You can also create your own potting mix by combining equal parts of peat moss (or coconut coir), perlite, and compost. Avoid using garden soil, as it can be too heavy and may contain pests or diseases. Ensure that your container has drainage holes to prevent waterlogging, which can lead to root rot.
Q: How often should I water my indoor parsley plant?
A: Water your parsley plant when the top inch of soil feels dry to the touch. Avoid overwatering, as this can lead to root rot. Water thoroughly until excess water drains out of the drainage holes. Allow the soil to dry slightly between waterings. The frequency of watering will depend on factors such as the size of your container, the type of potting mix you’re using, and the ambient temperature and humidity.
Q: How often should I fertilize my indoor parsley plant?
A: Parsley benefits from regular fertilization, especially when grown indoors. Use a balanced liquid fertilizer diluted to half strength every 2-4 weeks during the growing season (spring and summer). Look for a fertilizer that is specifically formulated for herbs or vegetables. Avoid over-fertilizing, as this can lead to nutrient burn.
Q: How do I harvest parsley from my indoor plant?
A: Harvest parsley by snipping off the outer stems near the base of the plant. This encourages new growth from the center. Avoid cutting off more than one-third of the plant at a time. Regular harvesting will keep your parsley plant bushy and productive.
Q: My parsley plant is turning yellow. What could be the problem?
A: Yellowing leaves on your parsley plant can indicate several issues. Overwatering is a common cause, as it can lead to root rot. Ensure that your container has drainage holes and that you’re allowing the soil to dry slightly between waterings. Underwatering can also cause yellowing leaves, so check the soil moisture regularly. Nutrient deficiencies can also contribute to yellowing. Fertilize your plant with a balanced liquid fertilizer to provide essential nutrients. Insufficient light can also cause yellowing, so ensure that your parsley plant is receiving adequate light from grow lights.
Q: Can I grow parsley from seed indoors?
A: Yes, you can absolutely grow parsley from seed indoors. Start by soaking the parsley seeds in water for 24 hours to improve germination rates. Sow the seeds in a seed-starting tray or small pots filled with seed-starting mix. Keep the soil consistently moist and provide warmth (around 70-75°F) for optimal germination. Once the seedlings have developed a few sets of true leaves, transplant them into larger pots.
Q: How long does it take for parsley to grow indoors?
A: Parsley can be a bit slow to germinate, typically taking 2-3 weeks. Once the seedlings emerge, it can take another 60-90 days for the plants to reach a harvestable size. Be patient and provide the plants with optimal growing conditions to encourage healthy growth.
Q: Can I move my indoor parsley plant outdoors during the summer?
A: Yes, you can move your indoor parsley plant outdoors during the summer, but it’s important to acclimate it gradually to the outdoor conditions. Start by placing the plant in a shaded area for a few hours each day, gradually increasing the amount of sunlight it receives over a week or two. This will help prevent sunscald and other stress-related issues. Bring the plant back indoors before the first frost in the fall.
Leave a Comment