
Potato bucket gardening: ever dreamt of harvesting a mountain of potatoes from your own backyard, even if you only have a tiny balcony or patio? I know I have! Forget sprawling fields and back-breaking digging; this simple, space-saving method is about to revolutionize your gardening game. For centuries, potatoes have been a staple food source across the globe, from the Andes Mountains where they originated to the bustling cities of today. But did you know that you don’t need acres of land to enjoy freshly grown, homegrown potatoes?
This DIY guide will unlock the secrets to abundant potato harvests using just a few buckets, some soil, and a little bit of know-how. Imagine the satisfaction of digging into your own container and unearthing a treasure trove of delicious, earthy potatoes! In today’s world, where access to fresh, healthy food is becoming increasingly important, potato bucket gardening offers a fantastic way to take control of your food source, reduce your carbon footprint, and connect with nature, all from the comfort of your own home. Plus, it’s a fun and rewarding project for the whole family. So, grab your buckets, and let’s get growing!
DIY Potato Bucket Gardening: Grow Your Own Spuds with Ease!
Hey there, fellow gardening enthusiasts! I’m so excited to share one of my favorite gardening hacks with you: potato bucket gardening! It’s a fantastic way to grow a ton of potatoes, even if you don’t have a lot of space. Plus, harvesting is a breeze! Forget digging around in the dirt; you just tip the bucket over. Trust me, once you try this, you’ll be hooked.
Why Bucket Gardening for Potatoes?
Before we dive into the how-to, let’s talk about why bucket gardening is so awesome for potatoes:
* Space-Saving: Perfect for balconies, patios, or small yards.
* Easy Harvesting: No more back-breaking digging!
* Controlled Environment: Better control over soil quality and watering.
* Mobility: You can move the buckets to follow the sun or protect them from frost.
* Fewer Pests: Elevated growing reduces access for some ground-dwelling pests.
What You’ll Need
Okay, let’s gather our supplies. Here’s what you’ll need to get started:
* Buckets: 5-gallon buckets are ideal, but you can use larger ones if you want. Make sure they’re food-grade if you’re concerned about chemicals leaching into your potatoes. I usually get mine from the local hardware store or even reuse old ones.
* Potatoes: Seed potatoes are the best option. You can buy them from a garden center or use potatoes from the grocery store that have started to sprout (eyes). Just make sure they haven’t been treated with sprout inhibitors.
* Potting Mix: A good quality potting mix is crucial. Don’t use garden soil, as it can compact in the bucket and hinder drainage. I like to use a mix of compost, peat moss, and perlite for good drainage and nutrient retention.
* Drill: For drainage holes.
* Water: Essential for keeping your potatoes happy and hydrated.
* Fertilizer (Optional): A balanced, slow-release fertilizer can give your potatoes an extra boost.
* Straw or Mulch (Optional): Helps retain moisture and suppress weeds.
Step-by-Step Instructions: Planting Your Potatoes
Alright, let’s get our hands dirty! Here’s how to plant your potatoes in buckets:
1. Prepare the Buckets:
* Drill drainage holes in the bottom of each bucket. I usually do about 4-5 holes, evenly spaced. This is super important to prevent waterlogging, which can rot your potatoes.
* Clean the buckets thoroughly if they’ve been used before.
2. Prepare the Seed Potatoes:
* If your seed potatoes are large, cut them into smaller pieces, making sure each piece has at least one or two “eyes” (those little sprouts).
* Let the cut pieces dry for a day or two to callous over. This helps prevent rot.
3. Initial Planting:
* Add about 4-6 inches of potting mix to the bottom of each bucket.
* Place 2-3 seed potato pieces on top of the soil, spacing them evenly.
* Cover the potatoes with another 4-6 inches of potting mix.
4. Water Thoroughly:
* Water the soil until it’s moist but not soggy. You should see water draining from the drainage holes.
5. Place in a Sunny Location:
* Potatoes need at least 6-8 hours of sunlight per day. Choose a spot that gets plenty of sun.
The “Hilling” Process: Encouraging More Potatoes
This is where the magic happens! “Hilling” is the process of adding more soil to the bucket as the potato plants grow. This encourages the plants to produce more potatoes along the buried stem.
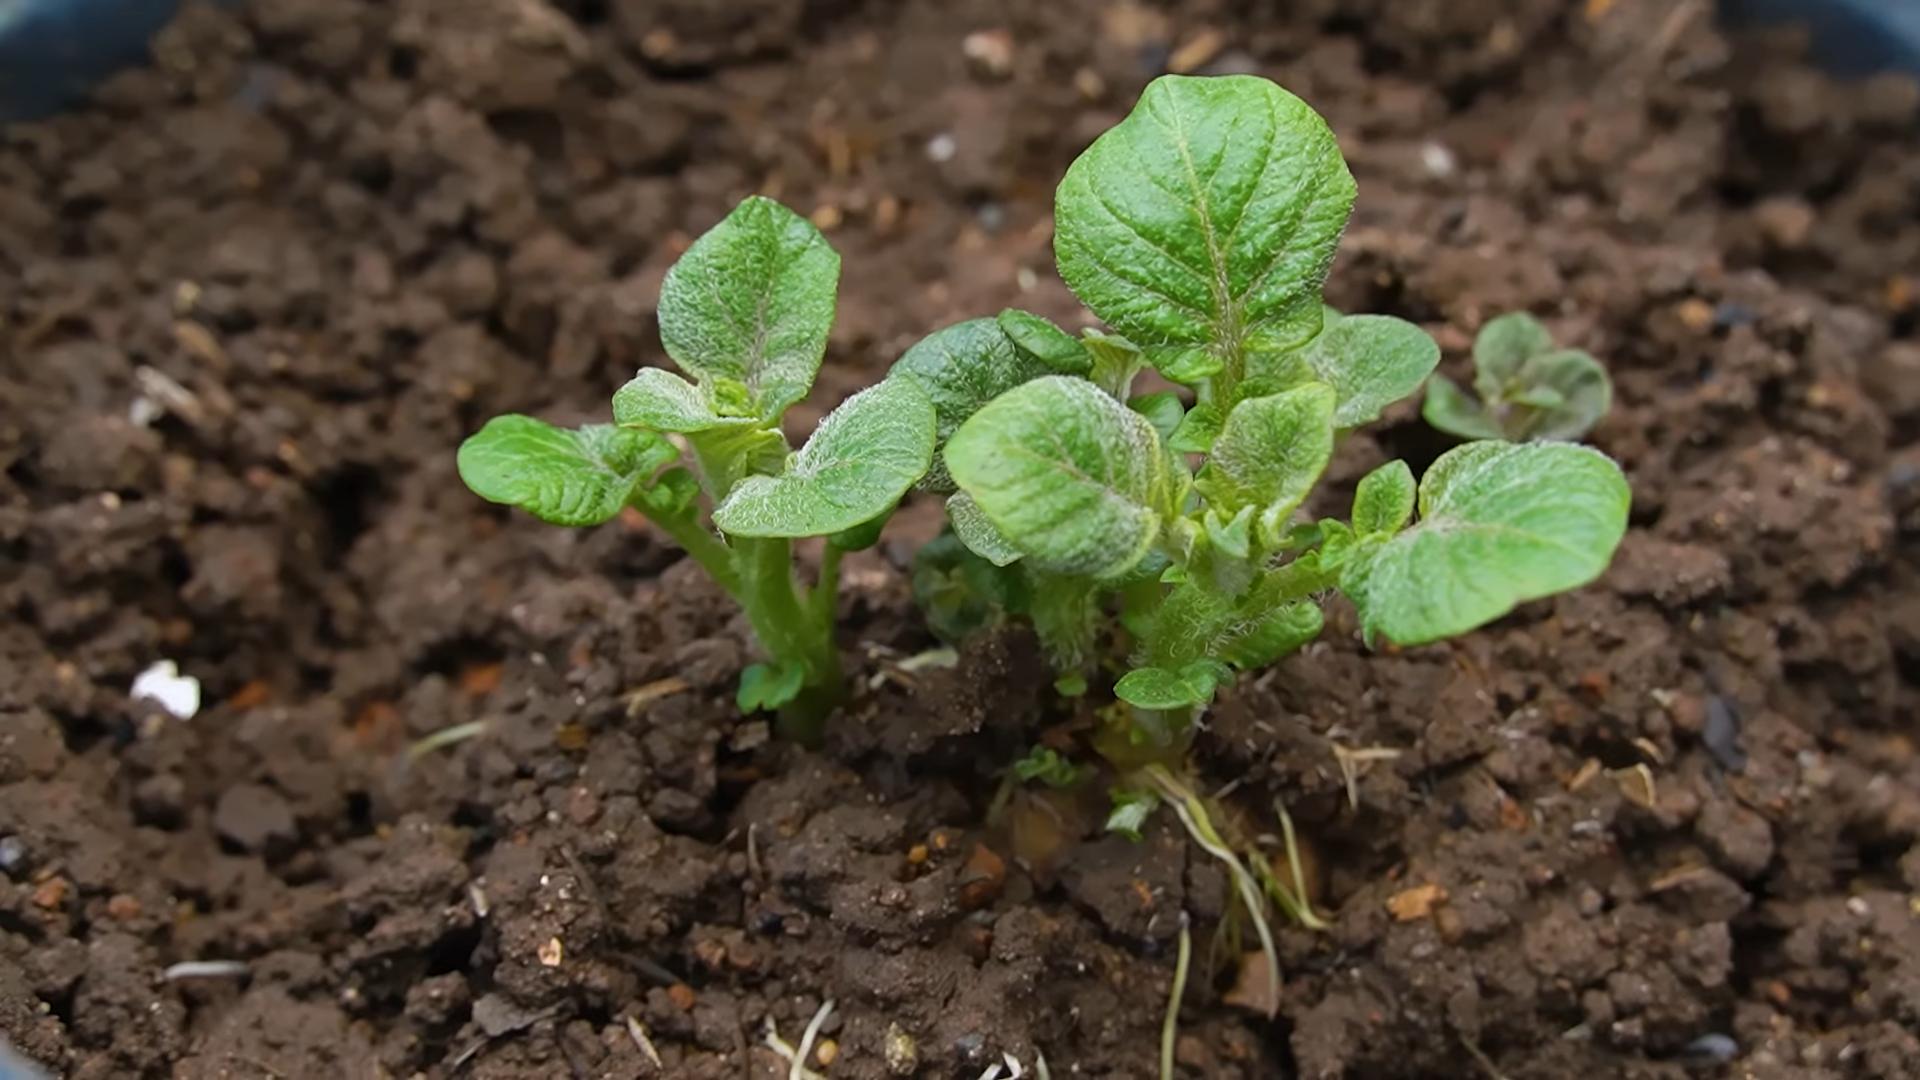
1. Wait for Sprouts:
* In a week or two, you should see sprouts emerging from the soil.
2. Add More Soil:
* Once the sprouts are about 6-8 inches tall, add more potting mix to the bucket, burying the stems up to the top few leaves.
3. Repeat the Process:
* Continue adding soil every few weeks as the plants grow, always leaving a few inches of leaves exposed. I usually do this until the bucket is almost full.
4. Water Regularly:
* Keep the soil consistently moist, but avoid overwatering. Check the soil moisture by sticking your finger into the soil. If it feels dry an inch or two down, it’s time to water.
Caring for Your Potato Plants
Now that your potatoes are growing, here are a few tips to keep them healthy and productive:
* Watering: As mentioned before, water regularly, especially during hot, dry weather.
* Fertilizing: If you’re using a slow-release fertilizer, you probably won’t need to fertilize again. However, if you notice the plants looking pale or weak, you can give them a boost with a liquid fertilizer diluted to half strength.
* Pest Control: Keep an eye out for pests like aphids, potato beetles, and flea beetles. You can usually control these with insecticidal soap or neem oil.
* Sunlight: Ensure your buckets are getting enough sunlight. If they’re not, consider moving them to a sunnier location.
* Mulching: Adding a layer of straw or mulch to the top of the soil can help retain moisture, suppress weeds, and regulate soil temperature.
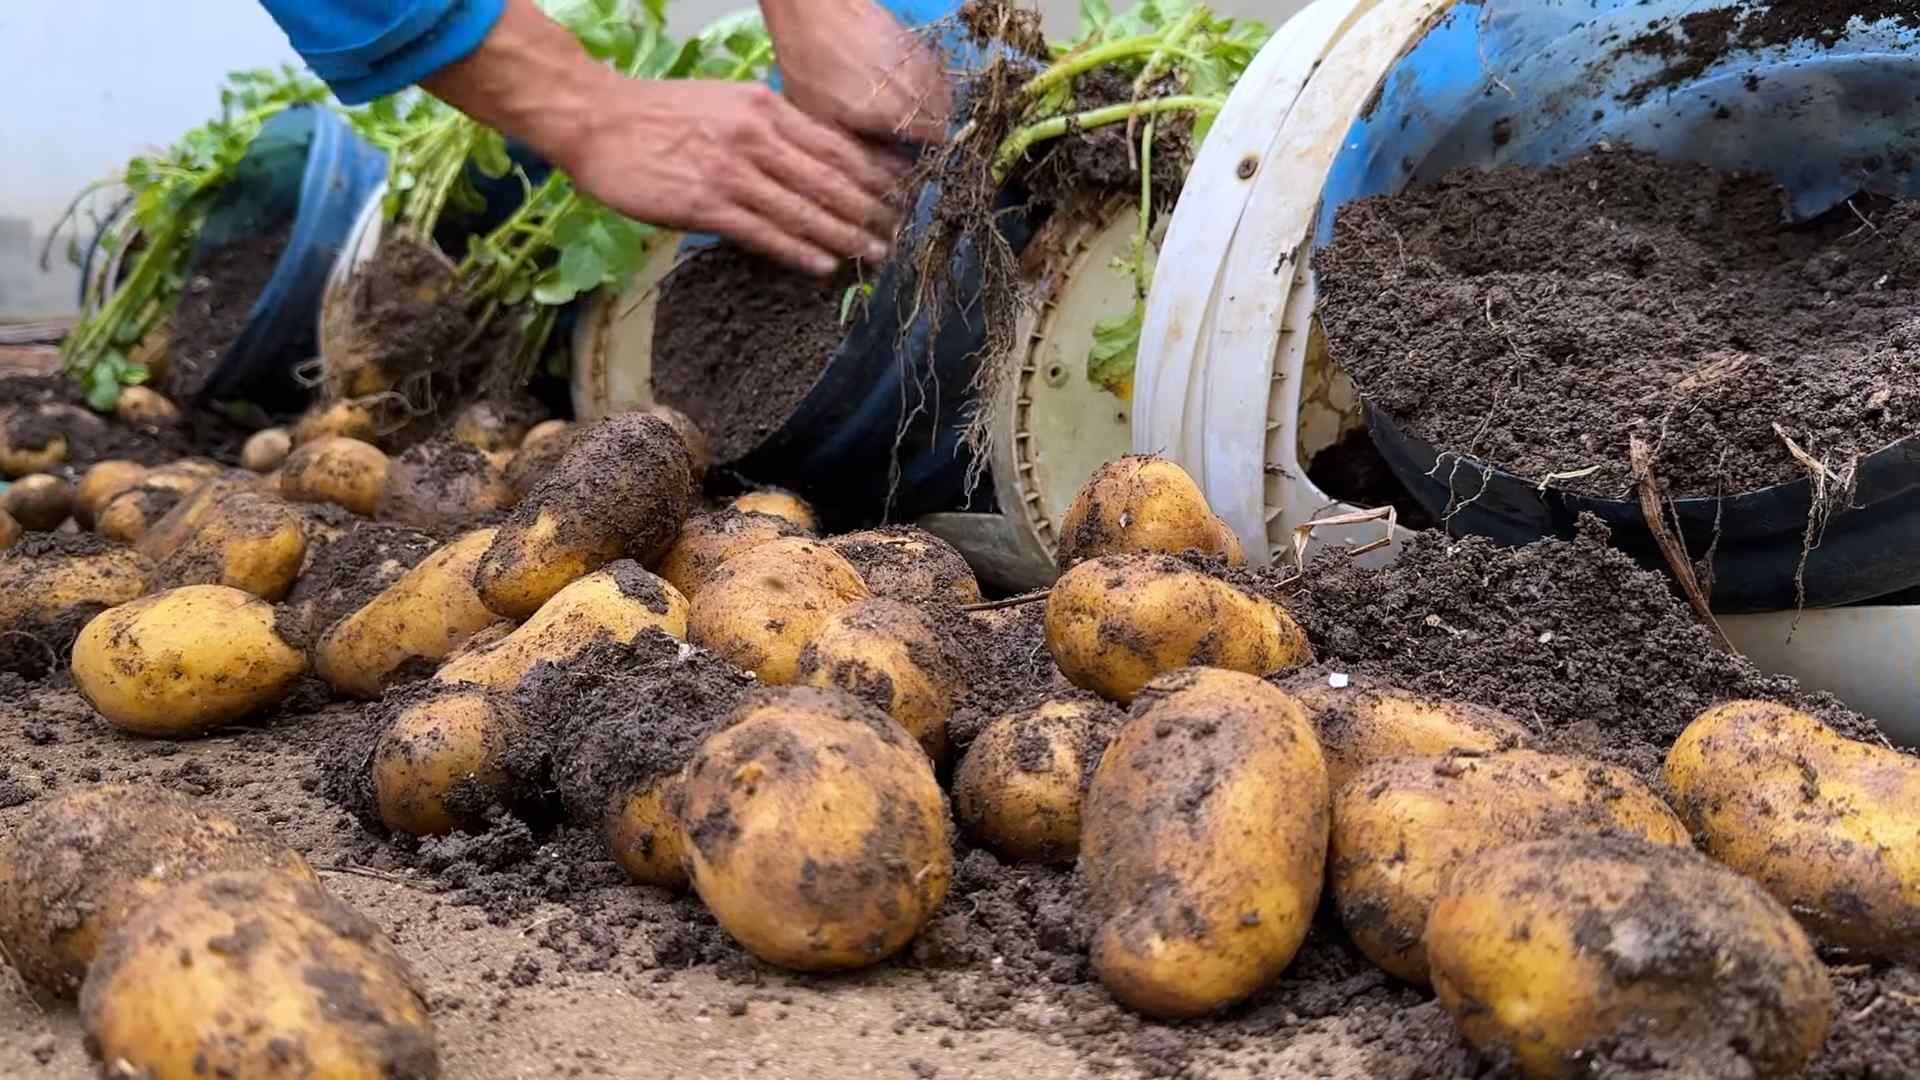
Harvesting Your Potatoes: The Fun Part!
This is the moment you’ve been waiting for! Harvesting your potatoes is super easy with bucket gardening.
1. When to Harvest:
* You can start harvesting “new potatoes” (small, tender potatoes) a few weeks after the plants flower. Just reach into the bucket and carefully pull out a few potatoes.
* For mature potatoes, wait until the plants start to die back and the foliage turns yellow or brown. This usually happens about 80-100 days after planting.
2. Harvesting:
* Simply tip the bucket over onto a tarp or sheet of plastic.
* Sift through the soil and collect your potatoes!
3. Curing (Optional):
* If you plan to store your potatoes for a long time, you can cure them by spreading them out in a cool, dark, and well-ventilated place for a week or two. This helps toughen the skins and prevent rot.
Troubleshooting
Even with the best planning, sometimes things can go wrong. Here are a few common problems and how to fix them:
* Yellowing Leaves: Could be a sign of overwatering, underwatering, nutrient deficiency, or disease. Check the soil moisture and adjust your watering accordingly. Fertilize if necessary.
* Potato Blight: A fungal disease that can cause brown spots on the leaves and potatoes. Remove infected foliage and treat with a fungicide.
* Pests: As mentioned before, use insecticidal soap or neem oil to control pests.
* No Potatoes: Could be due to lack of sunlight, poor soil, or not enough hilling. Make sure your plants are getting enough sun, use a good quality potting mix, and hill regularly.
Different Potato Varieties to Try
The fun thing about growing potatoes is the variety! Here are a few of my favorites:
* Yukon Gold: A classic all-purpose potato with a buttery flavor.
* Red Pontiac: A red-skinned potato that’s great for boiling and salads.
* Russet Burbank: The classic baking potato.
* Fingerling Potatoes: Small, elongated potatoes with a unique flavor and texture.
* Purple Potatoes: Add a pop of color to your dishes!
Tips for Success
Here are a few extra tips to help you succeed with potato bucket gardening:
* Use Food-Grade Buckets: If you’re concerned about chemicals leaching into your potatoes, use food-grade buckets.
* Don’t Overwater: Overwatering is a common mistake. Make sure the soil is well-draining and only water when the top inch or two of soil feels dry.
* Rotate Your Crops: Don’t plant potatoes in the same buckets year after year. Rotate your crops to prevent soilborne diseases.
* Have Fun! Gardening should be enjoyable. Experiment with different varieties and techniques to find what works best for you.
I hope you found this guide helpful! Potato bucket gardening is a rewarding and fun way to grow your own food. Happy gardening!
Conclusion
So, there you have it! Potato bucket gardening is more than just a gardening trend; it’s a game-changer for anyone looking to grow their own fresh, delicious potatoes, regardless of space constraints or gardening experience. We’ve walked you through the simple steps, highlighted the benefits, and armed you with the knowledge to create your own thriving potato patch in a bucket.
Why is this a must-try? Because it’s incredibly rewarding! Imagine the satisfaction of harvesting your own homegrown potatoes, knowing exactly where they came from and how they were grown. The taste difference between store-bought and freshly harvested potatoes is undeniable – a burst of earthy flavor that will elevate your meals to a whole new level. Plus, it’s a fantastic way to get your hands dirty (literally!) and connect with nature, even in the heart of the city.
But the beauty of potato bucket gardening lies in its adaptability. Feel free to experiment with different potato varieties. Russets are a classic choice for baking, while Yukon Golds offer a creamy texture perfect for mashed potatoes. Red potatoes are excellent for boiling and salads. Don’t be afraid to try a mix and see which ones thrive best in your environment.
Consider adding companion plants to your potato bucket. Marigolds can help deter pests, while basil can enhance the flavor of your potatoes. Just be sure to choose plants that have similar watering and sunlight requirements.
And speaking of sunlight, remember that potatoes need at least six hours of direct sunlight per day. If you don’t have a sunny spot, you can supplement with grow lights.
Watering is crucial, but avoid overwatering. The soil should be moist but not soggy. Check the soil moisture regularly and adjust your watering schedule accordingly.
Finally, don’t forget to fertilize your potato plants. A balanced fertilizer will provide them with the nutrients they need to grow strong and produce a bountiful harvest.
We are confident that you will find potato bucket gardening to be a fun, easy, and rewarding experience. It’s a fantastic way to grow your own food, connect with nature, and enjoy the delicious taste of homegrown potatoes.
Now it’s your turn! Grab a bucket, some seed potatoes, and get ready to embark on your potato-growing adventure. We encourage you to try this DIY trick and share your experiences with us. Post photos of your potato buckets, share your tips and tricks, and let us know how your harvest turns out. We can’t wait to see your potato-growing success stories! Happy gardening!
Frequently Asked Questions (FAQ)
What kind of bucket should I use for potato bucket gardening?
The ideal bucket size is around 5-10 gallons. This provides enough space for the potato plants to develop a healthy root system and produce a good yield. Make sure the bucket is made of food-grade plastic to avoid any harmful chemicals leaching into the soil. You’ll also need to drill drainage holes in the bottom of the bucket to prevent waterlogging. Dark-colored buckets can absorb more heat, which can be beneficial in cooler climates, but in hotter climates, a lighter-colored bucket might be preferable to prevent the soil from overheating.
Where can I get seed potatoes?
You can purchase seed potatoes from most garden centers or online retailers. Look for certified seed potatoes, as these are guaranteed to be disease-free. Avoid using potatoes from the grocery store, as they may have been treated with chemicals to prevent sprouting. If you only have access to grocery store potatoes, look for organic ones that have started to sprout naturally. Cut them into pieces, ensuring each piece has at least one “eye” (sprout). Let the cut pieces dry for a day or two before planting to prevent rotting.
How often should I water my potato bucket?
Watering frequency depends on the weather and the type of soil you’re using. Generally, you should water your potato bucket when the top inch of soil feels dry to the touch. Avoid overwatering, as this can lead to root rot. During hot, dry weather, you may need to water daily. In cooler, wetter weather, you may only need to water every few days. A good rule of thumb is to check the soil moisture regularly and adjust your watering schedule accordingly.
What kind of soil should I use for potato bucket gardening?
Use a well-draining potting mix that is rich in organic matter. Avoid using garden soil, as it can be too heavy and compact, which can hinder root growth. You can also amend your potting mix with compost or other organic materials to improve its fertility and drainage. A mix of equal parts potting soil, compost, and perlite or vermiculite works well.
How much sunlight do potato plants need?
Potato plants need at least six hours of direct sunlight per day to thrive. Choose a location for your potato bucket that receives plenty of sunlight. If you don’t have a sunny spot, you can supplement with grow lights.
When is the best time to plant potatoes in a bucket?
The best time to plant potatoes is in early spring, after the last frost. You can also plant potatoes in late summer for a fall harvest. The ideal soil temperature for potato growth is between 60 and 70 degrees Fahrenheit.
How do I know when my potatoes are ready to harvest?
You can start harvesting “new potatoes” (small, immature potatoes) about 7-8 weeks after planting. To harvest new potatoes, carefully dig around the base of the plant and remove a few potatoes. For a full harvest, wait until the potato plants have flowered and the foliage starts to die back. This usually takes about 10-12 weeks. Once the foliage has died back, stop watering the plants and let the potatoes cure in the soil for a week or two before harvesting.
What are some common pests and diseases that affect potato plants?
Common pests that affect potato plants include aphids, potato beetles, and flea beetles. Common diseases include early blight, late blight, and potato scab. You can prevent pests and diseases by using disease-resistant seed potatoes, practicing crop rotation, and keeping your potato plants healthy and well-nourished. If you do encounter pests or diseases, you can treat them with organic pesticides or fungicides.
Can I grow potatoes in a bucket indoors?
Yes, you can grow potatoes in a bucket indoors, but you will need to provide them with adequate light. Use grow lights to supplement natural sunlight. You will also need to ensure that the bucket has good drainage and that the soil is well-aerated.
What are some variations I can try with potato bucket gardening?
You can try growing different varieties of potatoes, such as russets, Yukon Golds, or red potatoes. You can also try adding companion plants to your potato bucket, such as marigolds or basil. Another variation is to use a self-watering bucket, which can help to regulate soil moisture. You can also experiment with different types of fertilizers to see which ones work best for your potato plants. Consider using a fabric grow bag instead of a plastic bucket for better aeration and drainage.
Leave a Comment