
Growing Brussels Sprouts in Pots might seem like a challenge reserved for seasoned gardeners with sprawling acres, but I’m here to tell you it’s totally achievable, even if your “garden” is a sunny balcony or a cozy patio! Forget the image of endless rows of farmland; we’re bringing the farm to you, one pot at a time. Have you ever dreamt of plucking fresh, vibrant Brussels sprouts right from your own little garden oasis? This DIY guide will turn that dream into a delicious reality.
Brussels sprouts, those miniature cabbage-like wonders, have a fascinating history. Believed to have originated in (you guessed it!) Brussels, Belgium, they’ve been cultivated since the 13th century. For centuries, they’ve been a staple in European cuisine, and now, thanks to modern gardening techniques, we can enjoy them fresh from our own homes, regardless of space.
Why bother with growing Brussels sprouts in pots? Well, for starters, it gives you complete control over the growing environment. No more battling unpredictable soil conditions or pesky garden pests! Plus, it’s incredibly rewarding to nurture these little plants from tiny seedlings to bountiful harvests. Imagine the satisfaction of serving a home-cooked meal featuring Brussels sprouts you grew yourself – talk about farm-to-table freshness! This DIY guide will provide you with all the tricks and hacks you need to succeed, from choosing the right pot size to mastering the art of watering and fertilizing. Let’s get our hands dirty and start growing!
Growing Brussels Sprouts in Pots: A Beginner’s Guide
Hey there, fellow gardening enthusiasts! So, you’re thinking about growing Brussels sprouts, but you’re short on space? No problem! You absolutely can grow these mini cabbages in pots, and I’m here to guide you through the whole process. It’s easier than you might think, and the reward of fresh, homegrown Brussels sprouts is totally worth it. Let’s get started!
Choosing the Right Pot and Soil
First things first, we need to talk about the foundation of our Brussels sprouts success: the pot and the soil.
* Pot Size Matters: Brussels sprouts need room to grow, both above and below the soil. A pot that’s too small will restrict their root development and stunt their growth. I recommend a pot that’s at least 12 inches in diameter and 12 inches deep. Bigger is generally better, so if you have the space, go for a 15-inch or even 18-inch pot. This will give your plants plenty of room to spread out.
* Material Considerations: The material of the pot isn’t as crucial as the size, but it’s still worth considering. Terracotta pots are breathable, which can help prevent overwatering, but they also dry out faster. Plastic pots retain moisture better, which can be beneficial in hot climates, but you need to be careful not to overwater. I personally prefer using plastic pots because they are lightweight and easy to move around.
* Drainage is Key: No matter what type of pot you choose, make sure it has drainage holes! Brussels sprouts hate sitting in soggy soil. If your pot doesn’t have enough drainage, you can drill a few extra holes in the bottom.
* Soil Selection: Now, let’s talk soil. Brussels sprouts are heavy feeders, meaning they need a nutrient-rich soil to thrive. A good quality potting mix is essential. Avoid using garden soil, as it can be too heavy and compact for container gardening. I like to use a mix of potting soil, compost, and a little bit of perlite for added drainage. The compost provides essential nutrients, and the perlite helps to keep the soil loose and well-draining.
Planting Your Brussels Sprouts
Okay, we’ve got our pot and soil sorted. Now it’s time to get our hands dirty and plant those Brussels sprouts!
1. Starting from Seed (Optional): You can start Brussels sprouts from seed indoors about 6-8 weeks before the last expected frost. Sow the seeds about ½ inch deep in seed-starting trays or small pots. Keep the soil moist and warm (around 70-75°F). Once the seedlings have a few sets of true leaves, you can transplant them into your larger pots.
2. Buying Transplants (Recommended for Beginners): For beginners, I highly recommend buying transplants from a local nursery. This will give you a head start and increase your chances of success. Look for healthy-looking plants with sturdy stems and vibrant green leaves.
3. Planting Time: Whether you’re transplanting seedlings or store-bought plants, the process is the same. Fill your pot with your chosen potting mix, leaving a few inches of space at the top. Gently remove the Brussels sprout plant from its container and loosen the roots slightly.
4. Planting Depth: Plant the Brussels sprout at the same depth it was growing in its original container. Don’t bury the stem too deep, as this can lead to rot.
5. Spacing: If you’re planting multiple Brussels sprouts in the same pot (which I don’t recommend for beginners, but it’s possible), space them at least 18 inches apart. For a single plant, the center of the pot is ideal.
6. Watering: After planting, water the Brussels sprout thoroughly until water drains out of the bottom of the pot. This will help settle the soil and get the roots established.
Caring for Your Brussels Sprouts
Now that your Brussels sprouts are planted, it’s time to provide them with the care they need to thrive.
* Sunlight: Brussels sprouts need at least 6 hours of sunlight per day. Choose a sunny spot in your garden or on your patio where your plants will get plenty of light. If you don’t have a sunny spot, you can supplement with grow lights.
* Watering: Water your Brussels sprouts regularly, especially during hot, dry weather. The soil should be consistently moist, but not soggy. Check the soil moisture by sticking your finger into the soil. If the top inch feels dry, it’s time to water.
* Fertilizing: As I mentioned earlier, Brussels sprouts are heavy feeders. Fertilize them every 2-3 weeks with a balanced liquid fertilizer. Follow the instructions on the fertilizer label for application rates. You can also amend the soil with compost tea every few weeks for an extra boost of nutrients.
* Pest Control: Brussels sprouts are susceptible to a few common pests, such as aphids, cabbage worms, and flea beetles. Inspect your plants regularly for signs of infestation. If you spot any pests, you can try spraying them with insecticidal soap or neem oil. You can also handpick the pests off the plants.
* Supporting the Plant: As your Brussels sprouts grow, they may become top-heavy and require support. You can use a stake or tomato cage to help keep the plant upright. This is especially important in windy areas.
* Removing Yellowing Leaves: As the plant matures, the lower leaves may start to yellow and die. Remove these leaves to improve air circulation and prevent disease.
Harvesting Your Brussels Sprouts
The moment we’ve all been waiting for! Harvesting those delicious Brussels sprouts.
1. Timing is Everything: Brussels sprouts are typically ready to harvest about 90-100 days after planting. The sprouts should be firm, green, and about 1-2 inches in diameter.
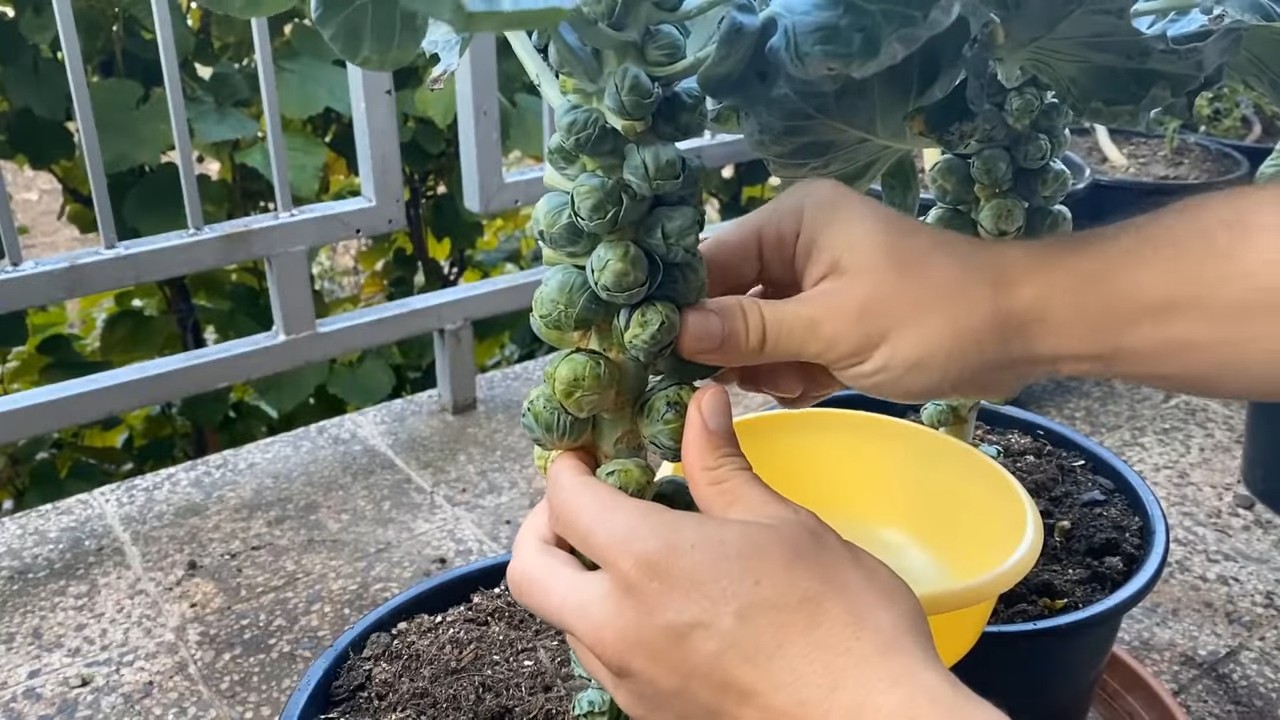
2. Harvesting Technique: Start harvesting from the bottom of the plant, working your way up. Twist the sprouts off the stem, or use a sharp knife to cut them off.
3. Continuous Harvest: Brussels sprouts mature from the bottom up, so you can harvest them over a period of several weeks. As you harvest the lower sprouts, the plant will continue to produce new sprouts higher up.
4. Topping the Plant (Optional): About a month before the first expected frost, you can top the plant by cutting off the top few inches of the stem. This will encourage the remaining sprouts to mature more quickly.
5. Storage: Freshly harvested Brussels sprouts can be stored in the refrigerator for up to a week.
Troubleshooting Common Problems
Even with the best care, you might encounter a few problems along the way. Here are some common issues and how to address them:
* Yellowing Leaves: Yellowing leaves can be caused by a variety of factors, including overwatering, underwatering, nutrient deficiencies, or pests. Check the soil moisture and adjust your watering accordingly. Fertilize your plants regularly to ensure they’re getting enough nutrients. Inspect your plants for pests and treat them as needed.
* Sprouts Not Forming: If your Brussels sprouts aren’t forming, it could be due to a lack of sunlight, poor soil, or insufficient watering. Make sure your plants are getting at least 6 hours of sunlight per day. Amend the soil with compost to improve its fertility. Water your plants regularly to keep the soil consistently moist.
* Pest Infestations: As mentioned earlier, Brussels sprouts are susceptible to a few common pests. Inspect your plants regularly for signs of infestation and treat them as needed. Insecticidal soap and neem oil are effective organic options.
* Bolting: Bolting is when the plant prematurely flowers, which can make the sprouts bitter. Bolting is usually caused by stress, such as extreme heat or drought. Provide your plants with consistent watering and shade them during the hottest part of the day to prevent bolting.
Extra Tips for Success
Here are a few extra tips to help you grow the best Brussels sprouts possible:
* Choose the Right Variety: Some Brussels sprout varieties are better suited for container gardening than others. Look for compact varieties that don’t get too tall. ‘Jade Cross’ and ‘Long Island Improved’ are two popular choices.
* Rotate Your Crops: Don’t plant Brussels sprouts in the same pot year after year. Crop rotation helps to prevent soilborne diseases and pests.
* Companion Planting: Plant Brussels sprouts with companion plants like marigolds, nasturtiums, and rosemary to deter pests.
* Mulching: Mulch around your Brussels sprouts with straw or wood chips to help retain moisture and suppress weeds.
* Be Patient: Growing Brussels sprouts takes time and patience. Don’t get discouraged if you don’t see results right away. With proper care, you’ll be rewarded with a bountiful harvest of delicious, homegrown Brussels sprouts.
Growing Brussels sprouts in pots is a rewarding experience. With a little bit of planning and care, you can enjoy fresh, homegrown Brussels sprouts

Conclusion
So, there you have it! Growing Brussels sprouts in pots isn’t just a whimsical gardening experiment; it’s a practical, space-saving, and surprisingly rewarding way to enjoy fresh, homegrown vegetables, even if you’re limited to a balcony, patio, or small yard. We’ve walked through the entire process, from selecting the right pot and soil to nurturing your plants and harvesting those delicious little sprouts.
Why is this DIY trick a must-try? Because it puts you in control. You know exactly what goes into your food, avoiding potentially harmful pesticides and herbicides. You get the satisfaction of watching something grow from a tiny seed to a bountiful harvest. And, let’s be honest, there’s nothing quite like the taste of freshly picked Brussels sprouts, bursting with flavor that store-bought varieties simply can’t match. Plus, growing them in pots allows you to move them around to optimize sunlight exposure and protect them from harsh weather conditions, giving you a significant advantage over in-ground planting.
But the beauty of this method lies in its adaptability. Feel free to experiment with different varieties of Brussels sprouts. ‘Long Island Improved’ is a classic choice, but ‘Redarling’ offers a beautiful reddish-purple hue and a slightly sweeter flavor. Consider companion planting in your pots. Marigolds can help deter pests, while herbs like thyme and rosemary can add a delightful aroma and potentially improve the flavor of your sprouts. You could even interplant with low-growing greens like spinach or lettuce to maximize your pot’s productivity.
Don’t be afraid to tweak the watering schedule based on your local climate and the specific needs of your plants. Observe your Brussels sprouts closely, and adjust your care routine accordingly. If you notice any signs of pests or diseases, address them promptly with organic solutions. Remember, gardening is a learning process, and every season brings new challenges and opportunities.
We strongly encourage you to give this DIY trick a try. It’s an investment in your health, your well-being, and your connection to nature. Imagine the pride you’ll feel when you serve a dish featuring Brussels sprouts that you grew yourself!
And most importantly, we want to hear about your experience! Share your photos, tips, and challenges in the comments section below. Let’s create a community of pot-growing Brussels sprouts enthusiasts and learn from each other. What varieties did you choose? What challenges did you face? What successes did you celebrate? Your insights can help other gardeners embark on their own Brussels sprouts adventures. So, grab your pots, your soil, and your seeds, and get ready to experience the joy of growing your own delicious and nutritious Brussels sprouts. Happy gardening!
Frequently Asked Questions (FAQ)
What is the best size pot for growing Brussels sprouts?
A pot that is at least 12 inches in diameter and 12 inches deep is recommended for growing one Brussels sprouts plant. However, a larger pot, such as a 15-18 inch diameter pot, is even better as it provides more room for the roots to grow and allows for better water retention. If you plan to grow multiple plants in one container, choose a very large pot or trough to ensure adequate spacing and nutrient availability for each plant. Remember, Brussels sprouts need room to develop their sprouts, and cramped conditions can lead to smaller, less productive plants.
What type of soil should I use?
Brussels sprouts thrive in well-draining, fertile soil that is rich in organic matter. A good potting mix specifically formulated for vegetables is an excellent choice. You can also create your own mix by combining equal parts of compost, peat moss (or coco coir), and perlite or vermiculite. The compost provides essential nutrients, the peat moss (or coco coir) helps retain moisture, and the perlite or vermiculite improves drainage. Avoid using garden soil in pots, as it can become compacted and poorly drained, hindering root growth. Before planting, amend the soil with a slow-release fertilizer to provide a steady supply of nutrients throughout the growing season.
How much sunlight do Brussels sprouts need?
Brussels sprouts require at least 6-8 hours of direct sunlight per day to thrive. Choose a location for your pots that receives ample sunlight throughout the day. If you live in a particularly hot climate, some afternoon shade may be beneficial to prevent the plants from overheating. If you don’t have a sunny spot, you can supplement with grow lights, especially during the seedling stage. Insufficient sunlight can lead to leggy growth and reduced sprout production.
How often should I water my Brussels sprouts?
Water your Brussels sprouts regularly, keeping the soil consistently moist but not waterlogged. The frequency of watering will depend on the weather conditions, the size of your pot, and the type of soil you are using. Check the soil moisture level regularly by sticking your finger about an inch into the soil. If it feels dry, it’s time to water. Water deeply, allowing the water to drain out of the bottom of the pot. Avoid overhead watering, as this can increase the risk of fungal diseases. During hot, dry weather, you may need to water daily.
How do I fertilize my Brussels sprouts?
Brussels sprouts are heavy feeders and require regular fertilization to produce a good crop of sprouts. Use a balanced fertilizer with an NPK ratio of around 10-10-10 or 14-14-14. Apply the fertilizer according to the package directions, typically every 2-3 weeks. You can also supplement with organic fertilizers such as compost tea or fish emulsion. Avoid over-fertilizing, as this can lead to excessive foliage growth at the expense of sprout production.
What are some common pests and diseases that affect Brussels sprouts?
Common pests that affect Brussels sprouts include aphids, cabbage worms, and flea beetles. Aphids can be controlled with insecticidal soap or neem oil. Cabbage worms can be handpicked or treated with Bacillus thuringiensis (Bt). Flea beetles can be deterred with row covers or diatomaceous earth. Common diseases include clubroot and downy mildew. Clubroot can be prevented by ensuring good soil drainage and avoiding planting in contaminated soil. Downy mildew can be controlled with copper-based fungicides. Regularly inspect your plants for signs of pests and diseases and take action promptly to prevent them from spreading.
When are Brussels sprouts ready to harvest?
Brussels sprouts are typically ready to harvest about 90-100 days after planting. The sprouts should be firm, tightly closed, and about 1-2 inches in diameter. Start harvesting from the bottom of the plant, working your way upwards. Twist or cut the sprouts off the stem. The lower leaves of the plant may turn yellow and drop off as the sprouts mature. You can continue to harvest sprouts over several weeks, as they mature at different rates.
Can I grow Brussels sprouts in containers indoors?
While it is possible to grow Brussels sprouts indoors, it can be challenging due to their high light requirements. You will need to provide them with at least 12-14 hours of artificial light per day using grow lights. You will also need to ensure good air circulation and maintain a consistent temperature. Indoor-grown Brussels sprouts may not produce as many sprouts as those grown outdoors.
What are some good companion plants for Brussels sprouts?
Good companion plants for Brussels sprouts include marigolds, nasturtiums, thyme, rosemary, and dill. Marigolds and nasturtiums help deter pests, while thyme and rosemary can improve the flavor of the sprouts. Dill attracts beneficial insects that prey on pests. Avoid planting Brussels sprouts near other members of the cabbage family, such as broccoli, cauliflower, and kale, as they can attract the same pests and diseases.
Can I save seeds from my Brussels sprouts?
Yes, you can save seeds from your Brussels sprouts, but it is important to note that they are cross-pollinated, so the seeds may not produce plants that are true to type. To save seeds, allow a few plants to bolt (flower) and produce seed pods. Once the seed pods are dry and brown, harvest them and extract the seeds. Store the seeds in a cool, dry place.
Leave a Comment