
Tomato sack gardening: Ever dream of harvesting juicy, sun-ripened tomatoes right outside your doorstep, even if you’re short on space? I know I have! Forget sprawling gardens and back-breaking weeding; there’s a simpler, more ingenious way to cultivate your own tomato bounty. This DIY guide unveils the secrets of tomato sack gardening, a method that’s not only incredibly space-saving but also surprisingly productive.
While container gardening has been around for centuries, offering a solution for urban dwellers and those with limited land, the tomato sack gardening technique is a more recent innovation. It builds upon the principles of vertical gardening, maximizing yield in a minimal footprint. Think of it as a modern twist on ancient hanging gardens, bringing the joy of fresh produce to even the smallest balconies and patios.
Why should you embrace this DIY trick? Well, for starters, it’s incredibly budget-friendly! You can repurpose materials you likely already have around the house, making it a sustainable and economical choice. More importantly, tomato sack gardening offers a fantastic solution for anyone struggling with poor soil quality or limited gardening space. Imagine the satisfaction of plucking a perfectly ripe tomato, knowing you nurtured it from seed to table, all within the confines of a simple sack. Let’s dive in and unlock the secrets to a thriving tomato harvest!
DIY Tomato Sack Gardening: Grow Your Own Delicious Tomatoes Anywhere!
Hey there, fellow gardening enthusiasts! I’m so excited to share one of my favorite gardening hacks with you: tomato sack gardening! It’s a fantastic way to grow tomatoes, especially if you’re short on space, have poor soil, or just want a fun and unique gardening project. Trust me, once you try it, you’ll be hooked!
This method is super versatile. You can grow tomatoes on your balcony, patio, or even a sunny driveway. Plus, it’s a great way to recycle those heavy-duty garden sacks you might have lying around. Let’s dive in!
What You’ll Need
Before we get started, let’s gather all the necessary supplies. This will make the whole process smoother and more enjoyable.
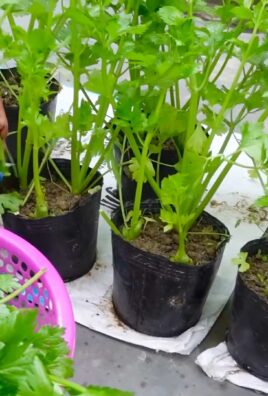
* A Heavy-Duty Garden Sack (or Burlap Sack): Look for a sack that’s at least 2 feet wide and 3 feet tall. The thicker the material, the better, as it will need to hold a lot of soil and support the weight of the tomato plants. Burlap sacks offer great drainage and a rustic look. You can find these at garden centers, feed stores, or even online.
* Potting Mix: This is crucial! Don’t use garden soil directly from your yard, as it can be too heavy and compact. A good quality potting mix will provide the right drainage and aeration for your tomato plants. I recommend a mix specifically formulated for vegetables.
* Compost: Compost is like a superfood for your plants! It adds nutrients, improves soil structure, and helps retain moisture. Mix it in with your potting mix for an extra boost.
* Tomato Seedlings: Choose your favorite tomato variety! I personally love Roma tomatoes for making sauce and cherry tomatoes for snacking. Make sure the seedlings are healthy and sturdy, with a good root system. You can start your own from seed or buy them from a local nursery.
* Slow-Release Fertilizer: This will provide your tomato plants with a steady supply of nutrients throughout the growing season. Look for a fertilizer specifically formulated for tomatoes.
* Watering Can or Hose: Essential for keeping your tomato plants hydrated.
* Sharp Knife or Scissors: For making drainage holes in the sack.
* Gloves: To protect your hands from the soil.
* Stakes or Tomato Cages (Optional): Depending on the tomato variety you choose, you might need to provide extra support as the plants grow.
* Landscape Fabric or Weed Barrier (Optional): To line the inside of the sack and prevent soil from escaping.
Preparing the Sack
This step is all about getting the sack ready to be filled with soil and planted with your tomato seedlings.
1. Clean the Sack: If you’re using a recycled sack, make sure to clean it thoroughly to remove any dirt, debris, or residue. You can use a brush and some soapy water. Rinse it well and let it dry completely.
2. Create Drainage Holes: This is super important to prevent the soil from becoming waterlogged. Use your sharp knife or scissors to poke several drainage holes in the bottom of the sack. Space them about 6-8 inches apart.
3. Line the Sack (Optional): If you’re worried about soil escaping through the sack, you can line the inside with landscape fabric or weed barrier. Cut a piece of fabric that’s slightly larger than the inside of the sack and secure it with staples or fabric glue. This step is optional, but it can help keep your growing area cleaner.
4. Roll Down the Top (Optional): Rolling down the top of the sack a few times can make it easier to fill with soil and create a more stable base. This also gives the sack a neater appearance.
Planting Your Tomato Seedlings
Now for the fun part – planting your tomato seedlings!
1. Partially Fill the Sack: Start by filling the sack with a mixture of potting mix and compost. Aim for about one-third to one-half full. This will give your tomato seedlings a good base to start growing.
2. Add Slow-Release Fertilizer: Sprinkle a generous amount of slow-release fertilizer over the soil. Follow the instructions on the fertilizer package for the correct amount.
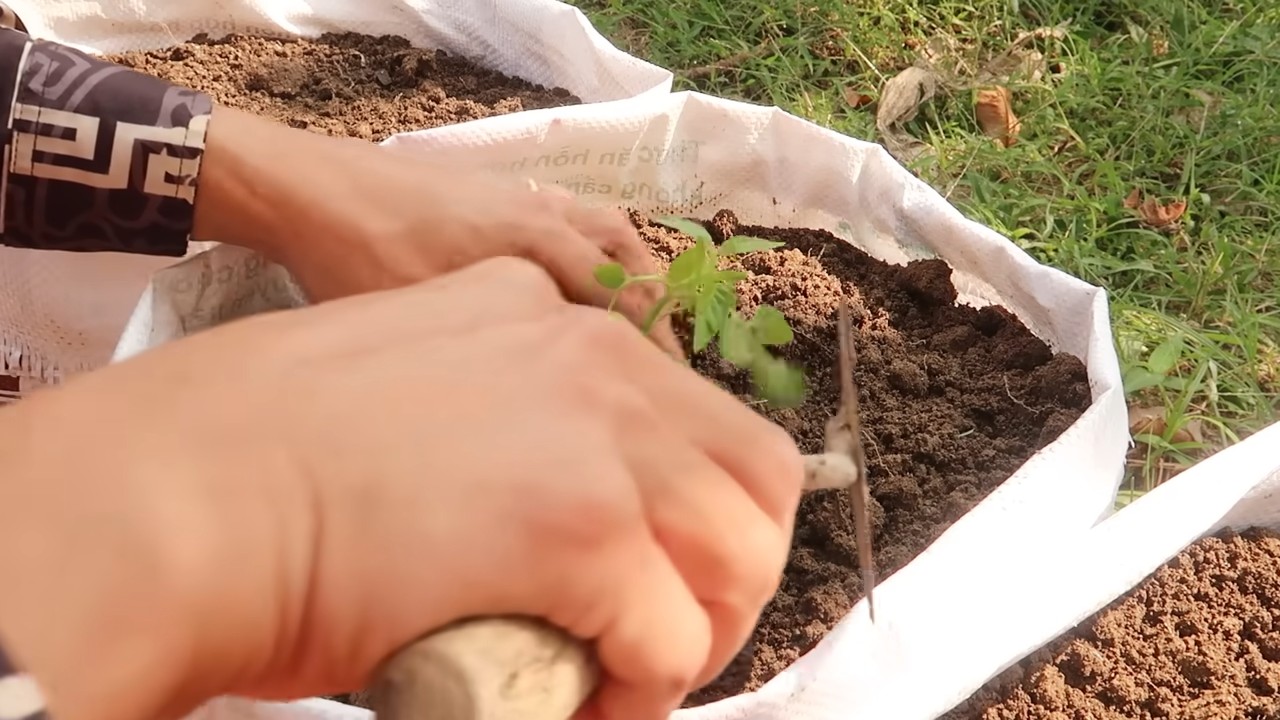
3. Position the Seedlings: Gently remove the tomato seedlings from their containers. Loosen the roots slightly with your fingers. Dig a small hole in the soil for each seedling and carefully place them in the holes. Space the seedlings about 12-18 inches apart, depending on the variety. If you are only planting one tomato plant, plant it in the center.
4. Fill with Soil: Fill the rest of the sack with the potting mix and compost mixture, leaving about 2-3 inches of space at the top. Gently pat down the soil around the seedlings to secure them in place.
5. Water Thoroughly: Water the newly planted tomato seedlings thoroughly until the water drains out of the drainage holes. This will help settle the soil and encourage root growth.
Caring for Your Tomato Plants
Proper care is essential for healthy and productive tomato plants.
1. Watering: Tomato plants need consistent watering, especially during hot weather. Water deeply whenever the top inch of soil feels dry to the touch. Avoid overwatering, as this can lead to root rot. I usually water my tomato sacks every day or two, depending on the weather.
2. Sunlight: Tomato plants need at least 6-8 hours of sunlight per day. Place your tomato sack in a sunny location where it will receive plenty of direct sunlight.
3. Fertilizing: In addition to the slow-release fertilizer you added at planting time, you can also supplement with liquid fertilizer every few weeks. Look for a fertilizer that’s high in phosphorus and potassium, which are essential for tomato production.
4. Pruning: Pruning your tomato plants can help improve air circulation and encourage fruit production. Remove any suckers (the small shoots that grow between the main stem and the branches) as they appear.
5. Support: As your tomato plants grow, they might need extra support to prevent them from falling over. You can use stakes or tomato cages to provide this support. Insert the stakes or cages into the soil around the plants and tie the stems to them with soft twine.
6. Pest and Disease Control: Keep an eye out for pests and diseases that can affect tomato plants, such as aphids, whiteflies, and blight. Treat any infestations or infections promptly with appropriate insecticides or fungicides. Organic options are always a good choice!
7. Mulching: Adding a layer of mulch around the base of the tomato plants can help retain moisture, suppress weeds, and regulate soil temperature. You can use straw, wood chips, or shredded bark as mulch.
Harvesting Your Tomatoes
The best part of growing your own tomatoes is, of course, harvesting them!
1. Ripeness: Tomatoes are typically ready to harvest when they are fully colored and slightly soft to the touch. The exact color will depend on the variety you’re growing.
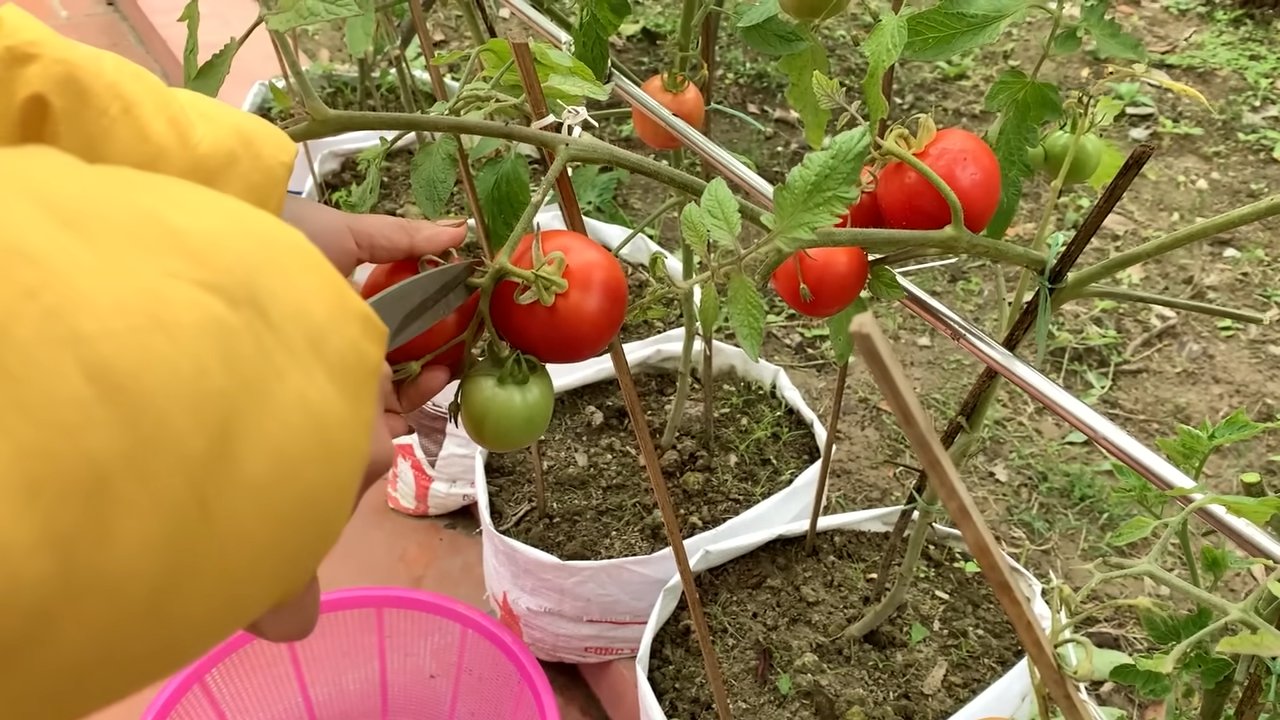
2. Harvesting Technique: Gently twist or cut the tomatoes from the vine, leaving a small piece of the stem attached.
3. Storage: Store your freshly harvested tomatoes at room temperature, away from direct sunlight. Avoid refrigerating them, as this can affect their flavor and texture.
Troubleshooting
Even with the best care, you might encounter some problems along the way. Here are a few common issues and how to address them:
* Yellowing Leaves: This could be a sign of overwatering, underwatering, nutrient deficiency, or disease. Check the soil moisture and adjust your watering accordingly. Fertilize with a balanced fertilizer if necessary. Inspect the plants for signs of disease and treat accordingly.
* Blossom End Rot: This is a condition where the bottom of the tomato turns black and leathery. It’s usually caused by a calcium deficiency. Add calcium to the soil by mixing in bone meal or crushed eggshells. Ensure consistent watering to help the plants absorb calcium.
* Pests: Aphids, whiteflies, and other pests can damage tomato plants. Treat infestations with insecticidal soap or neem oil. You can also attract beneficial insects to your garden to help control pests naturally.
Tips for Success
Here are a few extra tips to help you succeed with tomato sack gardening:
* Choose the Right Location: Make sure your tomato sack is in a location that receives at least 6-8 hours of sunlight per day.
* Use High-Quality Potting Mix: Don’t skimp on the potting mix! A good quality mix will provide the right drainage and aeration for your tomato plants.
* Water Regularly: Tomato plants need consistent watering, especially during hot weather.
* Fertilize Regularly: Provide your tomato plants with a steady supply of nutrients throughout the growing season.
* Prune Regularly: Pruning your tomato plants can help improve air circulation and encourage fruit production.
* Monitor for Pests and Diseases: Keep
Conclusion
So, there you have it! Tomato sack gardening: a simple, space-saving, and surprisingly effective way to grow your own delicious tomatoes. We’ve walked you through the process, highlighting the ease and accessibility of this method. But why is this DIY trick a must-try?
Firstly, it’s incredibly economical. Forget expensive raised beds or complicated irrigation systems. All you need is a burlap sack (or a sturdy grow bag), some good quality potting mix, and your tomato seedlings. This makes it perfect for budget-conscious gardeners or those just starting out.
Secondly, it’s a fantastic solution for small spaces. Whether you have a tiny balcony, a concrete patio, or just a sunny corner in your yard, tomato sack gardening allows you to maximize your growing potential without sacrificing valuable space. Imagine fresh, homegrown tomatoes just steps from your kitchen, even if you live in an apartment!
Thirdly, it’s surprisingly productive. The sack provides excellent drainage and aeration, promoting healthy root growth and abundant fruit production. You’ll be amazed at how many tomatoes you can harvest from a single sack.
But the benefits don’t stop there. Tomato sack gardening is also a great way to recycle and repurpose materials. Instead of throwing away that old burlap sack, give it a new life as a thriving tomato garden. It’s a sustainable and eco-friendly way to grow your own food.
Looking for variations? Absolutely! Try using different types of sacks, such as heavy-duty plastic grow bags or even repurposed feed sacks. Experiment with different tomato varieties, from cherry tomatoes to beefsteaks, to see which ones thrive best in your climate and growing conditions. You can also add companion plants, such as basil or marigolds, to your tomato sack to deter pests and attract beneficial insects. Consider adding a simple drip irrigation system to the top of the sack for consistent watering, especially during hot weather.
Don’t be afraid to get creative and personalize your tomato sack garden to suit your needs and preferences.
We’re confident that you’ll be thrilled with the results of tomato sack gardening. It’s a rewarding and enjoyable way to connect with nature, grow your own food, and enjoy the taste of fresh, homegrown tomatoes.
So, what are you waiting for? Grab a sack, some potting mix, and your favorite tomato seedlings, and get started today! We encourage you to try this DIY trick and share your experience with us. Post photos of your tomato sack gardens on social media using #TomatoSackGardening and let us know how it goes. We can’t wait to see your thriving tomato plants and hear about your delicious harvests! Happy gardening!
Frequently Asked Questions (FAQ)
What kind of sack should I use for tomato sack gardening?
The best type of sack to use is a burlap sack, as it’s breathable and allows for good drainage. However, you can also use heavy-duty plastic grow bags or even repurposed feed sacks. Just make sure the sack is strong enough to hold the weight of the soil and plants, and that it has drainage holes to prevent waterlogging. If using a plastic bag, ensure it is UV resistant to prevent degradation from the sun.
What kind of soil should I use?
Use a high-quality potting mix that is well-draining and rich in nutrients. Avoid using garden soil, as it can be too heavy and compact, hindering root growth. A mix of compost, peat moss, and perlite is ideal. You can also add slow-release fertilizer to the potting mix to provide your tomato plants with a steady supply of nutrients throughout the growing season.
How often should I water my tomato sack garden?
Water your tomato sack garden regularly, especially during hot weather. The frequency of watering will depend on the climate, the type of sack you’re using, and the size of your tomato plants. Check the soil moisture regularly by sticking your finger into the soil. If the top inch of soil feels dry, it’s time to water. Water deeply, until the water drains out of the bottom of the sack. Avoid overwatering, as this can lead to root rot.
How much sunlight do tomato plants need?
Tomato plants need at least 6-8 hours of sunlight per day to thrive. Choose a sunny location for your tomato sack garden that receives plenty of direct sunlight. If you live in a hot climate, you may need to provide some afternoon shade to protect your tomato plants from scorching.
What kind of tomato varieties are best for tomato sack gardening?
Almost any tomato variety can be grown in a sack, but determinate varieties (bush tomatoes) tend to be more manageable than indeterminate varieties (vining tomatoes). Determinate varieties grow to a certain size and then stop, while indeterminate varieties continue to grow and produce fruit throughout the growing season. Cherry tomatoes, Roma tomatoes, and patio tomatoes are all good choices for tomato sack gardening. If you choose an indeterminate variety, be sure to provide adequate support, such as a stake or trellis, to keep the plant from sprawling.
How do I fertilize my tomato sack garden?
Tomato plants are heavy feeders and require regular fertilization. You can use a liquid fertilizer or a slow-release fertilizer. If using a liquid fertilizer, apply it every 2-3 weeks, following the instructions on the label. If using a slow-release fertilizer, mix it into the potting mix at planting time. You can also supplement with compost tea or other organic fertilizers.
How do I prevent pests and diseases in my tomato sack garden?
To prevent pests and diseases, choose disease-resistant tomato varieties and practice good sanitation. Remove any dead or diseased leaves promptly. Water at the base of the plant to avoid wetting the foliage, which can promote fungal diseases. You can also use organic pest control methods, such as insecticidal soap or neem oil, to control common tomato pests. Companion planting with basil or marigolds can also help deter pests.
Can I reuse the soil in my tomato sack garden?
It’s generally not recommended to reuse the soil in your tomato sack garden, as it may be depleted of nutrients and harbor pests or diseases. However, if you do choose to reuse the soil, be sure to amend it with fresh compost and fertilizer. You can also sterilize the soil by baking it in the oven or solarizing it in the sun.
What do I do with my tomato sack garden at the end of the season?
At the end of the growing season, remove the tomato plants from the sack and dispose of them properly. You can compost the plants if they are not diseased. Empty the soil from the sack and either discard it or amend it and use it in other garden beds. Clean the sack thoroughly and store it in a dry place for next year. If you used a plastic bag, consider recycling it if possible.
Can I grow other vegetables in a sack besides tomatoes?
Yes, you can grow other vegetables in a sack, such as peppers, eggplants, cucumbers, and herbs. The same principles apply as with tomato sack gardening: use a high-quality potting mix, provide adequate sunlight and water, and fertilize regularly. Choose vegetable varieties that are well-suited to container gardening.
Leave a Comment