
Grow Chayote Squash Quickly and unlock a world of culinary possibilities right in your own backyard! Have you ever dreamt of harvesting your own vibrant, pear-shaped squash, ready to be transformed into delicious dishes? Well, dream no more! This DIY guide is your secret weapon to achieving a bountiful chayote harvest faster than you ever thought possible.
Chayote, also known as vegetable pear or mirliton, boasts a rich history, particularly in Mesoamerica, where it has been cultivated for centuries. It was a staple food for the Aztecs and Mayans, and its versatility has allowed it to spread across the globe. But let’s be honest, sometimes getting these vigorous vines to produce can feel like a waiting game. That’s where our quick-grow tricks come in!
In today’s fast-paced world, who has time to wait an entire season for a single squash? We all crave fresh, homegrown produce, but the demands of modern life often leave us feeling short on time. That’s why I’m so excited to share these simple yet effective DIY hacks that will help you grow chayote squash quickly and efficiently. Imagine the satisfaction of harvesting your own chayote, knowing you nurtured it from seed to table in record time. Get ready to impress your friends and family with your green thumb and enjoy the delicious rewards of your labor!
Growing Chayote Squash: A Speedy Guide to Bountiful Harvests
Hey there, fellow gardening enthusiasts! I’m so excited to share my secrets for getting a jumpstart on growing chayote squash. This amazing vegetable, also known as mirliton or vegetable pear, can be a bit slow to get going, but with these tips and tricks, you’ll be harvesting delicious chayote in no time. Let’s dive in!
Understanding Chayote and Its Quirks
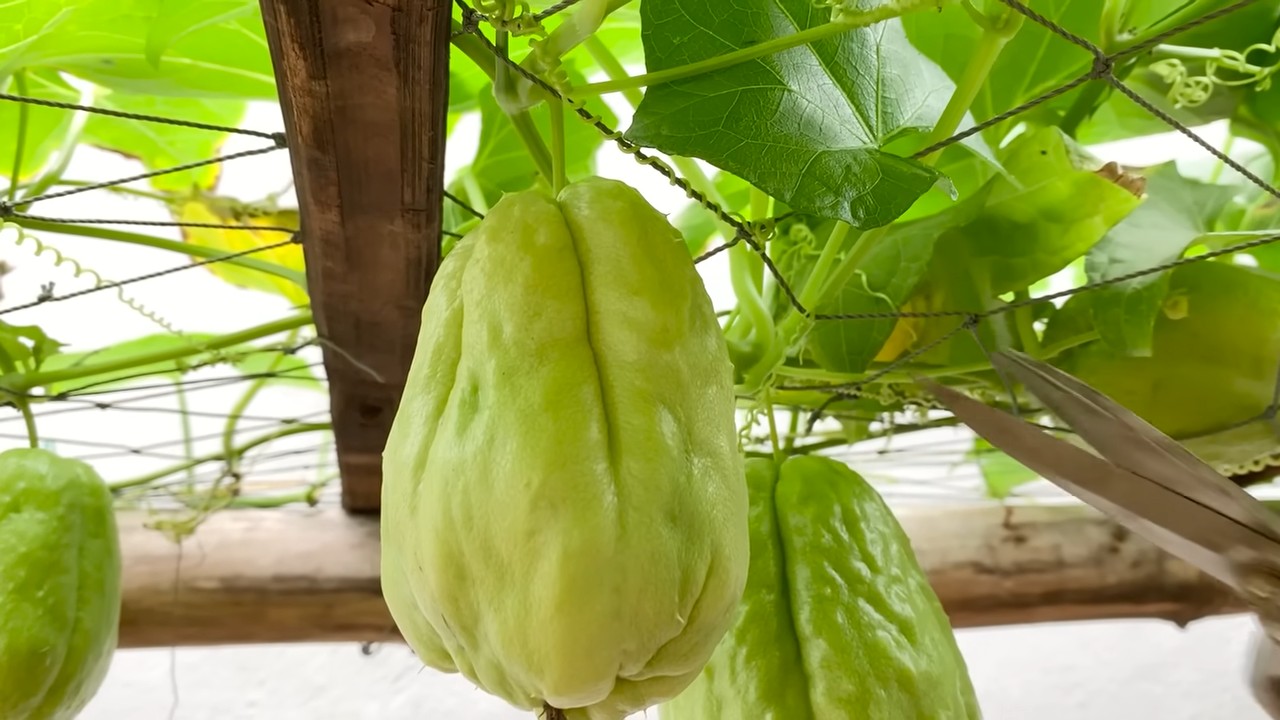
Before we get our hands dirty, let’s talk a little about chayote. It’s a unique squash because it’s typically grown from the whole fruit, not seeds. The fruit contains a single seed inside, and it’s this seed that germinates while still inside the fruit. This is why we plant the entire chayote.
Chayote loves warm weather and needs a long growing season. That’s why starting it indoors or using some clever techniques to warm the soil can make a huge difference in how quickly you see results.
Materials You’ll Need
* Chayote fruit (preferably one that’s already starting to sprout)
* Potting mix
* Large pot (at least 5 gallons)
* Garden soil
* Compost or other organic matter
* Trowel
* Watering can or hose
* Trellis or support structure (chayote vines are vigorous!)
* Optional: Heat mat
* Optional: Clear plastic wrap or dome
Getting Started: Sprouting Your Chayote
The first and arguably most crucial step is getting your chayote fruit to sprout. Here’s how I do it:
1. Choosing the Right Fruit: Look for a chayote fruit that’s mature and shows signs of sprouting. You might see a small crack at the blossom end (the end opposite the stem) or even a tiny sprout emerging. If you can’t find one already sprouting, don’t worry! You can encourage it.
2. Creating a Humid Environment: Place the chayote fruit in a plastic bag or container with some slightly damp paper towels or vermiculite. This will help maintain humidity, which is essential for sprouting.
3. Warmth is Key: Keep the container in a warm place, ideally between 70-80°F (21-27°C). A heat mat can be really helpful here, but a warm windowsill or the top of your refrigerator can also work.
4. Patience is a Virtue: It can take several weeks for the chayote to sprout, so be patient. Check the moisture level of the paper towels or vermiculite regularly and add a little water if needed. You want them damp, not soaking wet.
5. Monitoring the Sprout: Once you see a sprout emerging from the blossom end, it’s time to move on to the next step.
Planting Your Sprouted Chayote
Now that your chayote has sprouted, it’s time to get it into some soil.
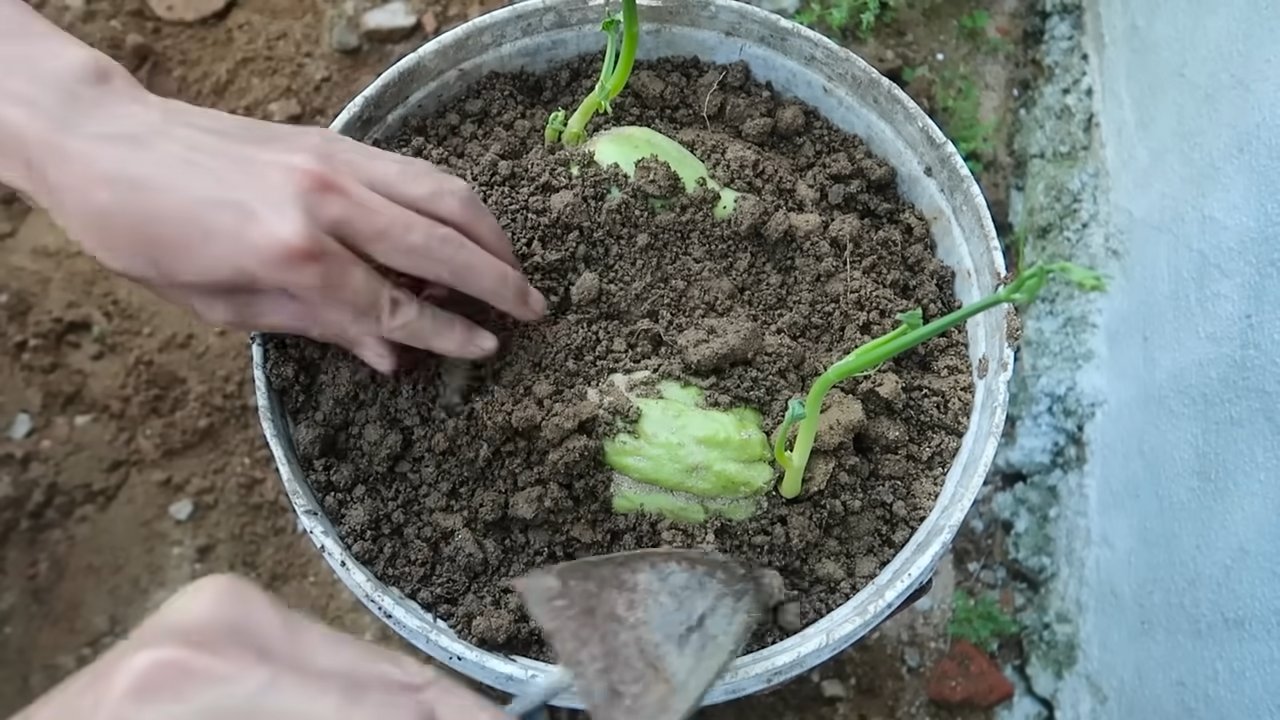
1. Preparing the Pot: Fill a large pot (at least 5 gallons) with a good quality potting mix. Make sure the pot has drainage holes to prevent waterlogging.
2. Planting the Fruit: Gently place the sprouted chayote fruit horizontally on top of the potting mix, with the sprout pointing upwards.
3. Covering the Fruit: Cover the fruit with about an inch of potting mix, leaving the sprout exposed.
4. Watering Gently: Water the soil gently to moisten it, being careful not to dislodge the sprout.
5. Creating a Mini-Greenhouse (Optional): To further encourage growth, you can create a mini-greenhouse effect by covering the pot with clear plastic wrap or a dome. This will help retain moisture and warmth. Just make sure to remove the cover occasionally to allow for ventilation and prevent mold growth.
6. Warm and Sunny Location: Place the pot in a warm, sunny location. Chayote needs plenty of sunlight to thrive.
Transplanting to the Garden
Once your chayote plant has developed a few leaves and the weather is consistently warm (no more threat of frost), it’s time to transplant it to the garden.
1. Choosing the Right Location: Select a sunny spot in your garden with well-drained soil. Chayote vines are vigorous and need plenty of space to grow, so choose a location where they can spread out.
2. Preparing the Soil: Amend the soil with compost or other organic matter to improve its fertility and drainage. Chayote loves rich soil.
3. Digging the Hole: Dig a hole that’s large enough to accommodate the root ball of your chayote plant.
4. Carefully Removing the Plant: Gently remove the chayote plant from the pot, being careful not to damage the roots.
5. Planting the Chayote: Place the plant in the hole and backfill with soil, gently firming it around the base of the plant.
6. Watering Thoroughly: Water the plant thoroughly after transplanting.
7. Adding a Trellis or Support Structure: Chayote vines are climbers and need a trellis or other support structure to grow on. Install the trellis or support structure near the plant. A sturdy fence, arbor, or even a strong homemade trellis will work.
Caring for Your Chayote Plant
Once your chayote plant is in the ground, it’s important to provide it with the care it needs to thrive.
1. Watering Regularly: Water your chayote plant regularly, especially during dry periods. Chayote needs consistent moisture to produce fruit.
2. Fertilizing: Fertilize your chayote plant every few weeks with a balanced fertilizer. This will help promote healthy growth and fruit production.
3. Pruning (Optional): You can prune your chayote vine to control its size and shape. Pruning can also help improve air circulation and sunlight penetration, which can reduce the risk of disease.
4. Pest and Disease Control: Keep an eye out for pests and diseases. Common pests that can affect chayote include aphids, squash bugs, and vine borers. Common diseases include powdery mildew and fungal infections. Treat any problems promptly with appropriate organic or chemical controls.
5. Mulching: Apply a layer of mulch around the base of the plant to help retain moisture, suppress weeds, and regulate soil temperature.
Encouraging Early Fruit Production
Here are some extra tips to encourage early fruit production:
* Warm the Soil: Use black plastic mulch to warm the soil before planting. This can help speed up growth and encourage earlier fruiting.
* Protect from Cold: If you experience a late frost, protect your chayote plant with a frost blanket or row cover.
* Hand Pollination (If Necessary): Chayote is typically pollinated by insects, but if you’re not seeing a lot of insect activity, you can try hand-pollinating the flowers. Use a small brush to transfer pollen from the male flowers to the female flowers. You can identify female flowers by the small fruit that forms behind the flower.
* Consistent Watering and Feeding: Consistent watering and feeding are crucial for healthy growth and fruit production. Don’t let your chayote plant dry out, and fertilize it regularly with a balanced fertilizer.
Harvesting Your Chayote
Chayote is typically ready to harvest in the fall, about 30-45 days after flowering. The fruits should be firm and green. You can harvest them when they’re small and tender or let them grow larger. I prefer to harvest them when they’re about the size of a pear.
To harvest, simply cut the fruit from the vine with a sharp knife or pruning shears.
Enjoying Your Harvest
Chayote is a versatile vegetable that can be used in a variety of dishes. It has a mild flavor that’s similar to zucchini or summer squash. You can eat it raw in salads, sauté it, bake it, or add it to soups and stews. It’s also delicious pickled or stuffed.
Troubleshooting
* No Sprouting: If your chayote isn’t sprouting, make sure it’s in a warm, humid environment. You may also need to be patient, as it can take several weeks for it to sprout.
* Slow Growth: If your chayote plant is growing slowly, make sure it’s getting enough sunlight, water, and fertilizer.
* No Fruit: If your chayote plant isn’t producing fruit, it may not be getting enough pollination. Try hand-pollinating the flowers or attracting more pollinators to your garden.
Growing chayote squash can be incredibly rewarding. With a little patience and these helpful tips, you’ll be enjoying a bountiful harvest in no time! Happy gardening!
Conclusion
So, there you have it! Unlocking the secrets to rapidly growing chayote squash is not only achievable but also incredibly rewarding. We’ve explored a simple yet effective DIY trick that bypasses the often-frustrating dormancy period, allowing you to enjoy a bountiful harvest much sooner than you might expect. This method, focusing on pre-sprouting your chayote, is a game-changer for gardeners eager to see quick results and maximize their growing season.
Why is this DIY trick a must-try? Because it addresses the biggest hurdle in chayote cultivation: germination. By providing the ideal environment for sprouting – consistent moisture, warmth, and darkness – you significantly increase your chances of success. No more waiting weeks or even months with no sign of life! This technique empowers you to take control of the process and witness the magic of germination firsthand.
But the beauty of gardening lies in experimentation! Feel free to adapt this method to suit your specific needs and preferences. For instance, if you live in a particularly humid climate, you might want to monitor the moisture levels in your sprouting medium more closely to prevent mold growth. Alternatively, if you’re in a colder region, consider using a heat mat to maintain a consistently warm temperature.
Variations to Consider:
* Sprouting Medium Alternatives: While we recommended using a mix of peat moss and perlite, you can also experiment with other well-draining mediums like coco coir or vermiculite.
* Container Size: Depending on the size of your chayote fruit, you might need to adjust the size of the container you use for sprouting. Ensure it’s large enough to accommodate the growing sprout without restricting its root development.
* Light Exposure After Sprouting: Once the sprout emerges, gradually introduce it to more light. Start with indirect sunlight and gradually increase the exposure to direct sunlight over a few days to prevent shock.
* Fertilizing Seedlings: Once the seedling has established itself, you can start feeding it with a diluted liquid fertilizer to promote healthy growth.
This DIY trick to grow chayote squash quickly is more than just a shortcut; it’s a way to connect with the natural world and experience the satisfaction of nurturing life from seed to harvest. Imagine the delicious meals you’ll create with your homegrown chayote – from stir-fries and soups to salads and pickles. The possibilities are endless!
We wholeheartedly encourage you to give this DIY trick a try. Don’t be afraid to get your hands dirty and experiment. And most importantly, we want to hear about your experience! Share your successes, your challenges, and any modifications you make along the way. Your insights will not only help other gardeners but also contribute to a collective understanding of how to best cultivate this versatile and delicious vegetable. So, grab a chayote, gather your supplies, and embark on this exciting gardening adventure. Happy growing!
Frequently Asked Questions
What if my chayote fruit starts to rot during the sprouting process?
Rotting is a sign of excessive moisture or poor ventilation. First, ensure your sprouting medium is well-draining and not waterlogged. If you’re using a plastic bag or container, make sure there are adequate air holes to allow for air circulation. You can also try gently wiping the chayote fruit with a diluted solution of hydrogen peroxide to kill any surface mold or bacteria. If the rot is extensive, it’s best to discard the fruit and start with a fresh one, paying closer attention to moisture levels this time. Consider using a terracotta pot for better breathability.
How long does it typically take for a chayote to sprout using this method?
While the exact timeframe can vary depending on factors like temperature and the freshness of the chayote, you can generally expect to see sprouting within 2 to 4 weeks using this DIY method. This is significantly faster than the traditional method, which can take several months. Keep in mind that patience is still key! Regularly check the moisture levels and temperature, and don’t be discouraged if it takes a little longer.
Can I use a chayote that I bought from the grocery store?
Yes, you can absolutely use a chayote purchased from the grocery store. However, it’s important to choose a healthy-looking fruit that is firm and free from blemishes or soft spots. Organic chayotes are often preferred, as they are less likely to have been treated with chemicals that could inhibit sprouting. Also, keep in mind that some commercially grown chayotes may be older and less viable, so your success rate might be slightly lower compared to using a freshly harvested fruit.
What type of soil should I use when transplanting the sprouted chayote?
When transplanting your sprouted chayote, choose a well-draining soil that is rich in organic matter. A good mix would be equal parts garden soil, compost, and perlite or sand. This combination provides the necessary nutrients, drainage, and aeration for healthy root development. Avoid using heavy clay soils, as they can become waterlogged and suffocate the roots. You can also amend your existing garden soil with compost and other organic matter to improve its fertility and drainage.
How much sunlight does a chayote plant need?
Chayote plants thrive in full sun, meaning they need at least 6 to 8 hours of direct sunlight per day. However, in extremely hot climates, they may benefit from some afternoon shade to prevent leaf scorch. When planting your chayote, choose a location that receives ample sunlight throughout the day. If you’re growing it indoors, place it near a sunny window or use grow lights to supplement the natural light.
Is it necessary to provide a trellis or support for the chayote vine?
Yes, absolutely! Chayote is a vigorous vine that can grow quite large, so it’s essential to provide it with a sturdy trellis or support structure. This will not only help to keep the plant off the ground but also improve air circulation and sunlight penetration, which can lead to a more abundant harvest. You can use a variety of materials for your trellis, such as wood, metal, or even strong netting. Make sure the trellis is strong enough to support the weight of the mature vine and its fruits.
How often should I water my chayote plant?
Water your chayote plant regularly, especially during hot and dry weather. The soil should be kept consistently moist but not waterlogged. Check the soil moisture by sticking your finger about an inch deep into the soil. If it feels dry, it’s time to water. Avoid overwatering, as this can lead to root rot. During the cooler months, you can reduce the frequency of watering.
What are some common pests and diseases that affect chayote plants?
Chayote plants are generally relatively pest and disease-resistant, but they can be susceptible to certain problems, such as aphids, spider mites, and powdery mildew. Regularly inspect your plants for any signs of infestation or disease. If you notice any problems, take action promptly to prevent them from spreading. You can use organic pest control methods, such as insecticidal soap or neem oil, to control pests. For powdery mildew, improve air circulation around the plant and apply a fungicide if necessary.
How do I know when my chayote squash is ready to harvest?
Chayote squash is typically ready to harvest when it is about 4 to 6 inches long and has a smooth, glossy skin. The fruit should feel firm to the touch. You can harvest chayote at different stages of maturity, depending on your preference. Younger fruits tend to be more tender and have a milder flavor, while older fruits can be tougher and have a slightly stronger flavor. Use a sharp knife or pruners to cut the fruit from the vine, leaving a short stem attached.
Can I grow chayote in a container?
Yes, you can grow chayote in a container, but you’ll need a large container (at least 20 gallons) to accommodate the plant’s vigorous growth. Choose a container with good drainage holes and use a well-draining potting mix. You’ll also need to provide a sturdy trellis or support structure for the vine to climb on. Container-grown chayote plants may require more frequent watering and fertilizing than those grown in the ground.

Leave a Comment